


Metroid Prime Hunters Walkthrough – Arcterra, Part II
WALKTHROUGH
- Celestial Archives
- Alinos
- Vesper Defense Outpost
- Arcterra
- Celestial Archives, Part II
- Alinos, Part II
- Arcterra, Part II
- Vesper Defense Outpost, Part II
- Oubliette
The Imperialist
Scans in This Section
Lore: Alimbic War 09, Seal Sphere 01
Our second round of planet hopping changes up the order a bit, as we need to revisit Arcterra next and save VDO for last. As soon as you land, activate the Morph Ball and drop all the way down to the bottom. Enter Sic Transit and destroy the orange blast shield leading to Fault Line. Take out the Quadroids to disable the force fields, then scan the ALIMBIC WAR 09 and SEAL SPHERE 01 datashades. Move up to the open room and-wait why did the force fields just reactivate?


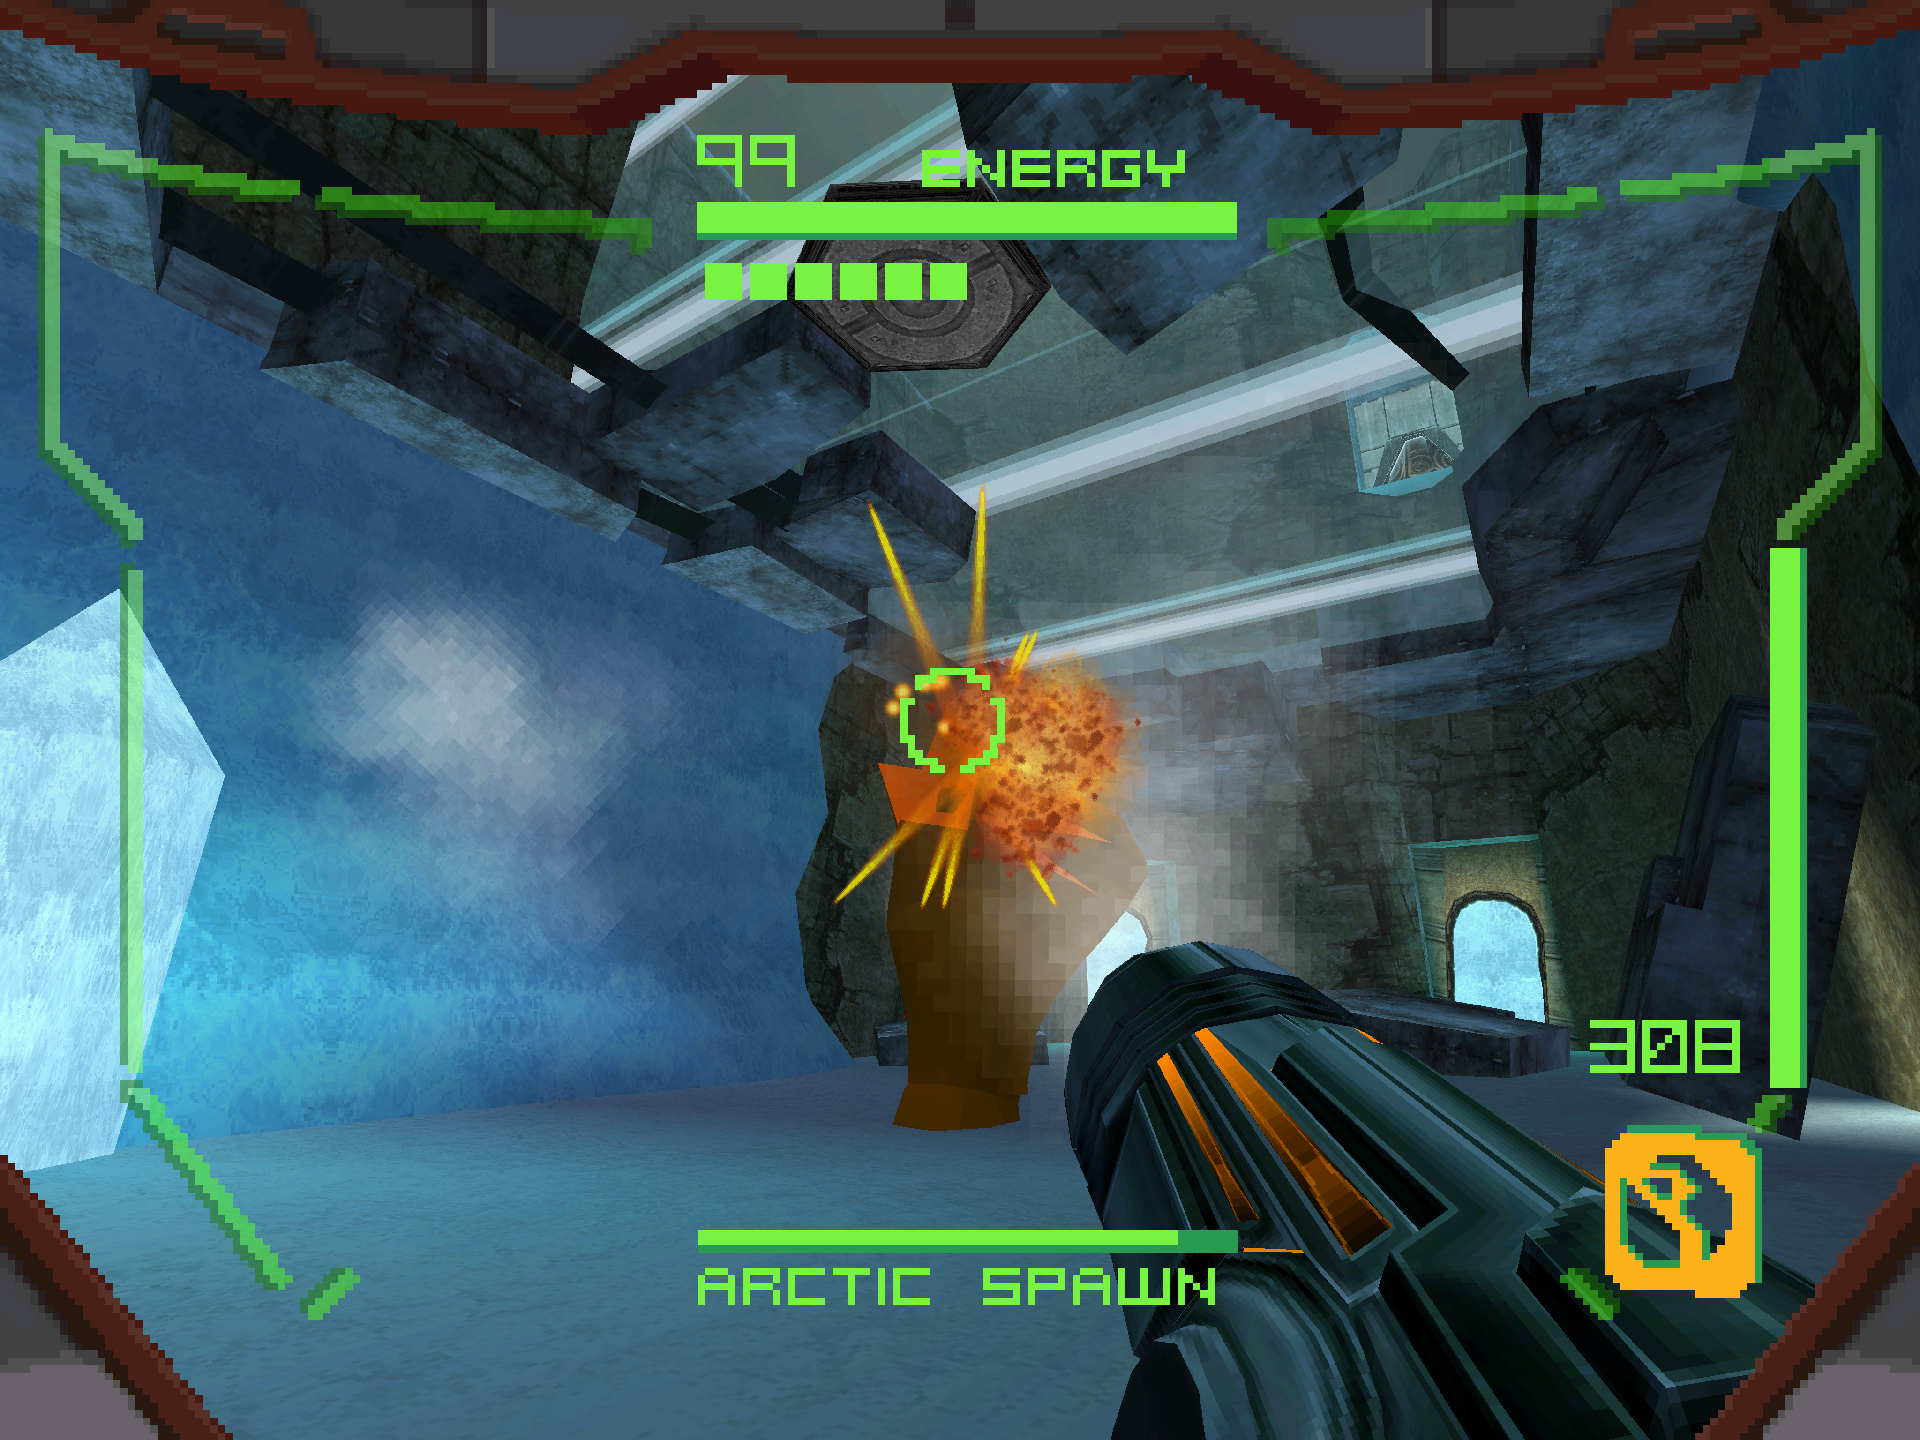
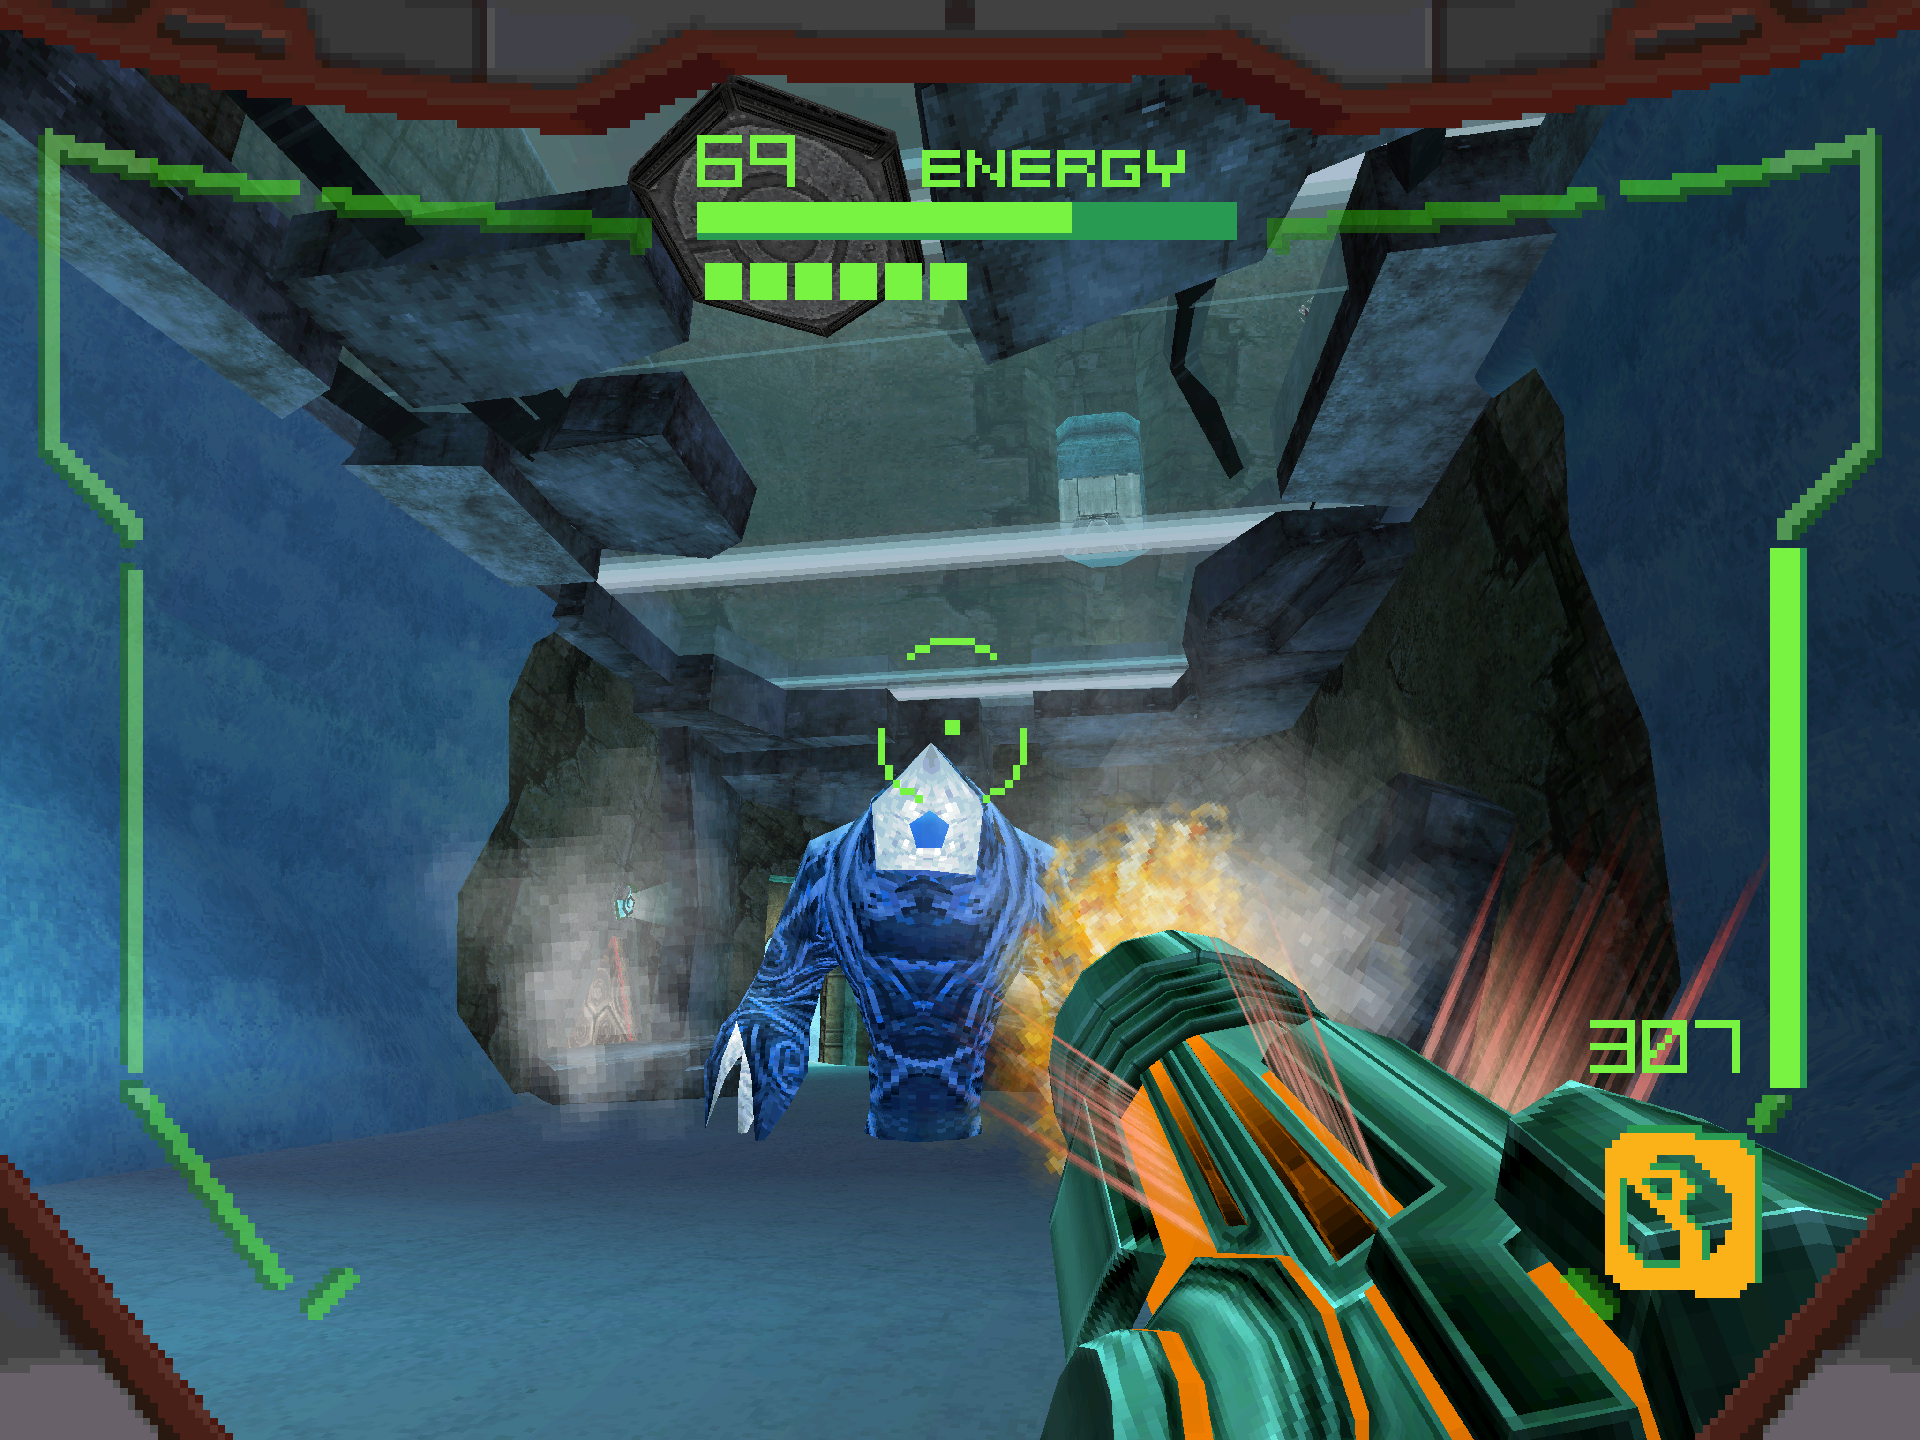
Arctic Spawn
Scans in This Section
Bioforms: Arctic Spawn *missable*
Equipment: Imperialist
Not even the Fire Spawn could escape getting reused! The Arctic and Fire spawns are nearly identical except for their surface level differences. You probably don’t need me to tell you about them, but I’m going to anyway in order to increase the word count. The Arctic Spawn scoops up snow from the ground to make the deadliest snowballs in the Metroid saga. So deadly in fact that you’ll freeze upon contact! You’ll want to use the Magmaul as well against it to do the most damage. Like the Fire Spawn, charge your beam while it dives into the snow and release once it resurfaces. Don’t forget to scan the ARCTIC SPAWN before you melt it away! Upon defeat, you’ll earn the IMPERIALIST. Hope you like getting headshots!
The Seventh Stronghold
Scans in This Section
Bioforms: Alimbic Turret v2.7
Lore: Alimbic Prophecy 08, Alimbic War 01, Gorea 03, Alimbic War 12, Alimbic War 06, Gorea 04, Alimbic War 04, Alimbic War 05, Oubliette 01
After grabbing the Imperialist, scan ALIMBIC PROPHECY 08 and head through the red blast shield. Take the maze in Frost Labyrinth to the top and disable the red blast shield blocking access to Sanctorus. To get there, take the left path after exiting the tunnel and go up until you hit the wall. Head left through the disabled green laser barrier and follow the path from there. Once inside, head left to grab UA EXPANSION #10, then scan the ALIMBIC WAR 01 datashade. Turn around and take the right hallway from the entrance where you’ll find the GOREA 03 and ALIMBIC WAR 12 datashades waiting to be scanned. Before leaving the hallway, check the ceiling on the wall to find a Greater Ithrak waiting to pounce. Pull out the Imperialist and snipe him out of existence.
Once the area is clear, pull out the Scan Visor and add the ALIMBIC WAR 06 and GOREA 04 datashades to your logbook. Then with your visor still active, scan the three spectral locks in the room. One is located nearby the terminal, the second is directly behind it at eye level, and the final one is located behind an ice barrier near the Artifact Shield. Disengaging all three locks will disable the force field and activate the Imperialist switch, which only opens up at long ranges. Shoot the switch to spawn a Shield Key, granting you access to BINARY SUBSCRIPTURE #4B. Upon obtaining the artifact, two Guardians will jump through the ceiling and ambush you. Whip out the Shock Coil and give them a dose of electricity before heading back to Fault Line.


Back at Fault Line, shoot the Imperialist switch on the upper right to activate a moving platform to the top. You’ll notice a giant force field blocking everything behind you. However, just behind it you’ll notice an inactive ship deck portal. Scan the switch to activate it, then head to the Ice Hive and take its ship deck portal back to your ship. Then, from Arcterra Gateway, take the opposite portal, now active, back to the portal you recently activated to teleport to the other side of the force field. Snipe the two Imperialist switches at the top to disable the force field altogether and use the nearby jump pad to enter the Drip Moat.
Once inside, jump over the moving platform and use the jump pad in the pit to obtain UA EXPANSION #11. Once you’re back up, use the moving platform to traverse the other side. You’ll have to face a series of hostile creatures along the way in a shooting gallery as the platform moves across the moat. These creatures include Petrasyls, Shriekbats and War Wasps. The War Wasps in this room actually behave differently than their counterparts. Instead of telegraphing a wind up sting attack, they’ll charge head on along the platform’s path and cause contact damage.


ADVANCED STRATEGIES: The game intends for us to use the platform, but the rails it travels along are both a lot safer and faster. You can choose to slow things down to your own pace or go full speed using the Boost Ball if you want to speedrun it!
After you cross the moat, you’ll arrive in Subterranean. The entire arena is covered in a maze of force fields with three Imperialist switches near the opening at the roof. We need to navigate the maze and find an opening to shoot all three of the switches to activate the lift in the center. First move up, right, down. You should be able to hit the first switch if you jump up from here. Continue the path you’re on and pause once you’ve passed the third horizontal force field. On the raised portion of the arena, you should be able to jump up and hit the next switch. Lastly, go back to the fork and stand next to the horizontal force field signposting the opposite path. You should be able to hit this switch after jumping. With the lift active, continue following the left path, hugging the wall whenever you can. When you reach the elevated force field, jump on it and follow the path to the lift.


On the lower floor, scan the ALIMBIC WAR 04 datashade and grab MISSILE EXPANSION #8 at the end of the hallway. Next, head into the ice crevice and scan the ALIMBIC WAR 11 datashade. Turn left and scan the ALIMBIC WAR 05 datashade as well as the ALIMBIC TURRET V2.7. Take out the turret to reveal a Shield Key, which in turn disables the Artifact Shield holding CARTOGRAPH ARTIFACT #4B. Take the lift back up to the surface and exit the room. As soon as you try to leave, the force fields will lift and a swarm of Guardians will assault you using a variety of weapons. If you’re good at aiming the Imperialist, headshots are a one-hit kill. Sniping definitely isn’t my strong suit though, so I prefer to use the Shock Coil (I know, what a shock). Either one of these choices will lead you to a quick and decisive victory. After you’ve mopped the floor with these goobers, head back to Fault Line.


Use the opposite jump pad and take out the Psycho Bits along with their spawn devices to earn a Shield Key. Grab the key and scan the gun turret CPU by the electrical barriers along the way to disable all of the obstacles blocking the final artifact. Go behind the mountain, about one level up from where you collected the Shield Key, and scan the OUBLIETTE 01 datashade. Then fire a missile at the pillar to topple it over and use it as a platform to leave the room. Go to the bottom, collect ATTAMETER ARTIFACT #4B, then head back up and take the Stronghold Portal to another fun and exciting battle.


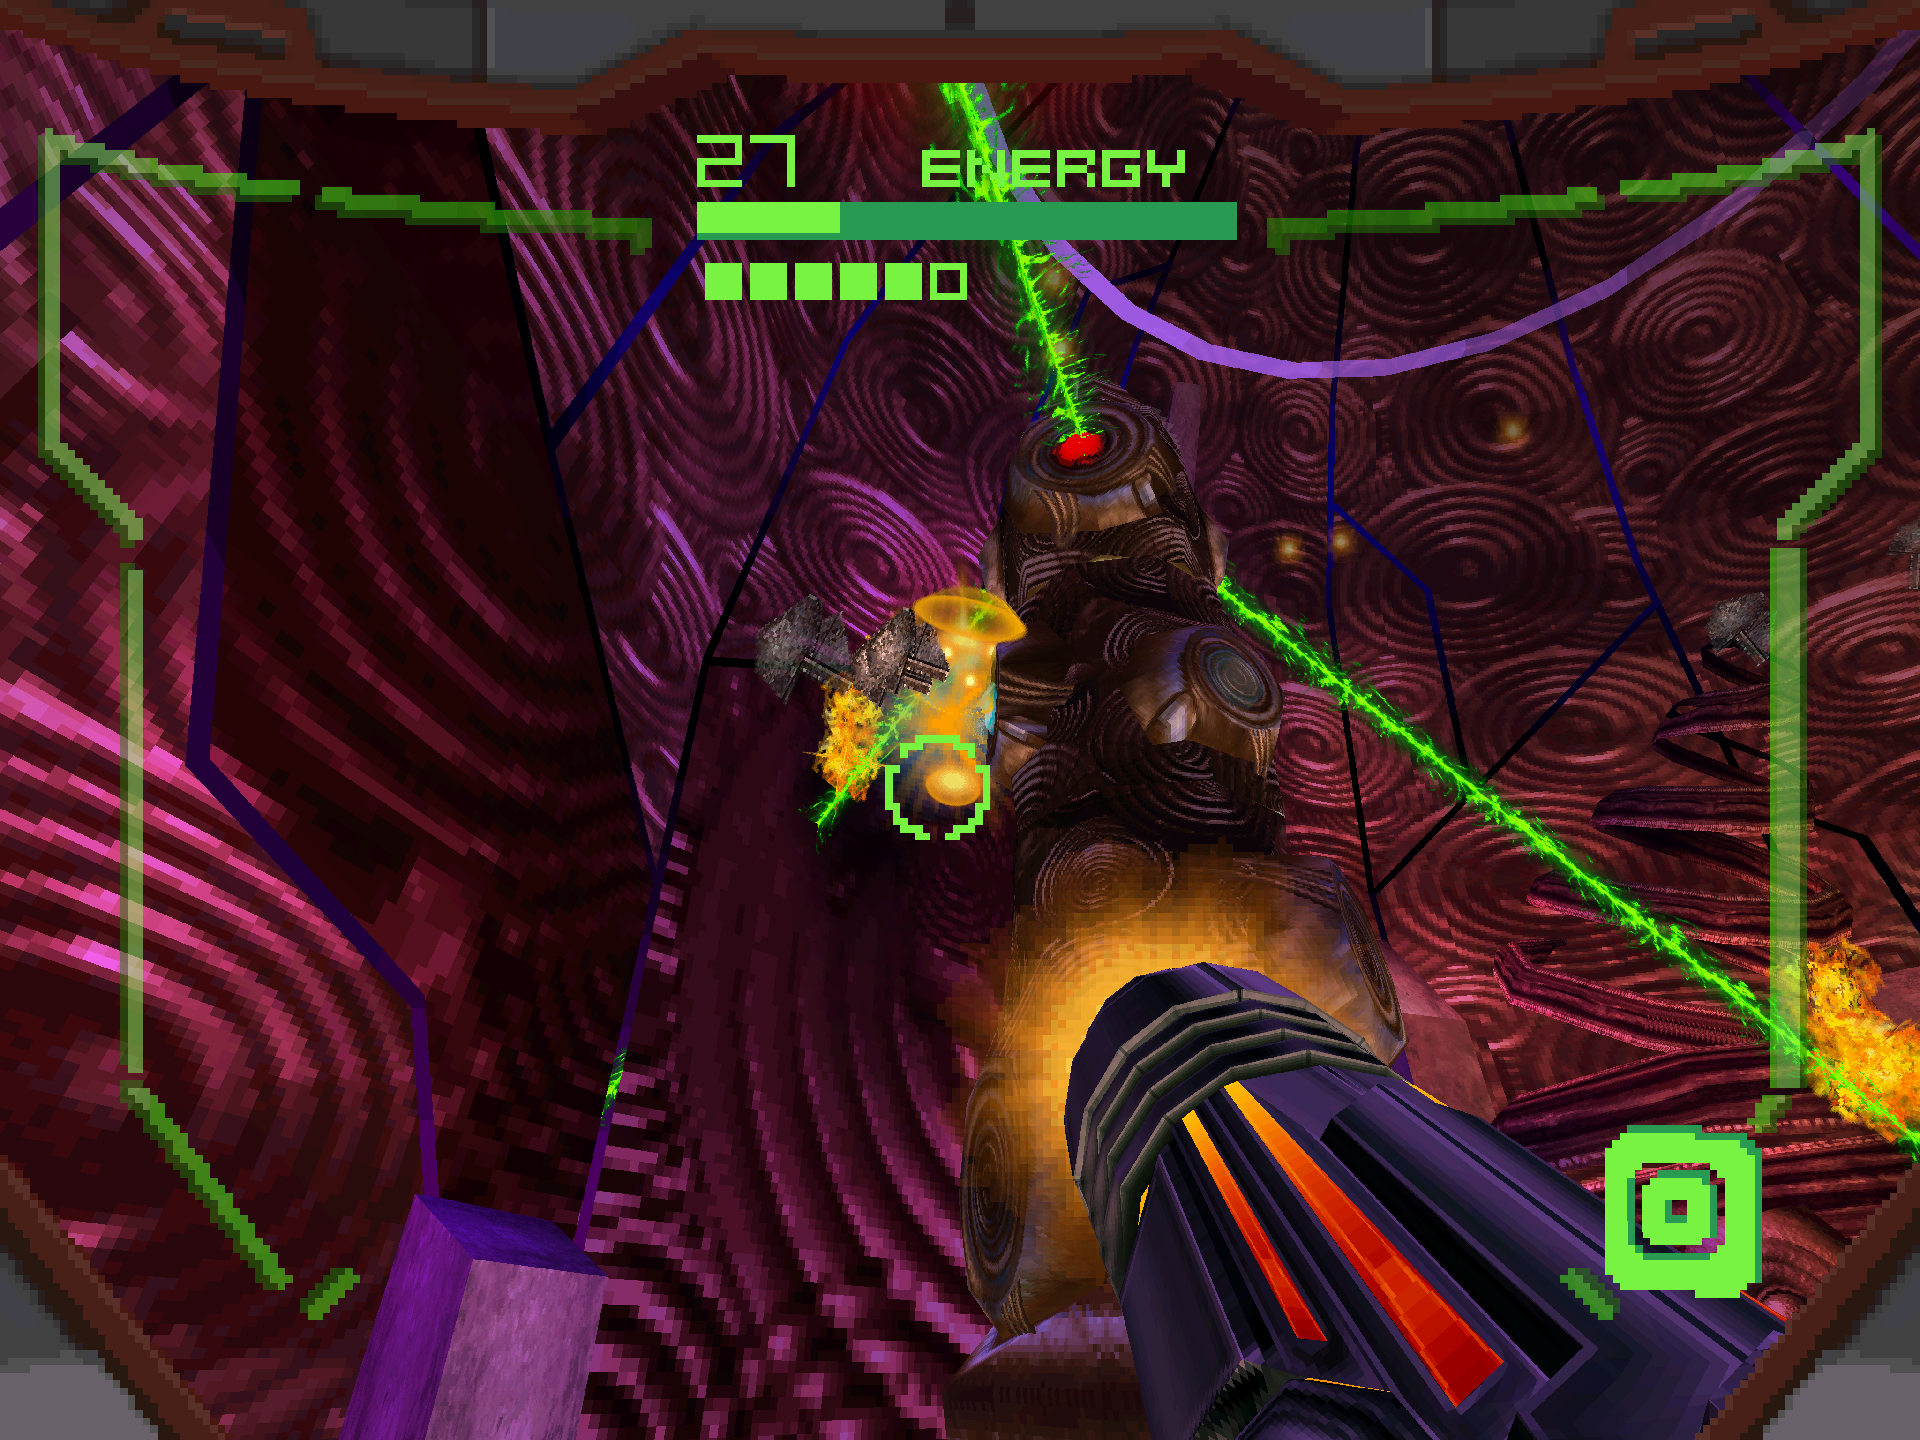
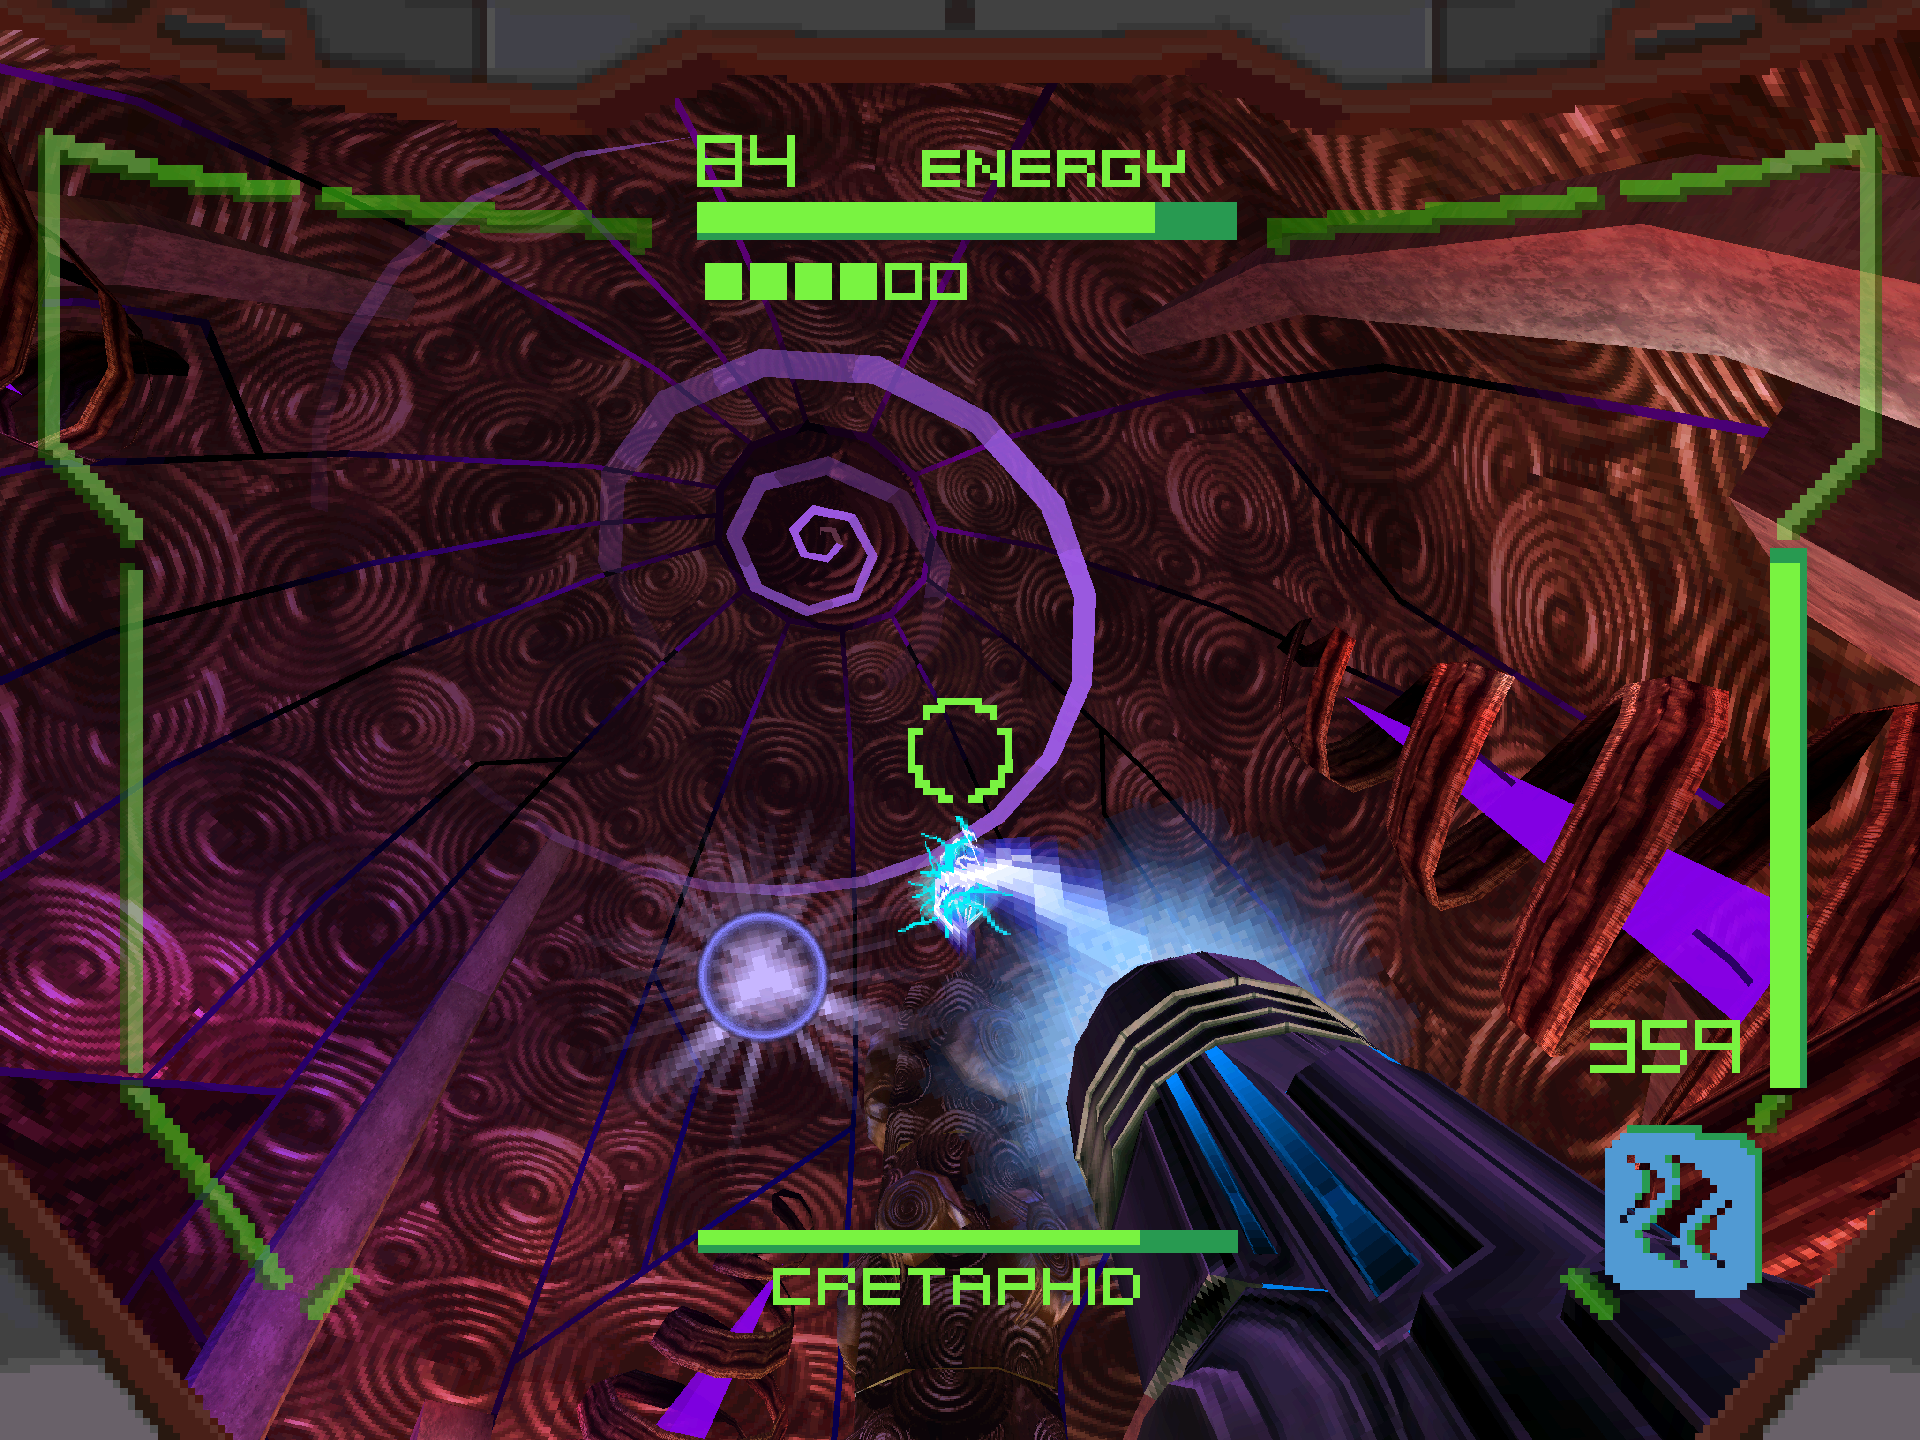
Cretaphid v4
Scans in This Section
Lore: Cretaphid v4 *missable*
The last Cretaphid we’ll ever have to worry about! This fight takes everything from the v3 and adds one more key feature… it moves! That’s right, on top of chemical lasers and heatseeking plasma (which do more damage), Cretaphid will now slowly move from one side of the room to the other, making it the most deadly DVD screensaver ever conjured up! The strategies here are pretty much identical to the v3 fight. This time we’ll also be keeping an eye on which direction it’s moving though so that we don’t get cornered. On the final phase, you also might want to take out the chemical laser weak points first since the extra movement can make them a little trickier to avoid at ground level. Don’t forget to add CRETAPHID V4 to your logbook before the end of the fight!
Time to Go!
Scans in This Section
None
It’s that time again, get ready to outrun that security protocol! We have four minutes on the timer, which might seem slim for a round two escape, but we’re actually not too far off from the main path. Use the pillar you knocked over from before to exit the room and drop below towards Sic Transit. From there head to Arcterra Gateway, climb to the top and fly your ship to safety.


Annnnnnd that’s it! This might be the shortest subsection of a walkthrough I’ve ever written.
Next Chapter: Vesper Defense Outpost, Part II