


Metroid: Zero Mission Walkthrough – Bosses
Here you’ll find a detailed list of strategies, information, and tips in fighting the many bosses of Metroid: Zero Mission.
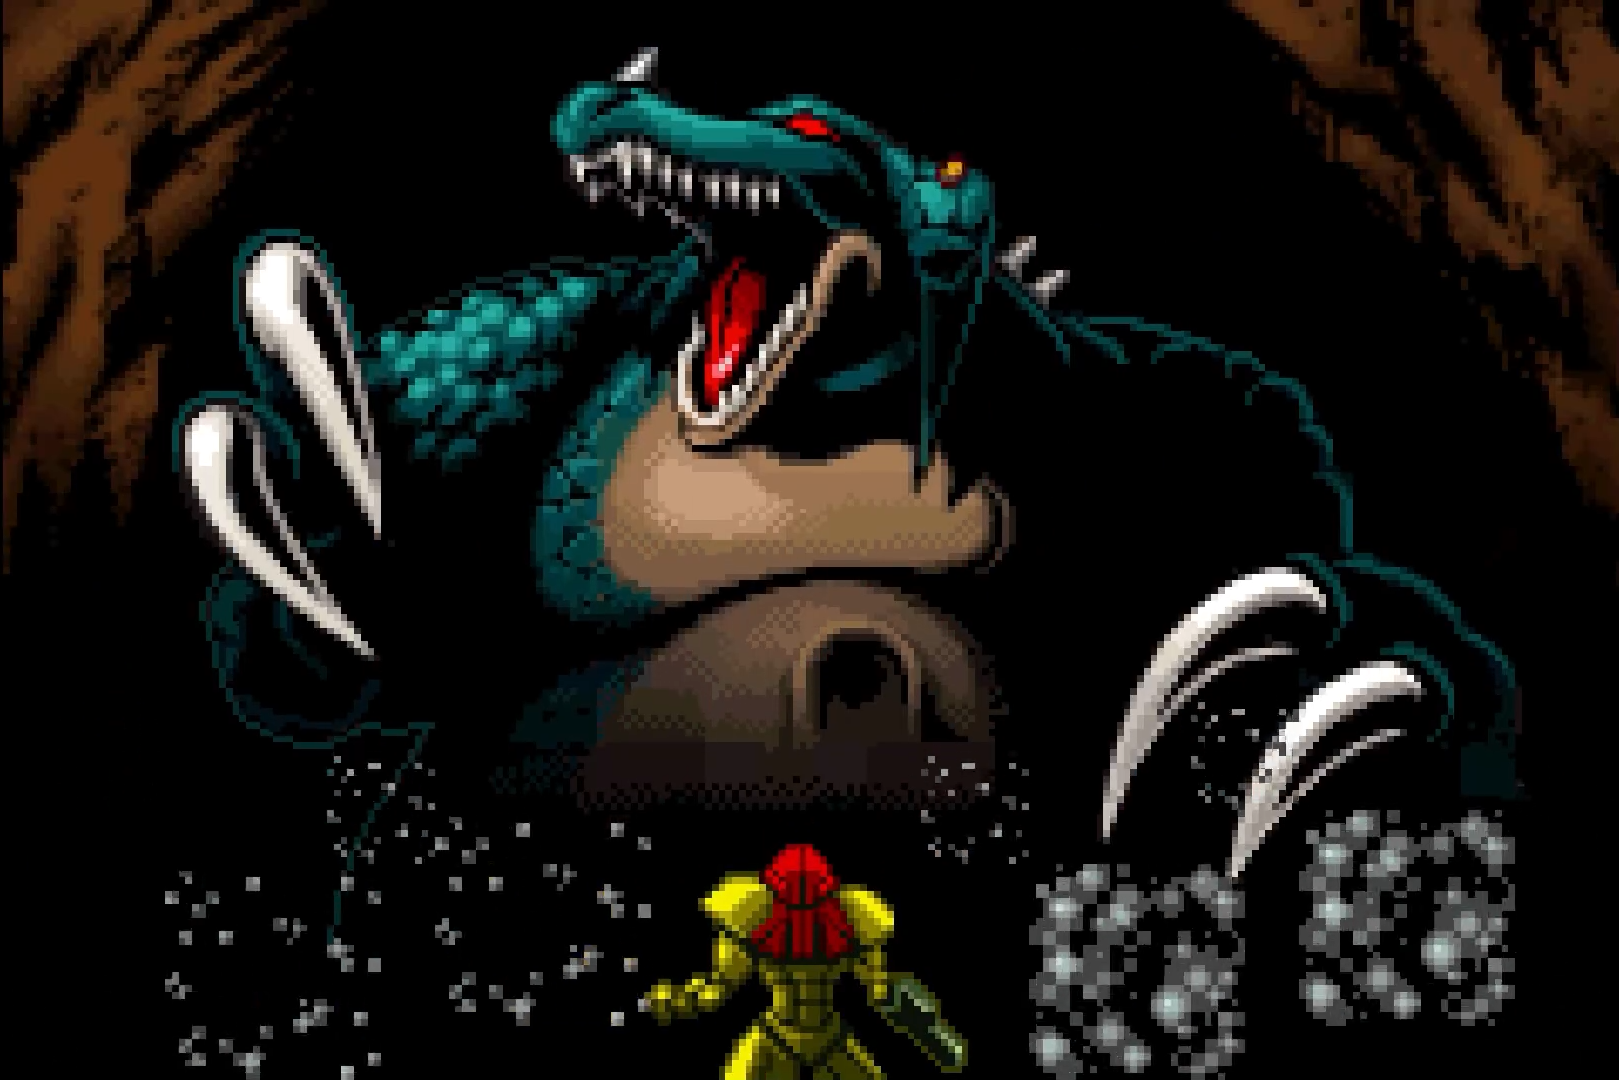
Deorum
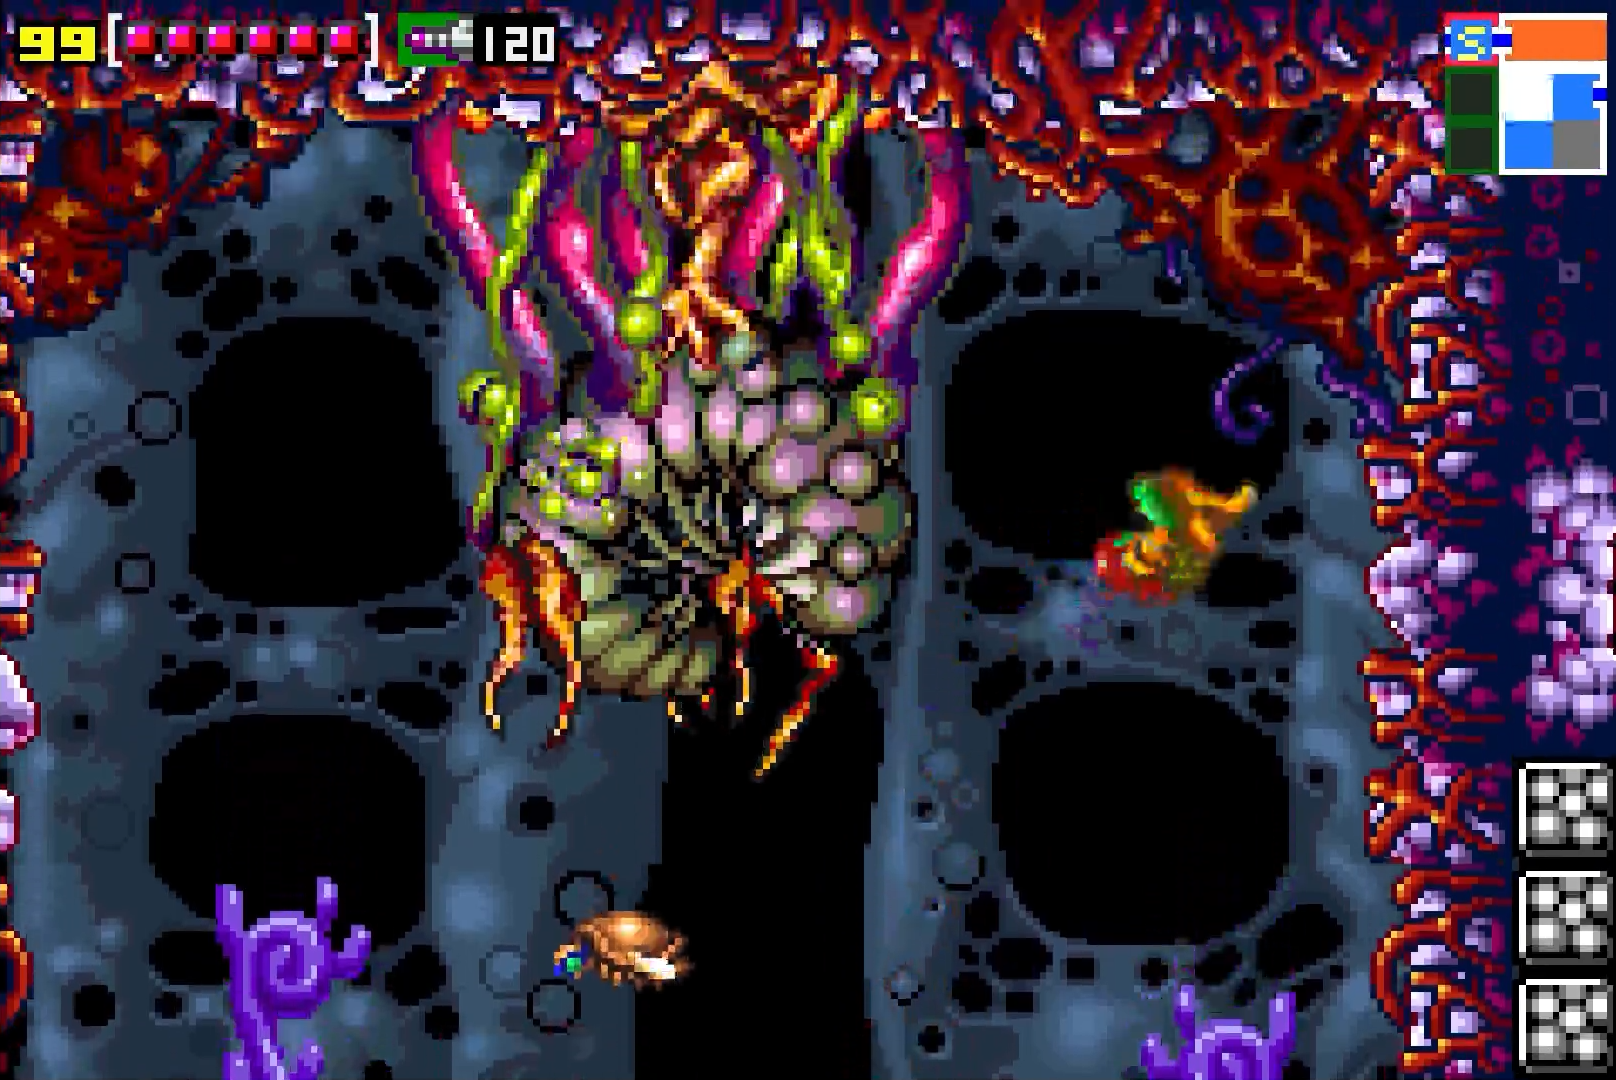
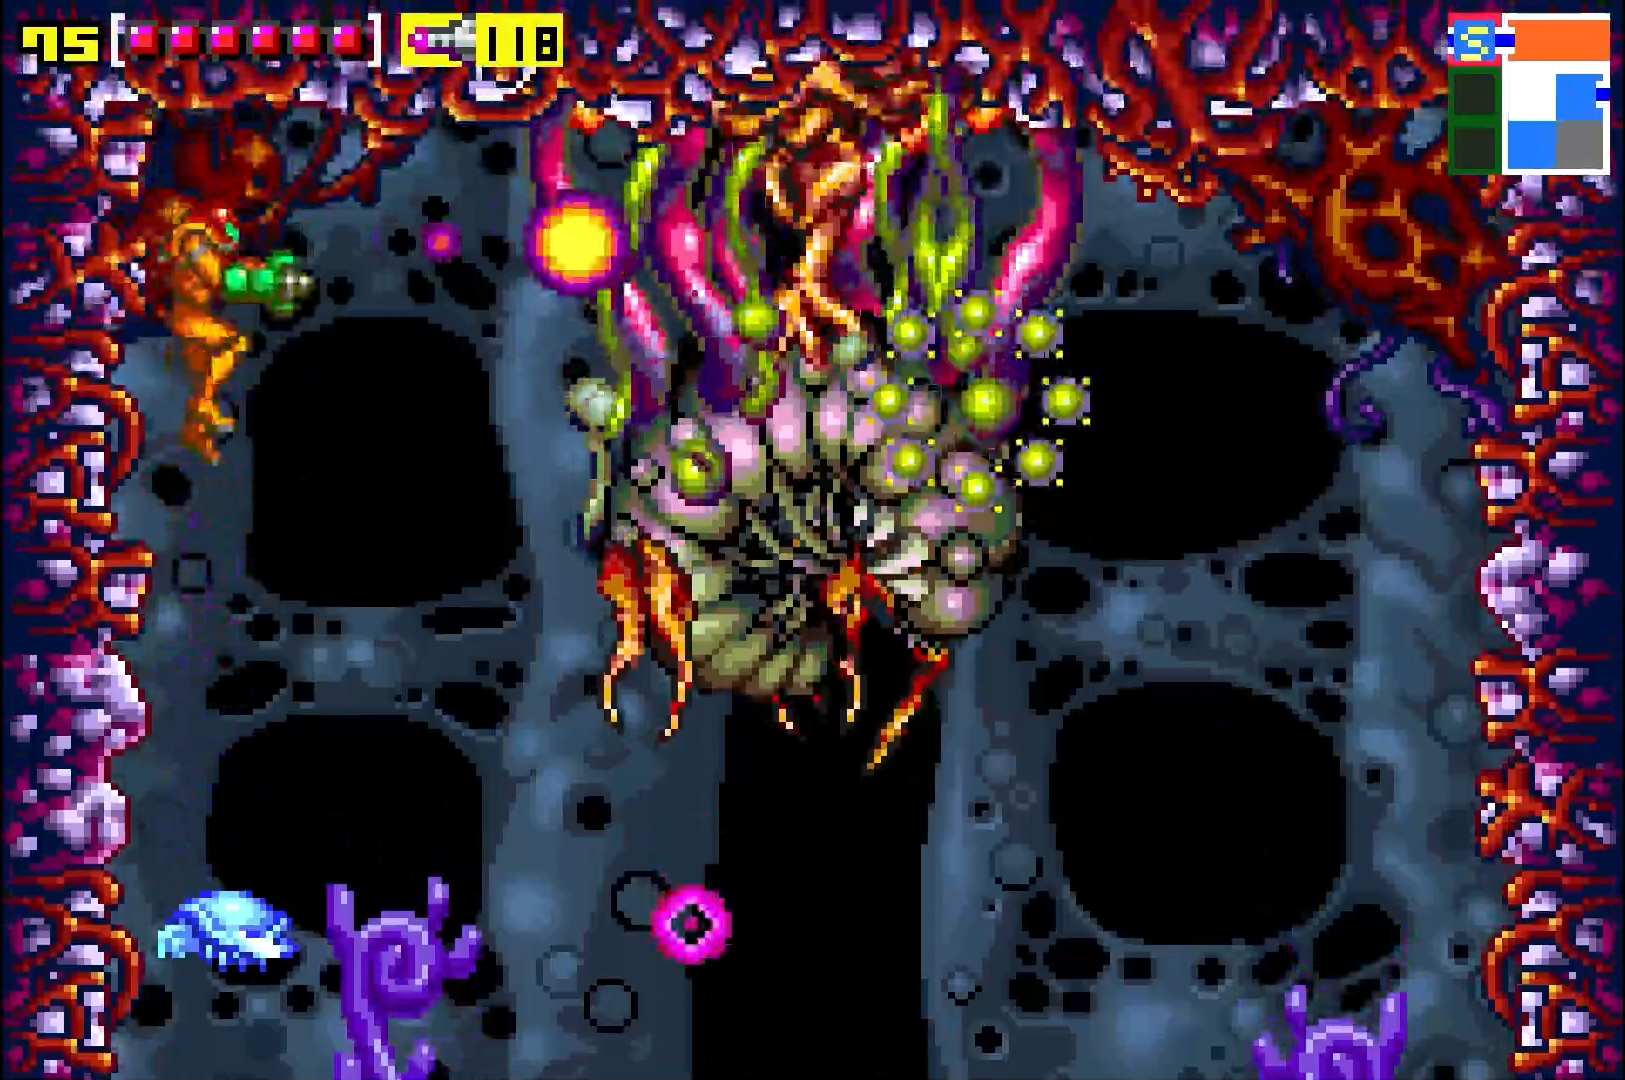
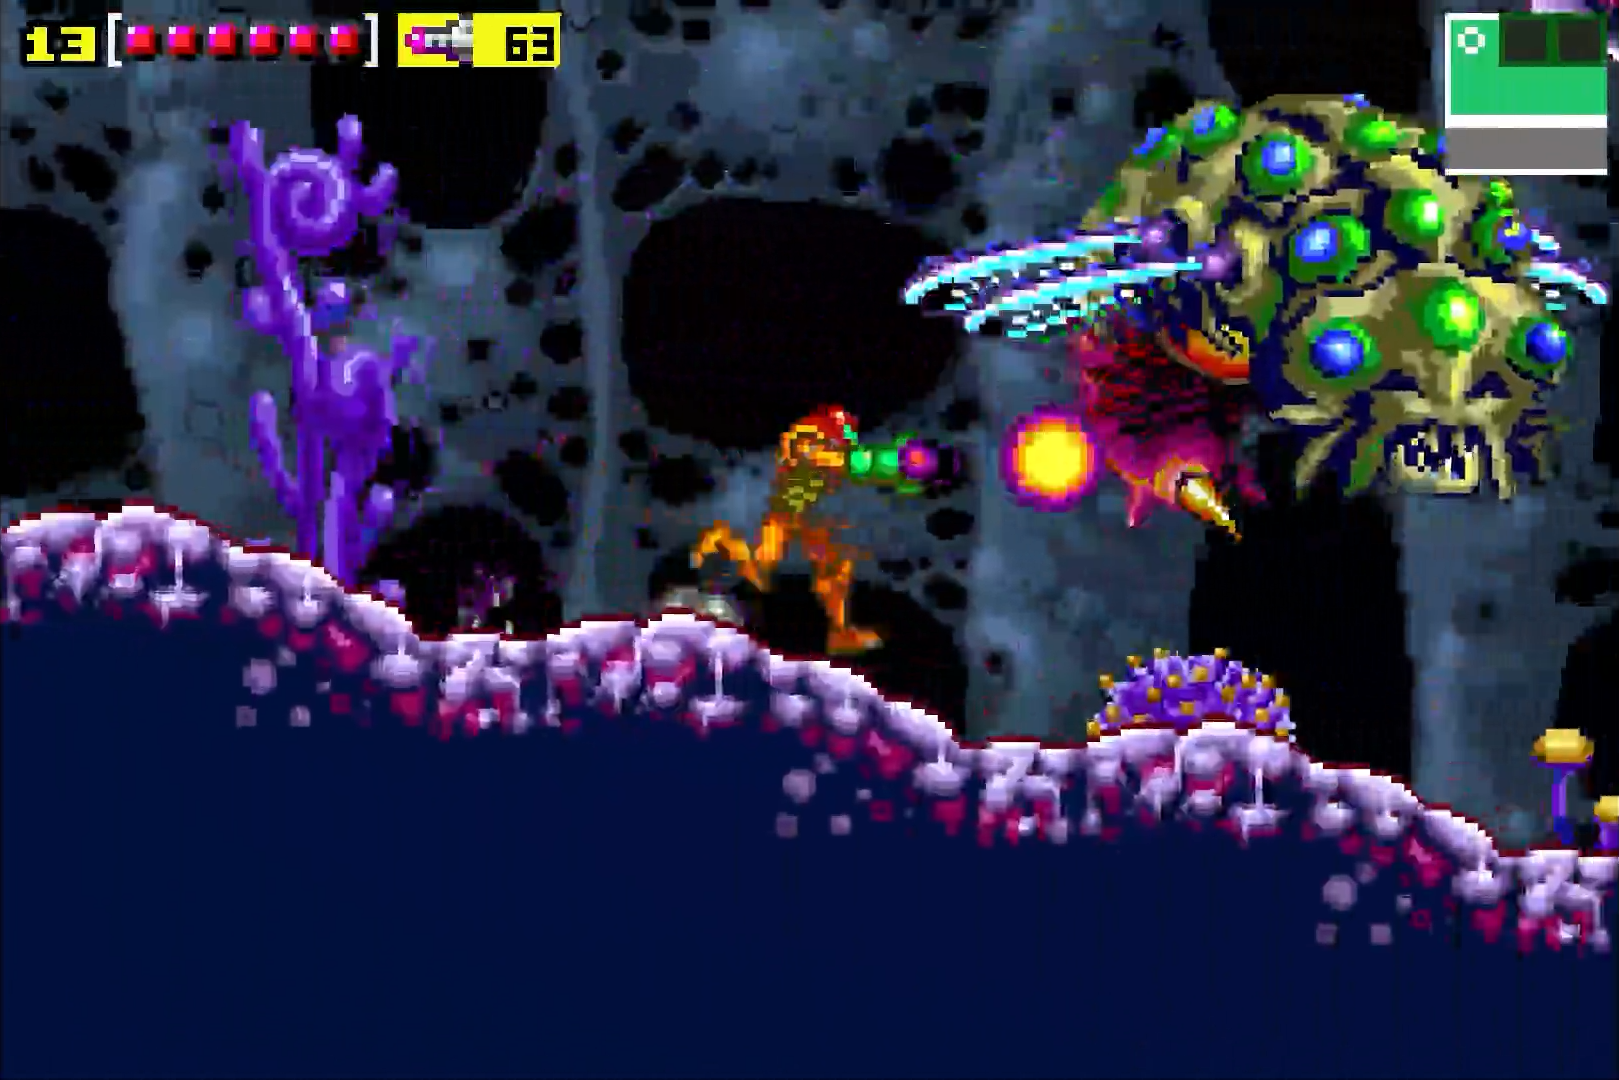
Here we go, the first boss battle of Metroid: Zero Mission! This is actually a pretty unique boss in that it’s actually optional. You’ll be forced to deal with Deorum’s attacks, but if you take too long to actually kill it, Deorum will slither away and retreat. You’ll have opportunities to fight it again at different points of the game early on, so don’t be dismayed if this giant worm escapes your wrath at the beginning, but if you really don’t want to throw down with this fella, you don’t actually have to.
Of course, we’re a bunch of bloodthirsty bounty hunters, and I for one want the powerup that Deorum is housing, so let’s get to work!
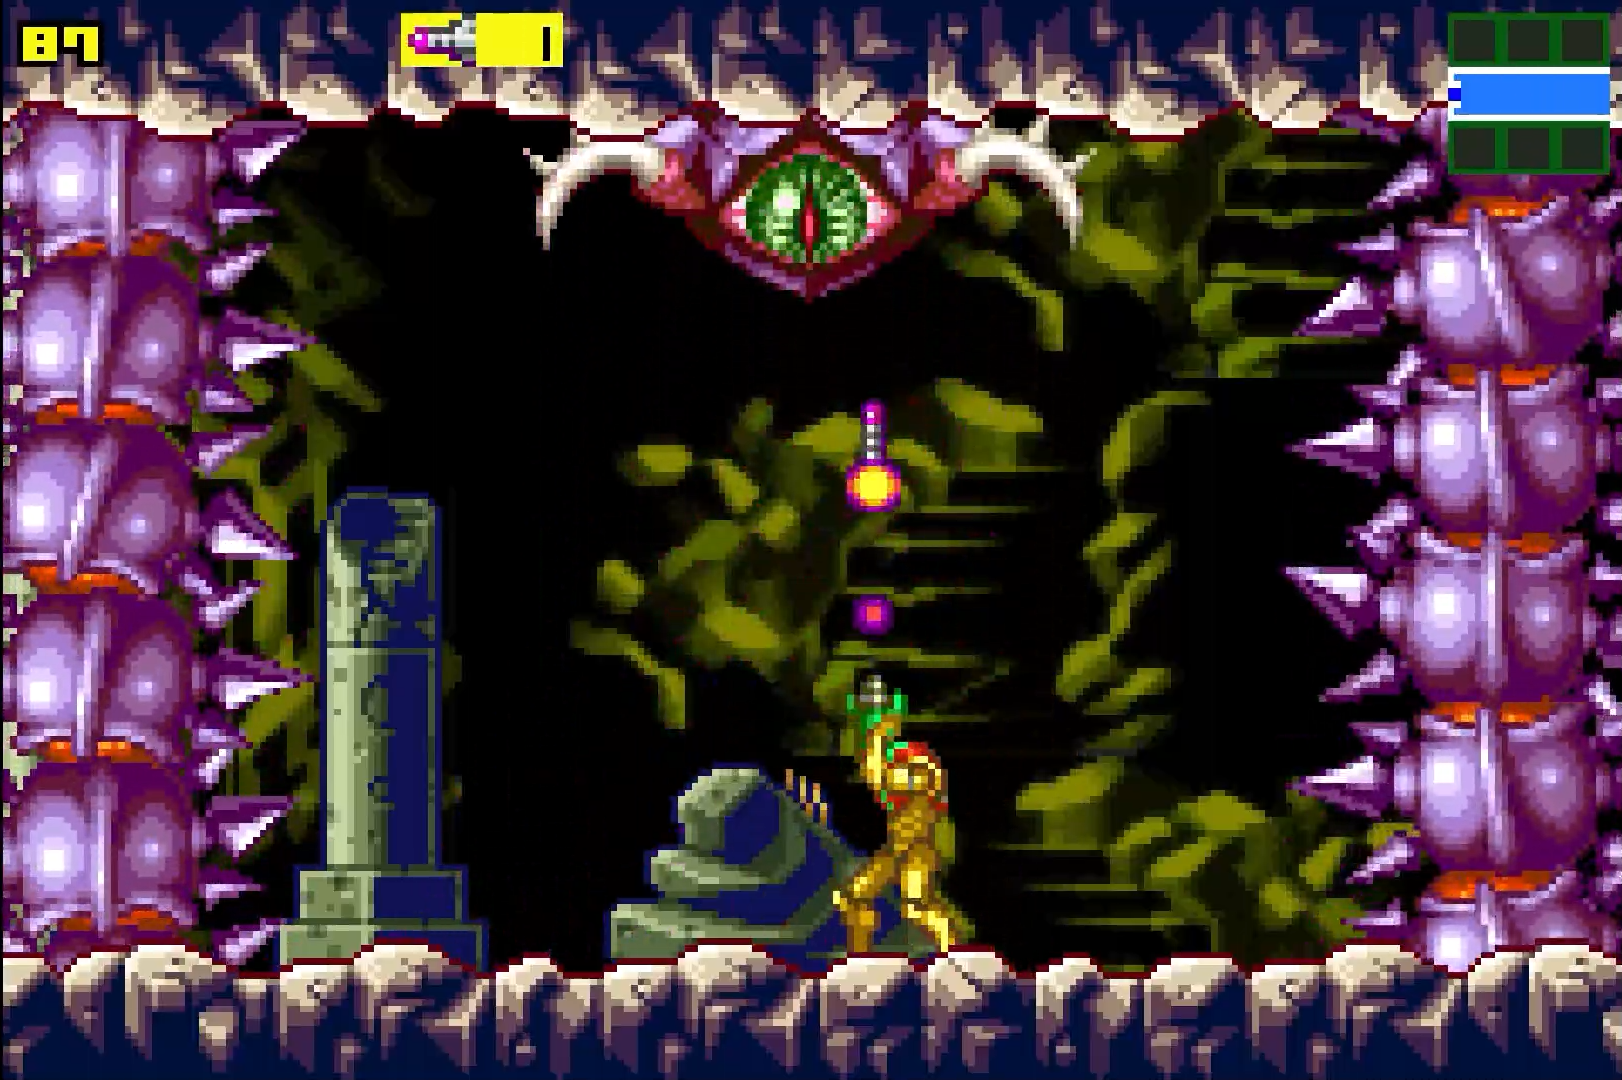
You’ll be trapped in a small arena, with Deorum’s big smelly tentacles on the left and right boxing you in. Deorum’s head will be in the middle of the screen, and if you didn’t already put it together, his eye is the weak spot we want to hit. Its attack is basically just the head lowering down and bonking you if you happen to be standing directly under him, so don’t do that! That being said, as soon as it starts to slither back up towards the top of the screen, run back so you’re directly under it and blast a missile right into its eye! You’ll only have time for one missile shot, so make it count!
Once Deorum’s head is back at the top of the screen, his tentacles will start to fire off little spikes in your direction. You can either avoid these OR shoot them down for some health and ammo. These two attacks are all Deo has in its bag of tricks, so just make sure that you’re running under its head and blasting the eye on its ascent to the top of the screen, and then avoiding those spikes, and you’ll be just fine.
Three missiles to the eye is what you’ll need to bring Deorum down. Doing so will net you the CHARGE BEAM! Again, if Deo ran away, don’t worry. You’ll get a chance to finish him off soon enough.
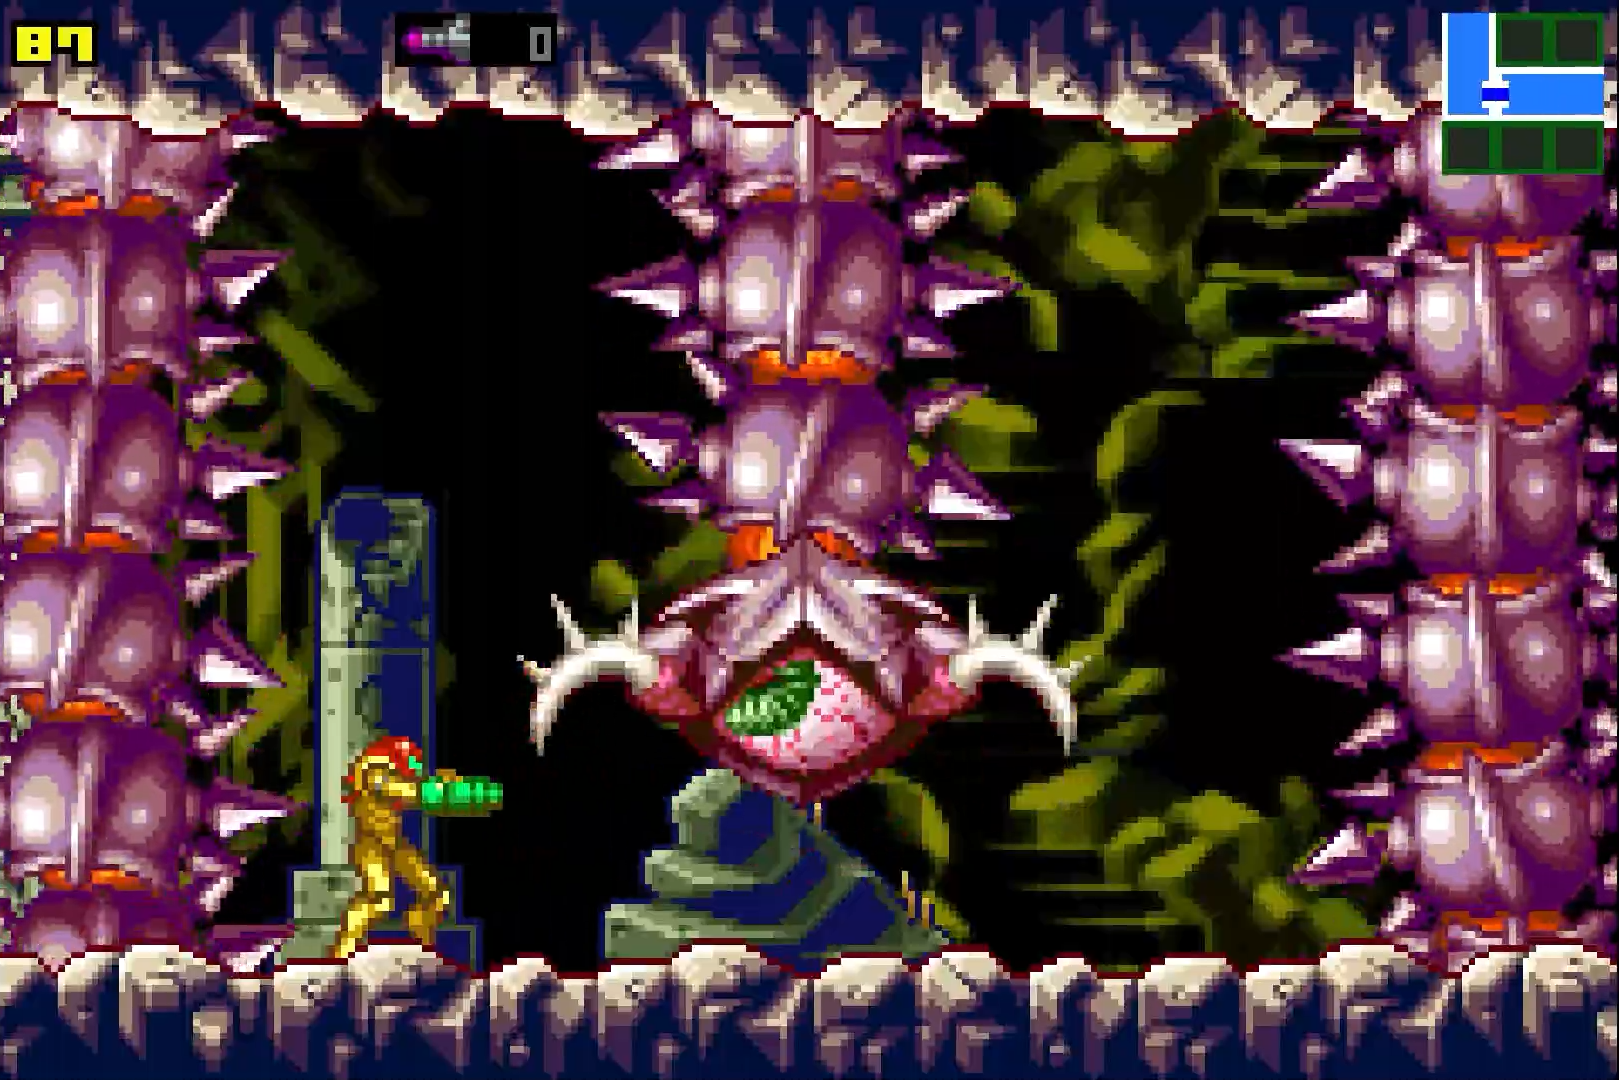
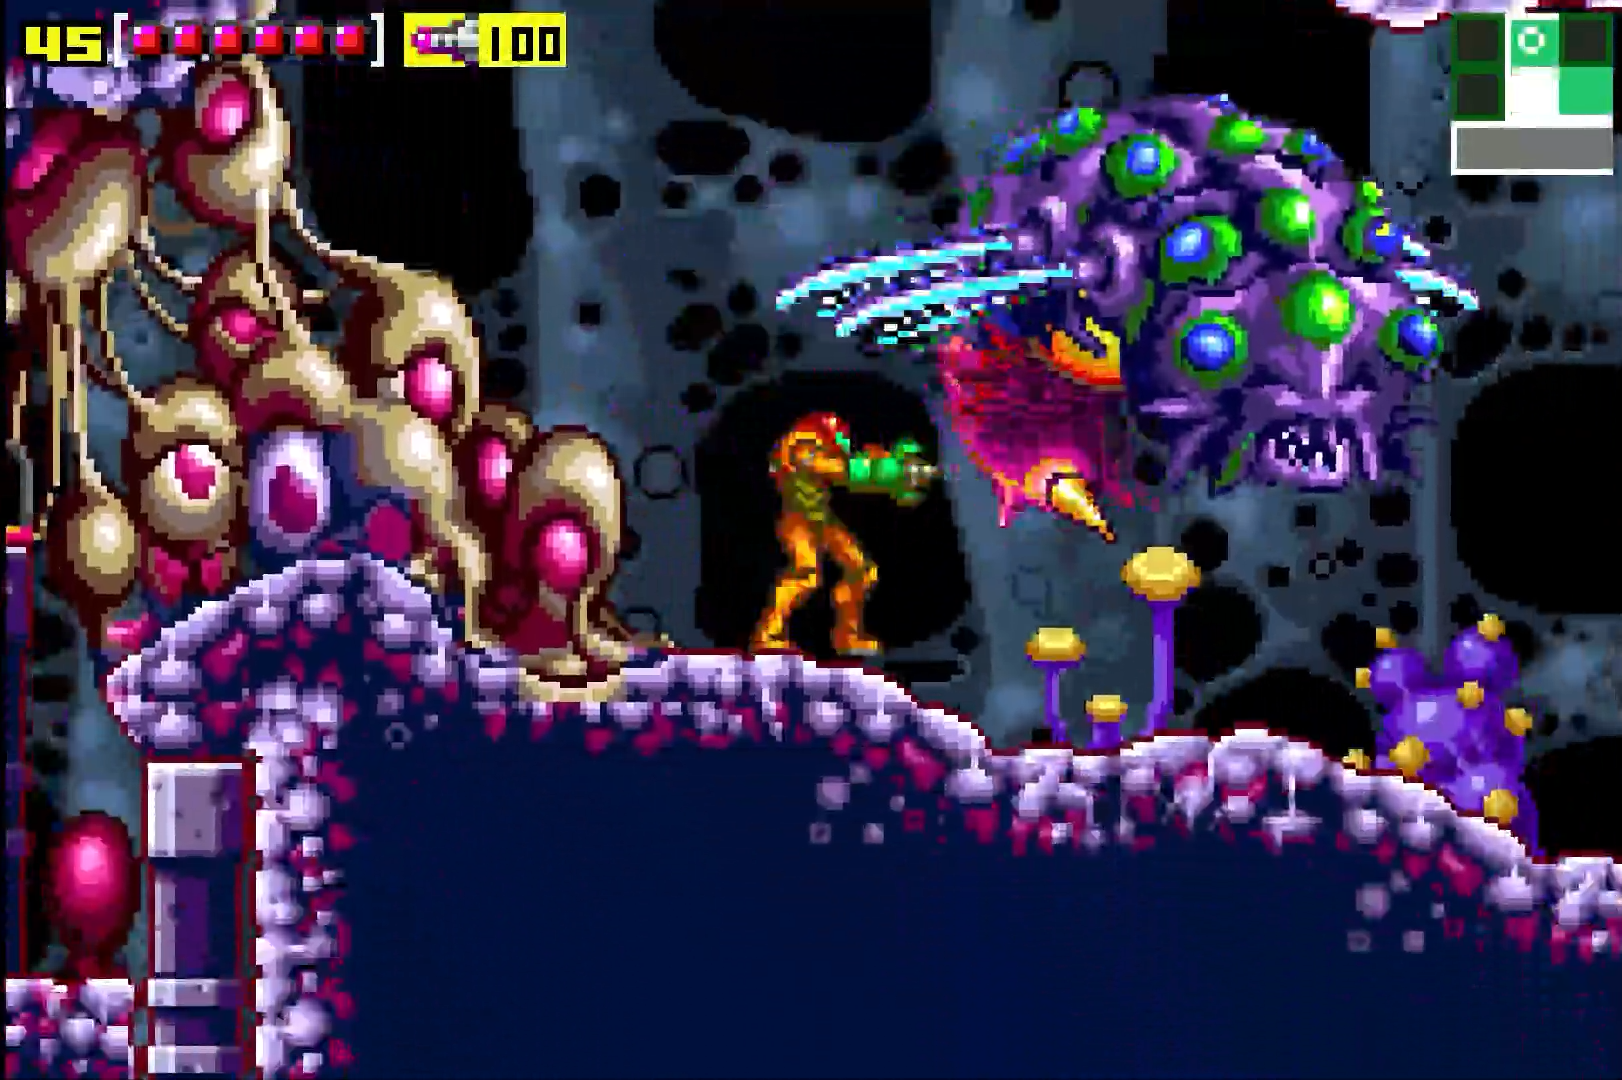
Acid Worm
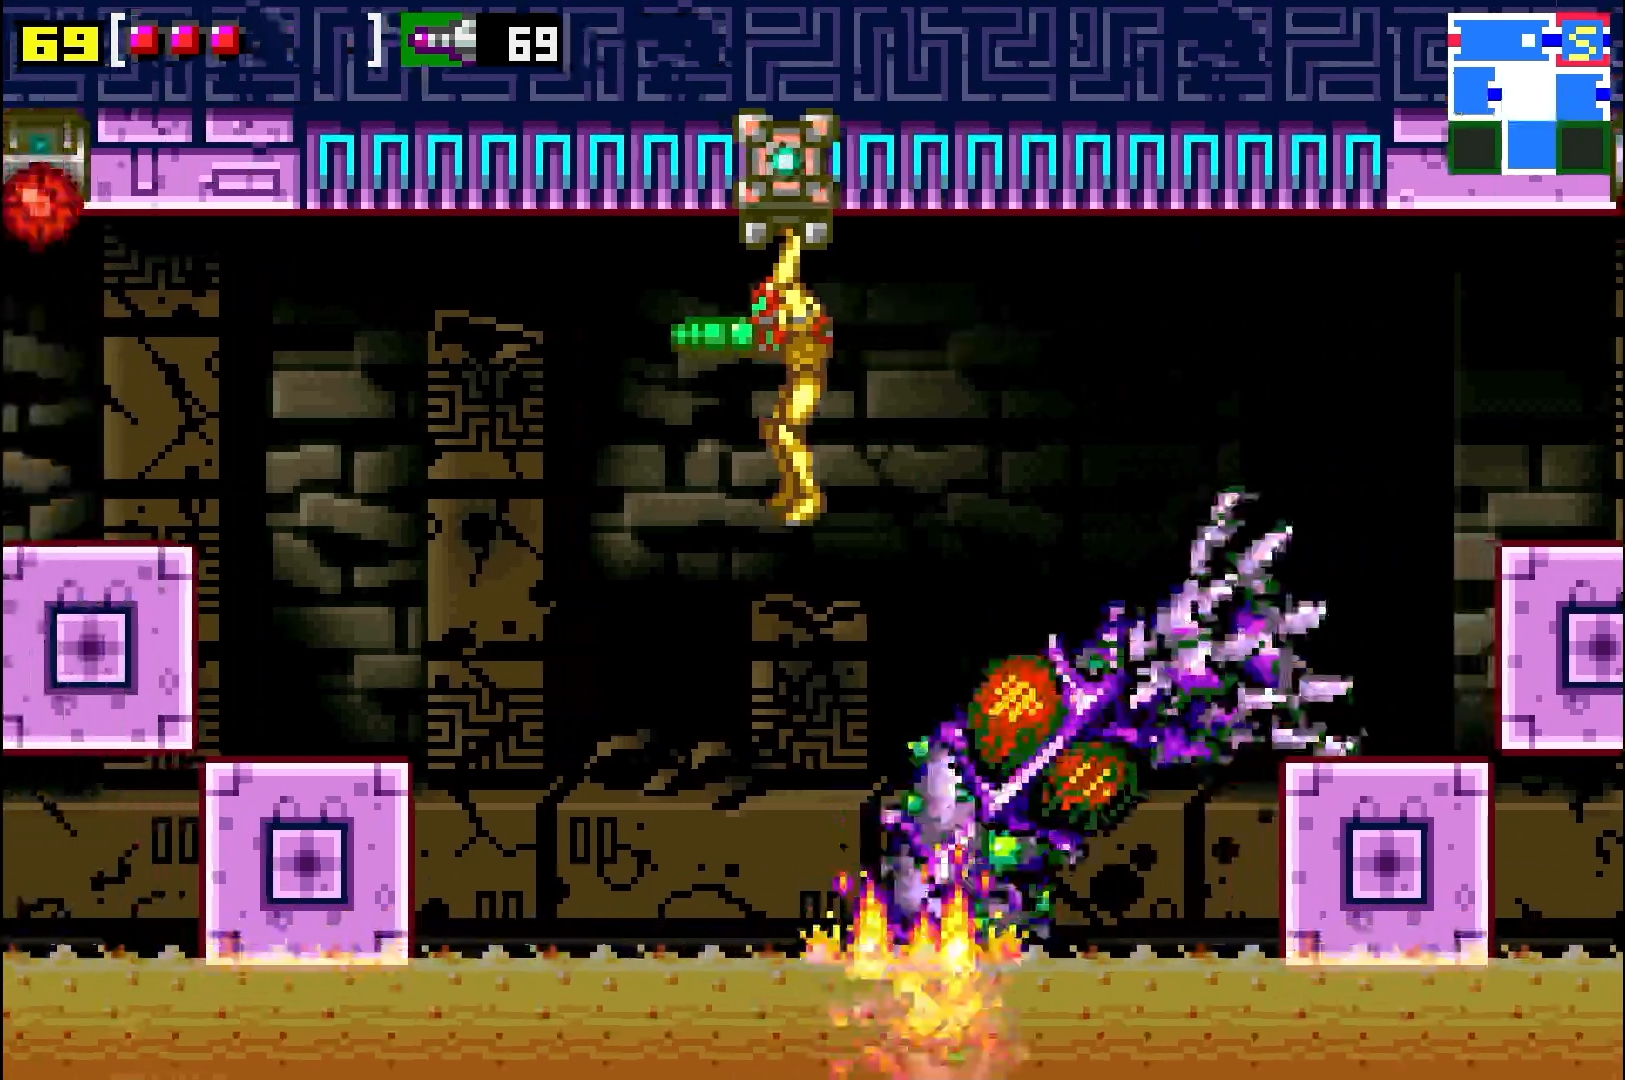
Step inside the room and take a second to look at your surroundings. You’ll see a zipline on the ceiling that runs from side to side, a pool of acid on the bottom that you definitely don’t want to fall into, and three platforms sticking out – one on the left, the right, and the middle. Once you’re ready, take the zipline across to initiate the battle.
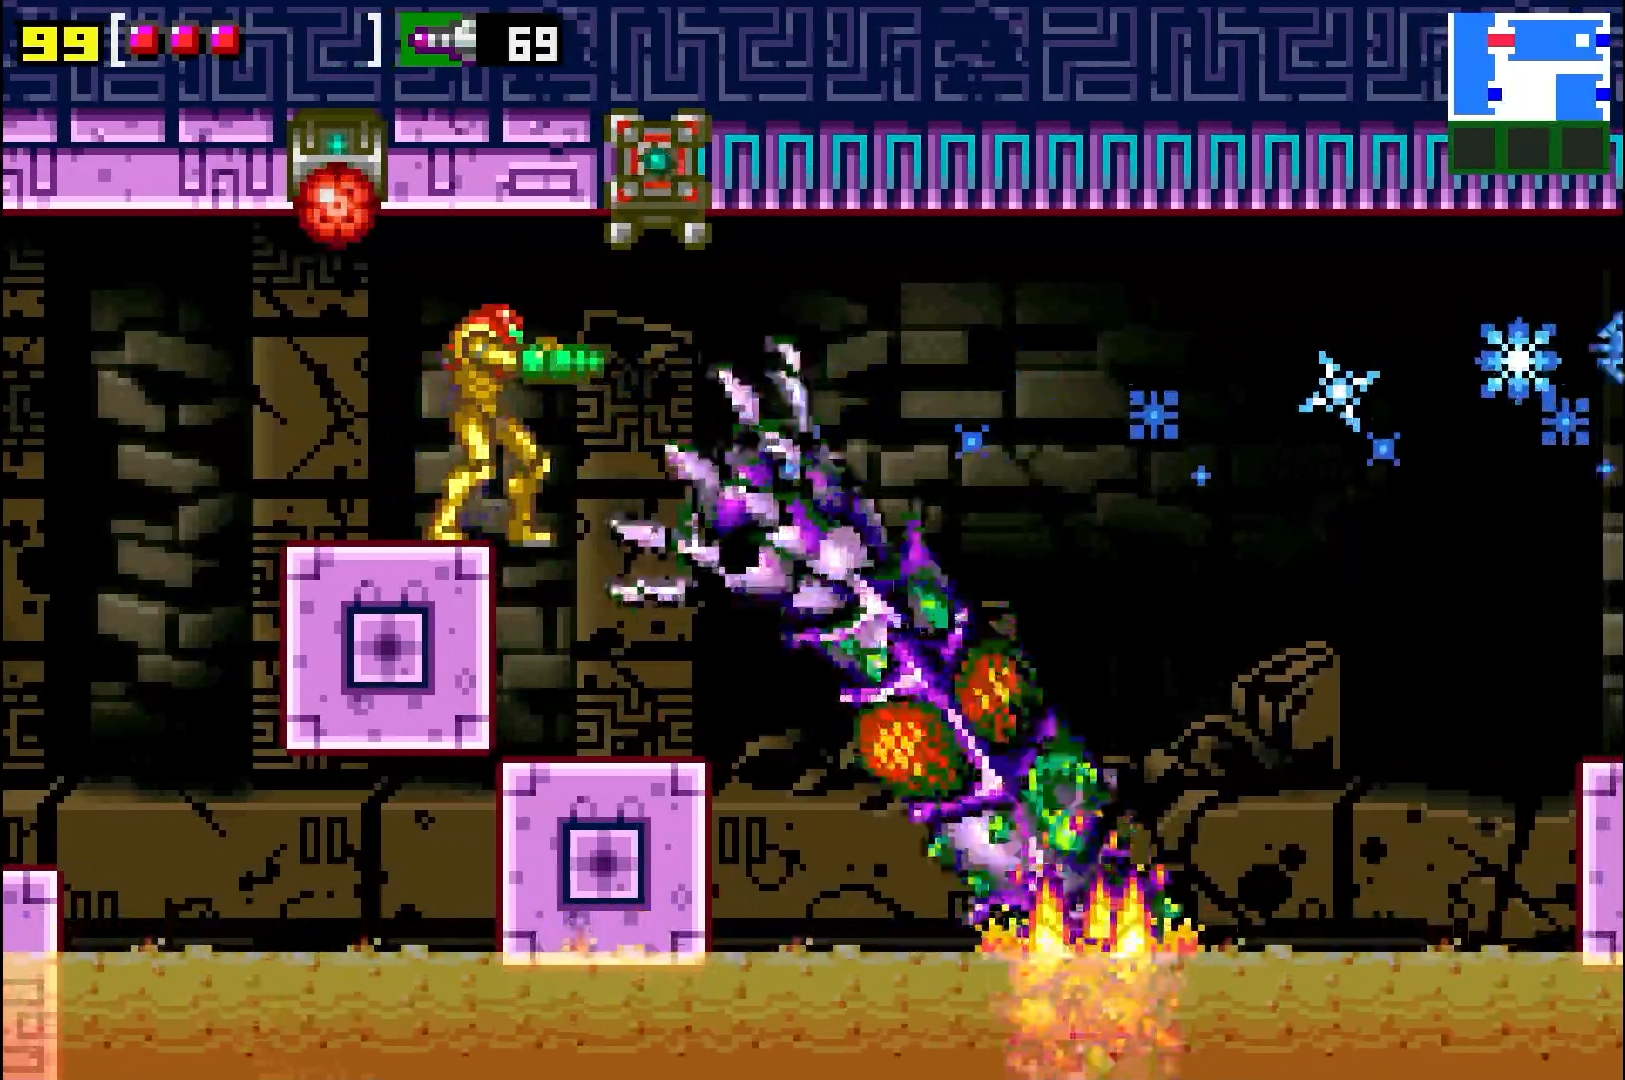

It won’t take long for the monstrous Acid Worm to shoot up from below and destroy the middle platform, leaving you with only the far left and far right platforms to stand on. The Acid Worm will park its body in the middle of the battlefield, which works to our advantage since we always know where it will be and the point of origin of all its attacks. With the right strategy, this boss battle will be a breeze, so let’s go worm hunting.
You’ll see two glowing orbs (are these supposed to be its eyes? Do worms have eyes??) just below the Acid Worm’s pincers; that’s the spot that we’ll want to concentrate fire. This first phase is pretty darn easy – stand on either side of the battlefield, watching the Acid Worm while it’s still submerged in acid. When you see its pincers flex once and then twice, jump up and grab the zipline. Err on the side of caution until you get the timing down correctly, as a zipline across too early will be far more preferable to a jump too late. As you’re zipping across, you’ll see the Acid Worm strike the now-empty platform and get its mandibles stuck, leaving it exposed for a few shots. Once you’ve landed on the opposite lower platform, turn around and fire off a bunch of missiles at its eyes. You’ll be perfectly aligned and have an opportunity to fire off multiple missiles.
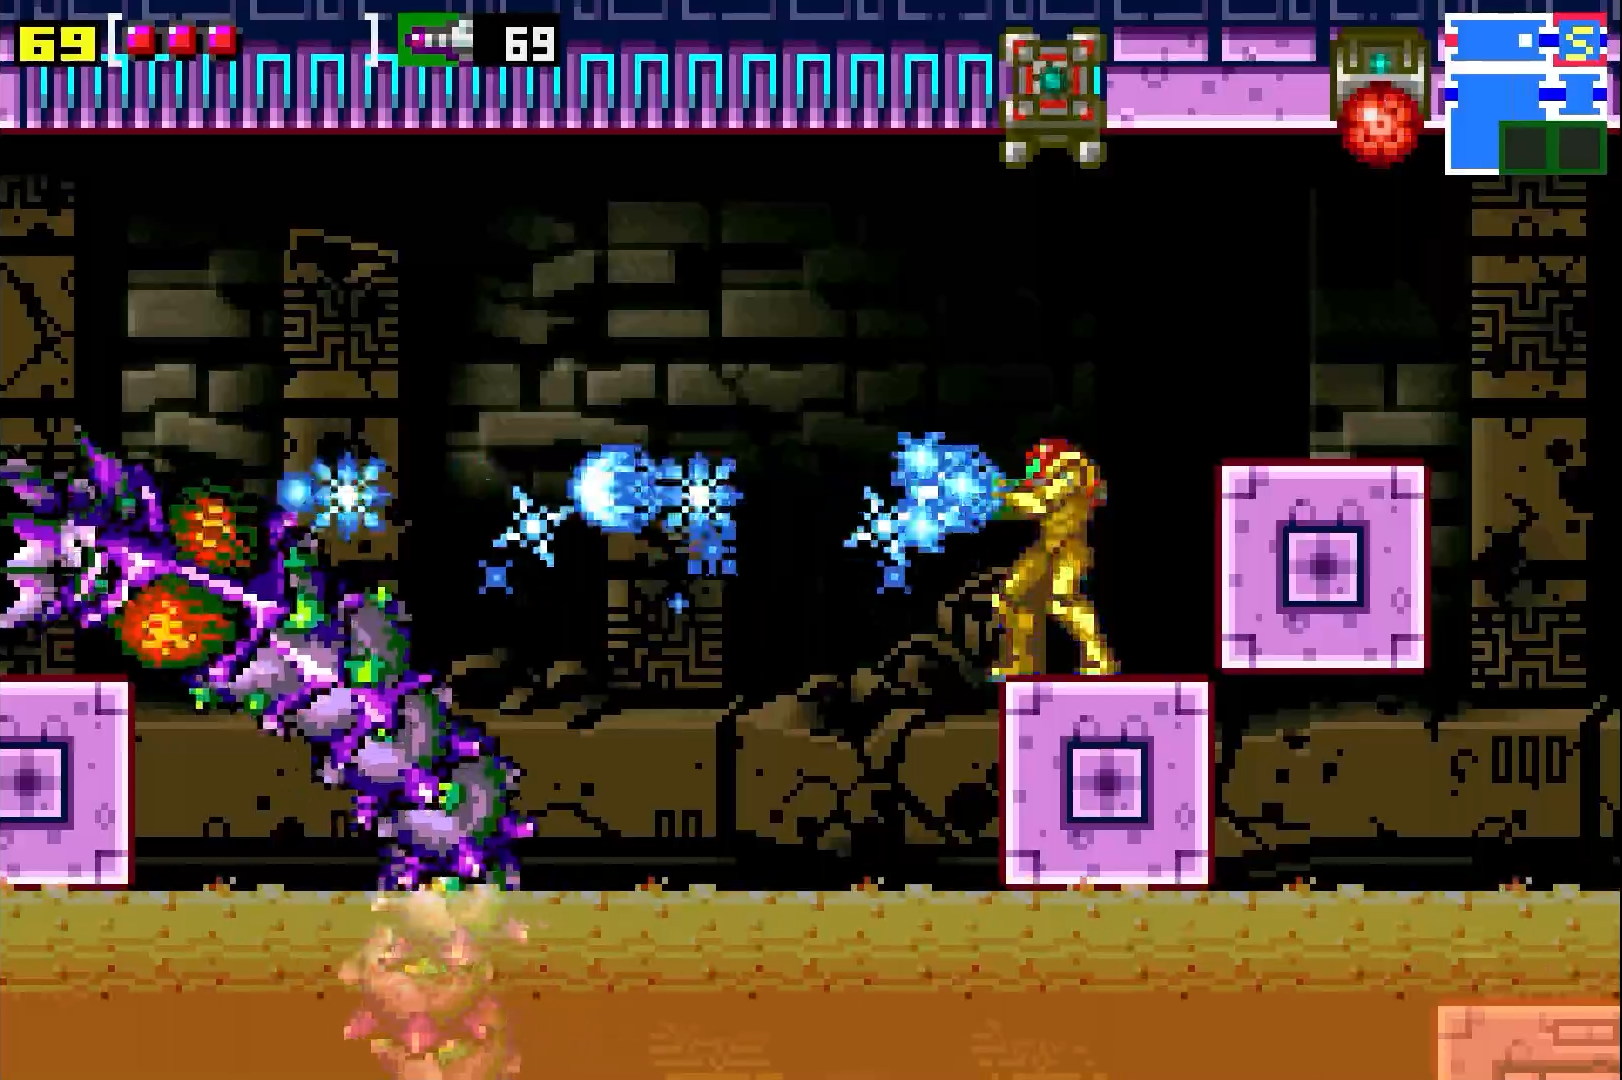
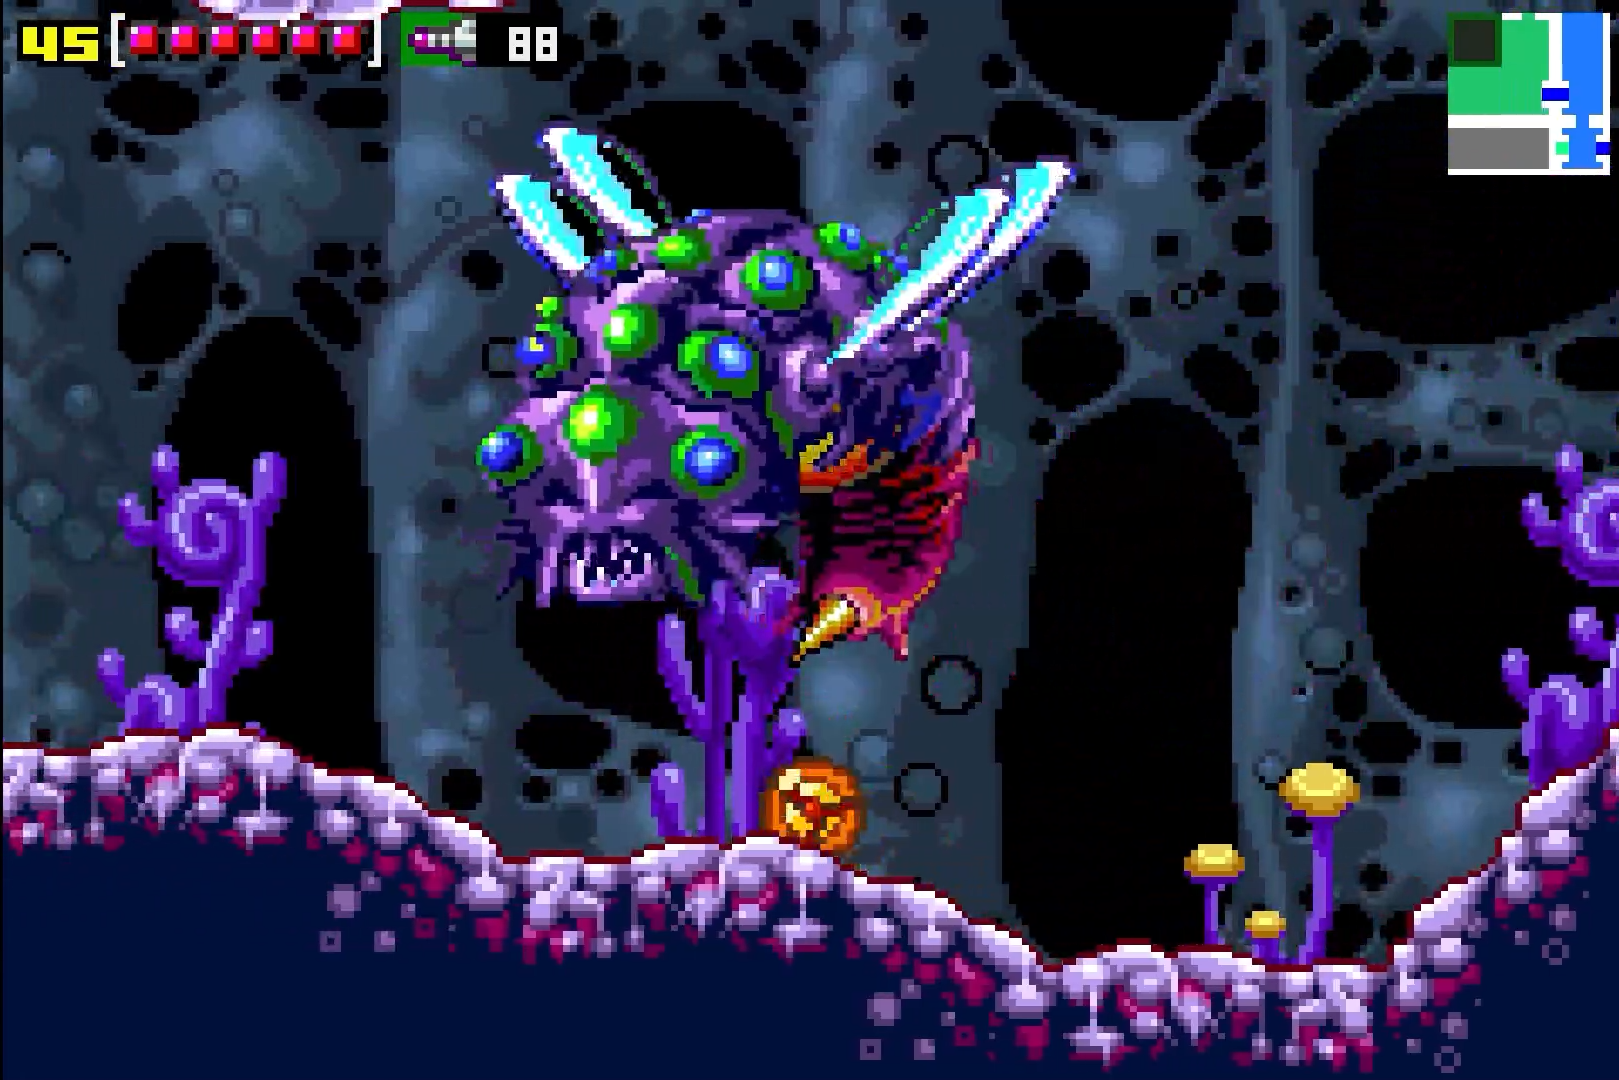
Once the Acid Worm has taken enough damage, it will retreat under the acid and scream. The acid in the room will now start to rise, submerging the lower platforms, but leaving the higher one’s safe. Fortunately, just as quickly as the acid rises, the acid will start to fall. When the acid is basically gone from the lower platform, quickly get down and zipline across, because the Acid Worm will be coming in hot to attack. Dropping down a bit early to the lower platform and taking a bit of acid damage is preferable to getting bitten by the Acid Worm, so do that if you need to.
Other than the acid rising and falling, nothing else about this fight has changed. Keep ziplining across just as the Worm is trying to bite you and pummel it with missiles when it bites the platform instead, and this boss will fall in no time.
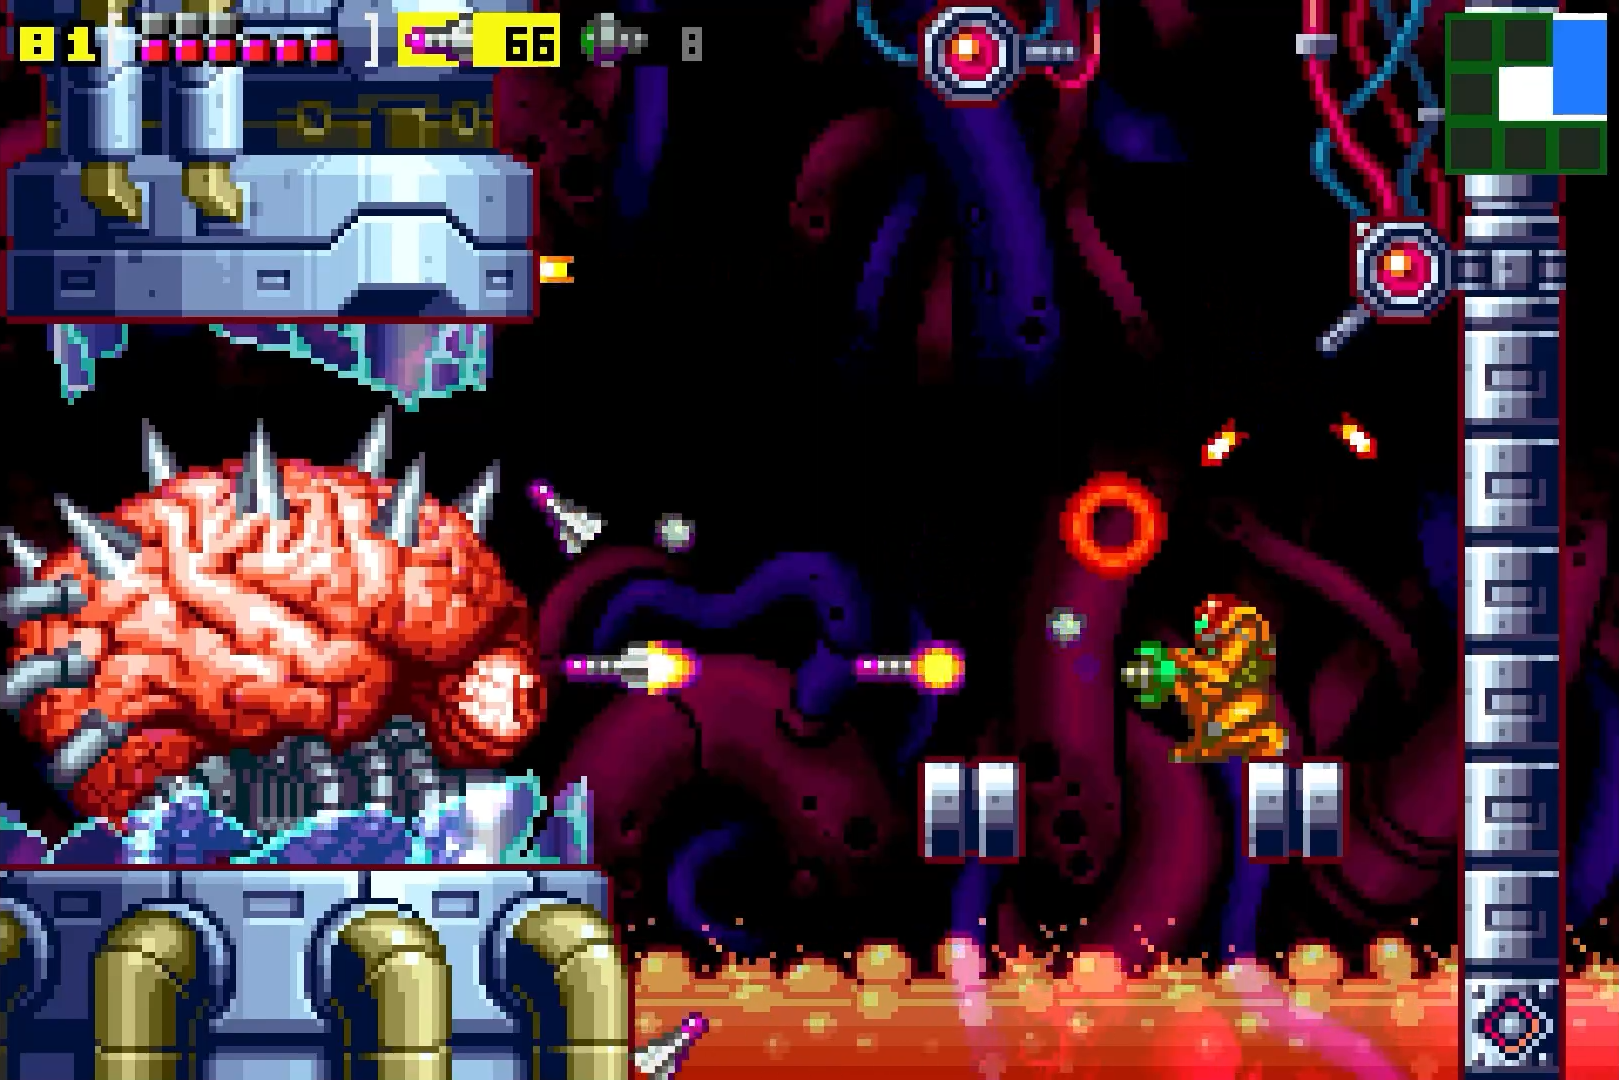
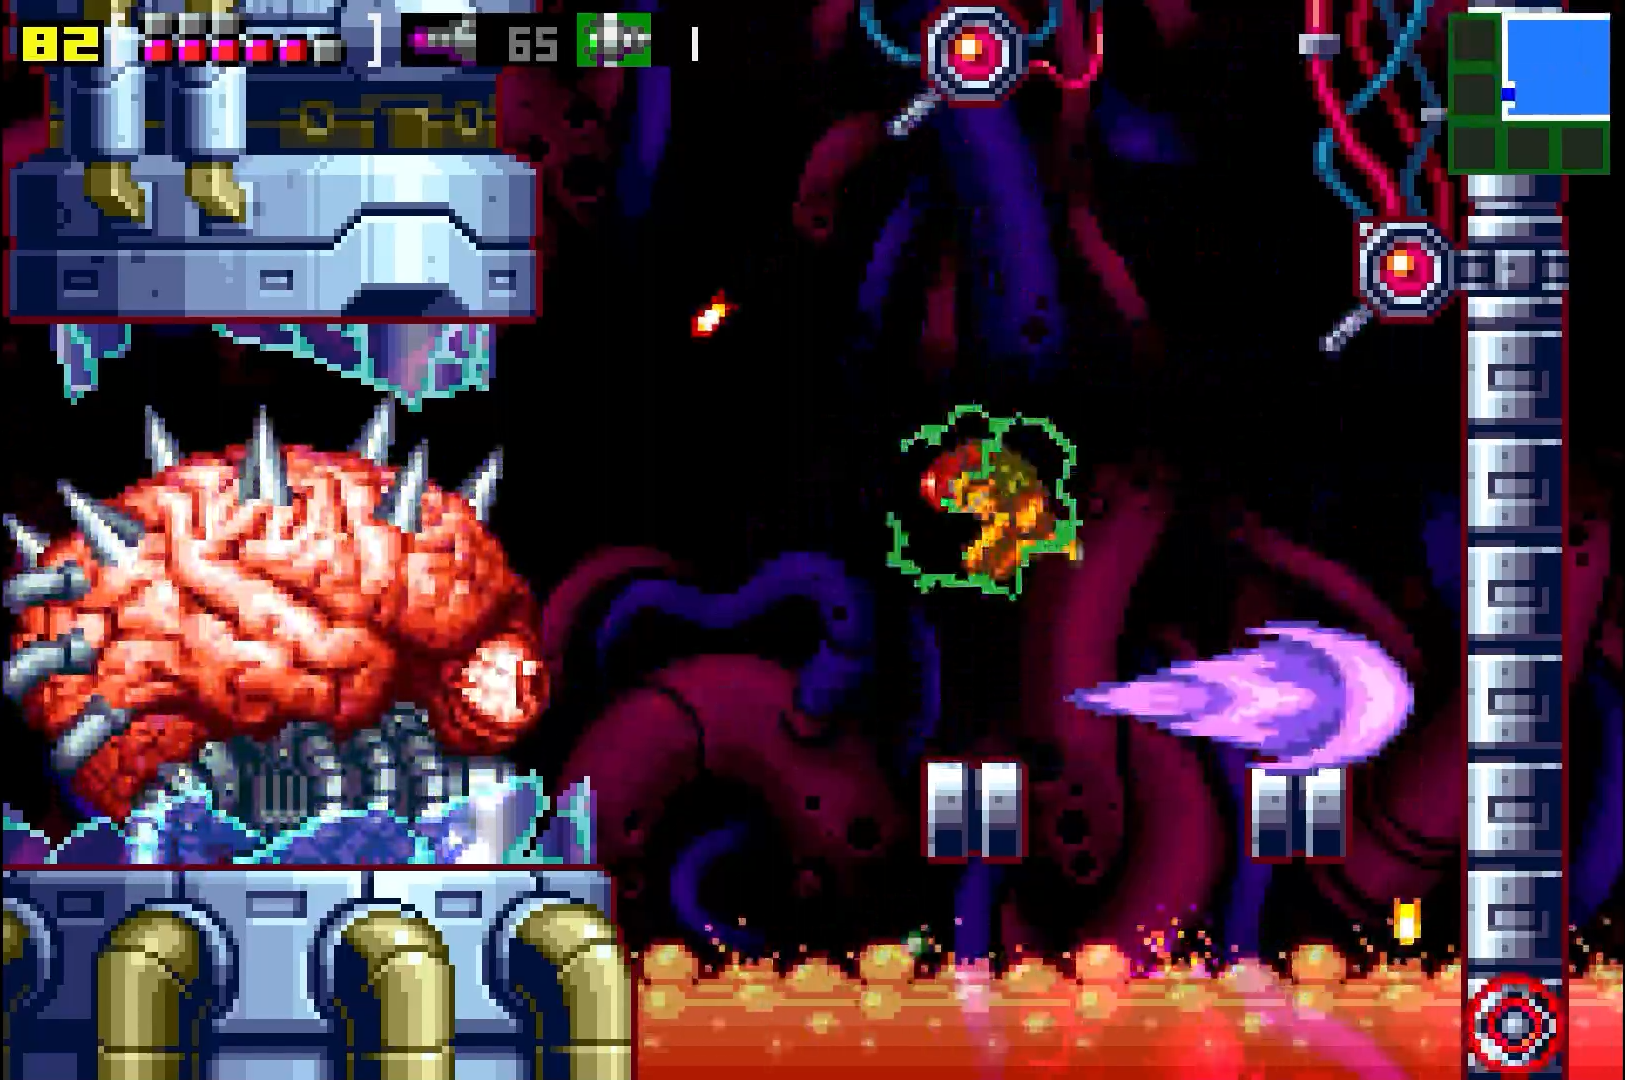
Kraid
Kraid is back and bigger than ever! That’s right – this ain’t your granddaddy’s Kraid. Unlike in NEStroid, our reptilian foe is now several stories tall, and looking incredibly slick with his redesigned sprite. You’ll remember that Kraid is one of the bosses you’ll need to defeat before you can gain access to Tourian, so let’s get to work.
If you’ve fought Kraid in Super Metroid before, then luckily, you’ve basically fought him in Zero Mission too. The only difference is that we start off on a level playing field, which you should absolutely take advantage of. Kraid will start the battle off by letting out a massive scream, and this is your chance to act quickly and pop his mouth full of a couple missiles. Kraid’s weak point is indeed the mouth, so we’ll want to concentrate fire there. To get him to open his mouth, you’ll need to hit Kraid in the head with either missiles or a charged shot. Once it connects, his mouth will open and you’ll have a second or two to jump up and pop a couple shots down his throat.
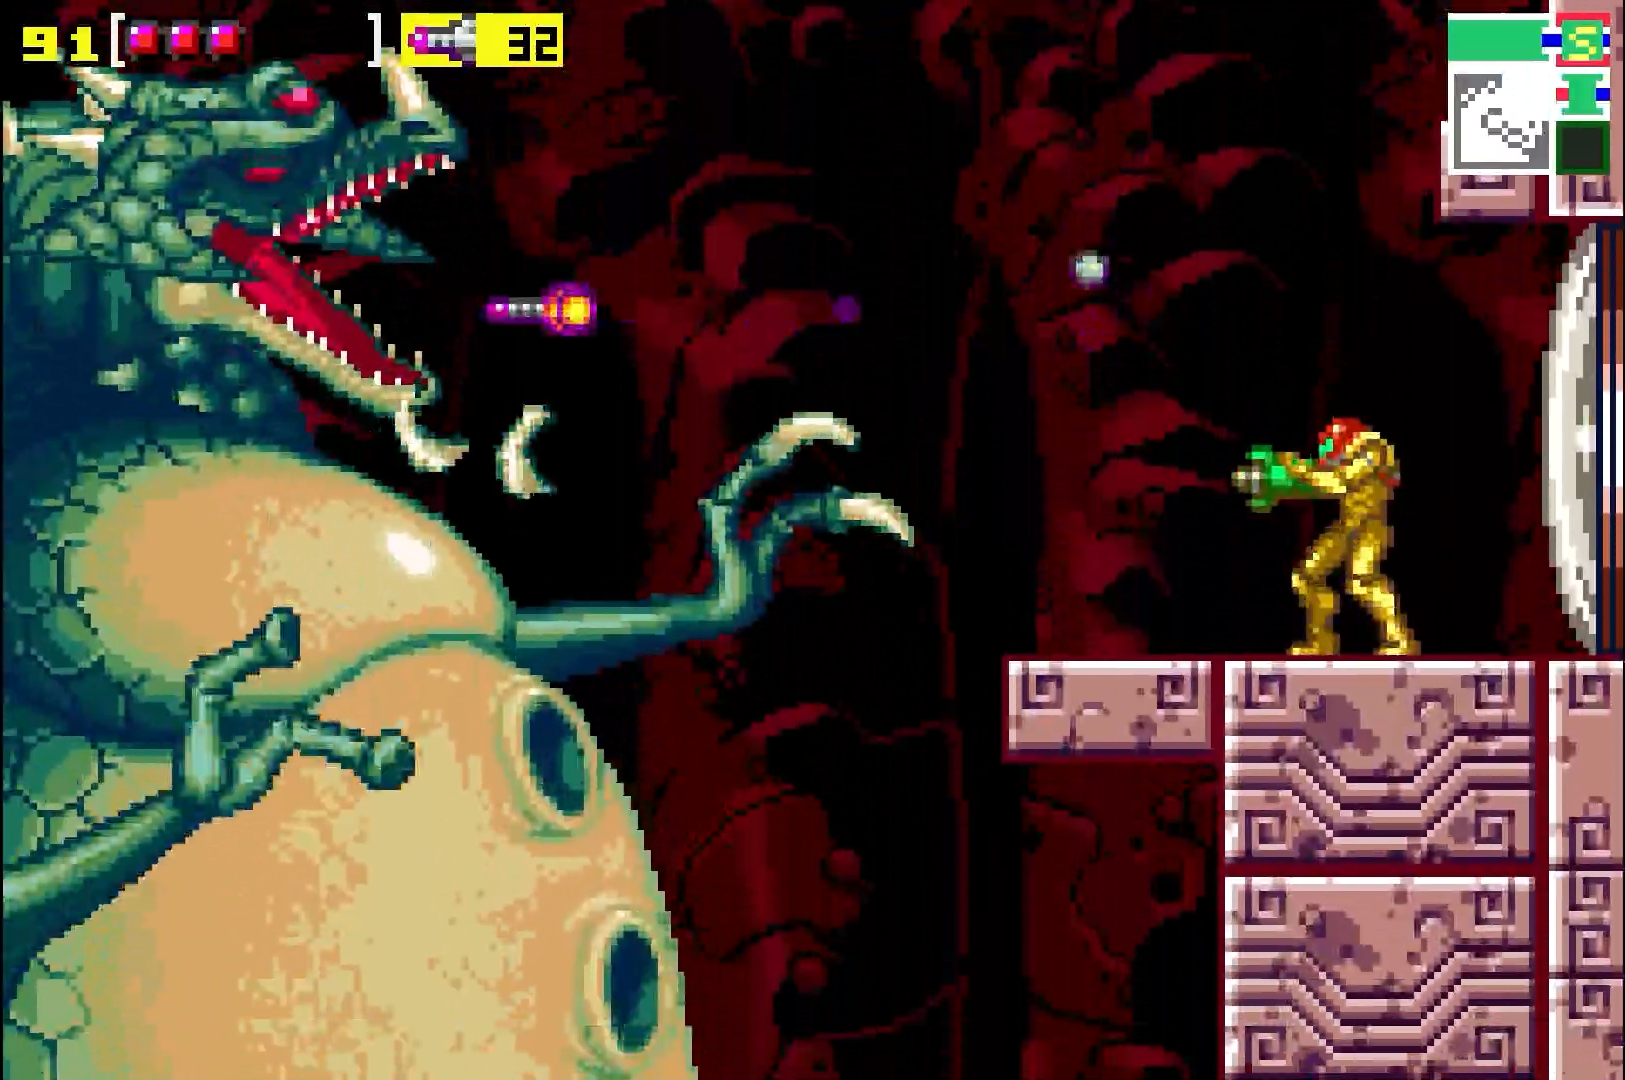

Kraid’s no pushover though, and he’ll be doing his best to make sure you don’t hit him. His main two attacks consist of swatting at you with his arms (they always kind of remind me of Tyrannosaurus arms, no?), which will knock you back and potentially off the platform you need to be on, and summoning two little spikes that will constantly be flying towards you, those also with the potential to knock you down. The good news is the spikes don’t move super fast and they can be shot to get health or ammo.
If you do get knocked down, be cautious. Kraid will fire off some pretty gruesome spiky platforms from his belly buttons (plural… yuck) that will smash into you if you’re in the way. Conversely, you can also climb these platforms once they hit the wall and use them to pull yourself back up to the platform. Kraid will fire off one platform, and then a second just above it, so time your jumps so you don’t get hit and can climb back up.
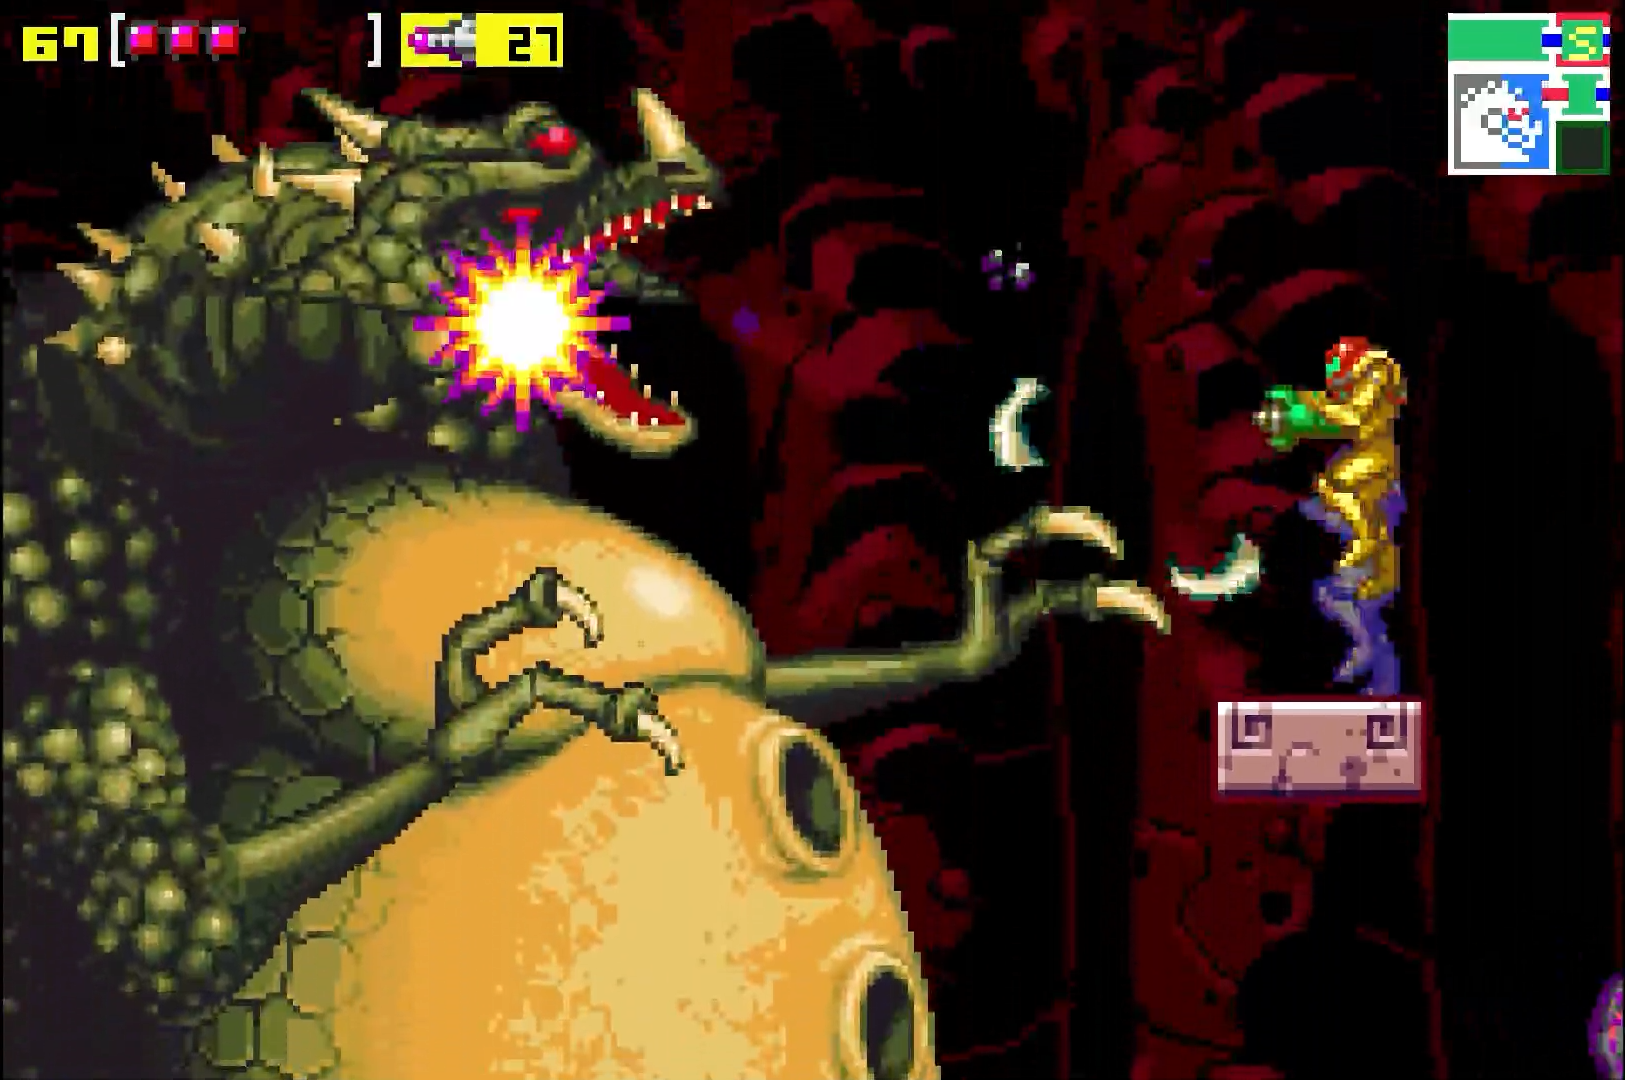
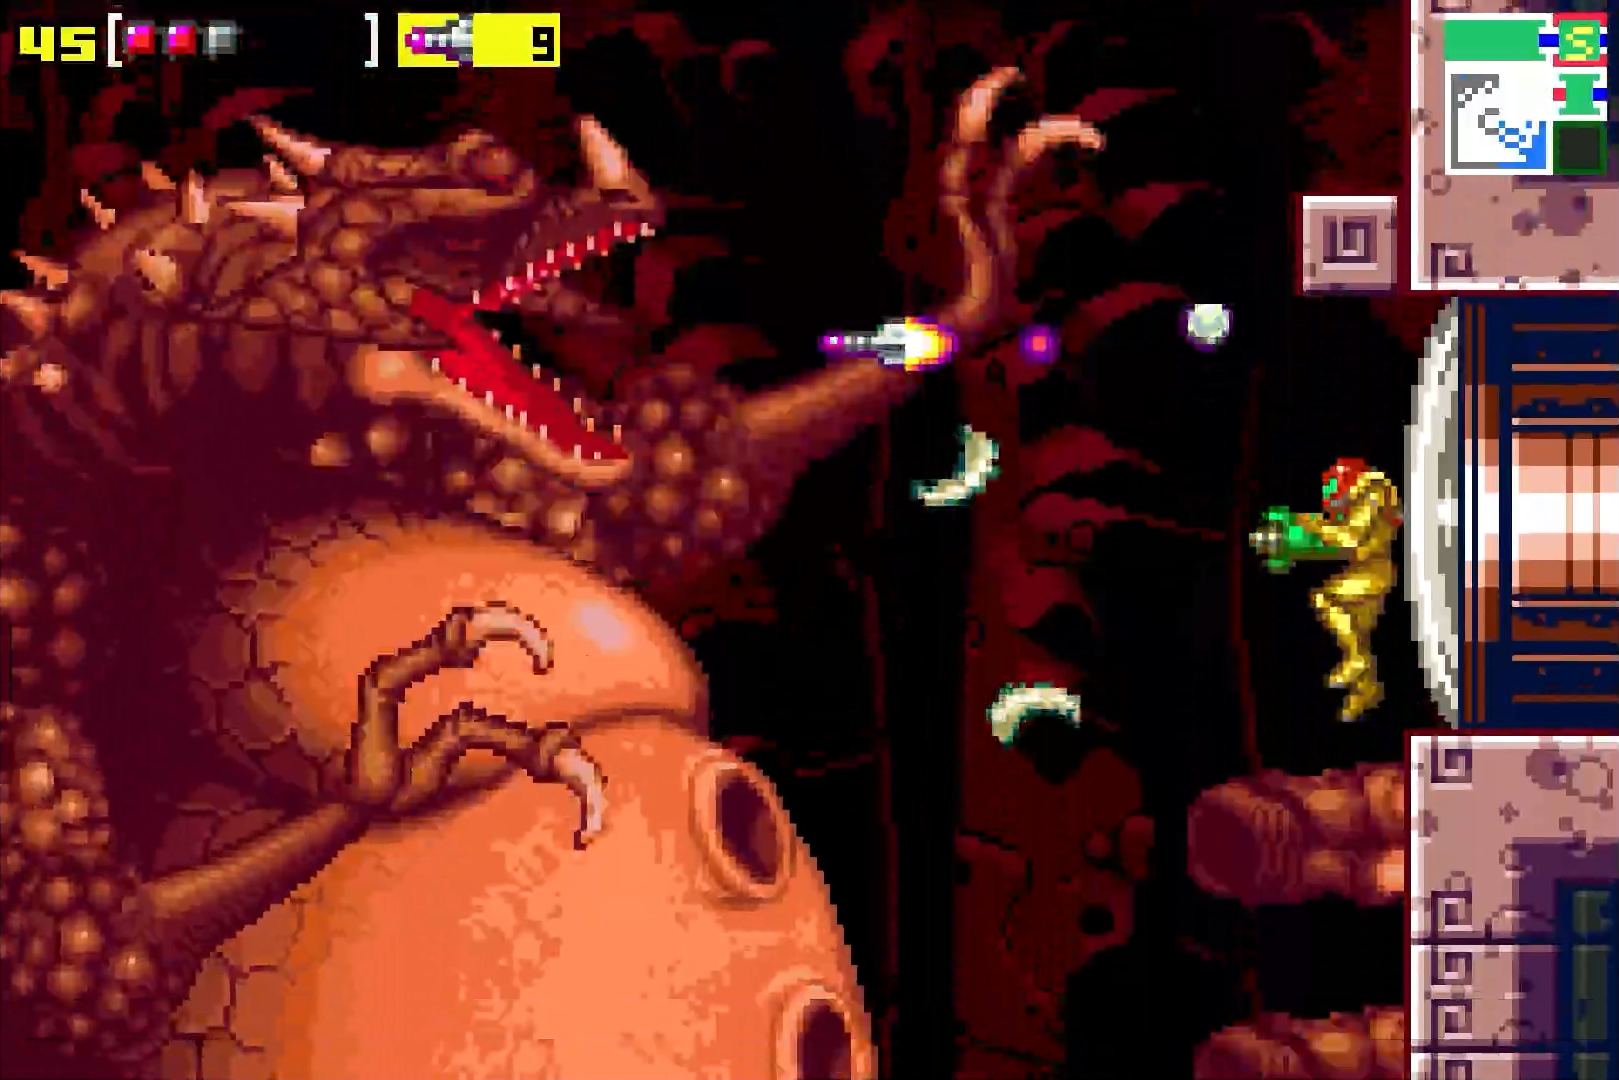
Keep peppering him with missiles and eventually the platform on the top that you’ve been shooting Kraid from will be destroyed. You have two options now: one, you can drop down and use the platforms that Kraid shoots from his belly to get the height you need to shoot his head. Kraid will now shoot out a third platform above the other two, so as long as you time the jumps right, this is probably the better choice. Option two is the little ledge in the top right corner of the room. I don’t really like this because you can’t get a great shot off to Kraid’s mouth, and you’ll more than likely need to drop down and fire, at which point, you may as well just jump up and shoot him from his belly button platforms. Worth noting too that the belly button platforms will have you out of reach of Kraid’s arm, so you just need to worry about dealing with the spikes.
Keep at it, shooting spikes, dodging his arm, climbing the platforms, and pumping his mouth full of missiles, and soon enough, the giant beast will fall. You’ll see a cutscene of Kraid’s statue lighting up in Tourian, signifying our enemy is down. Go into the next room and claim the SPEED BOOSTER.
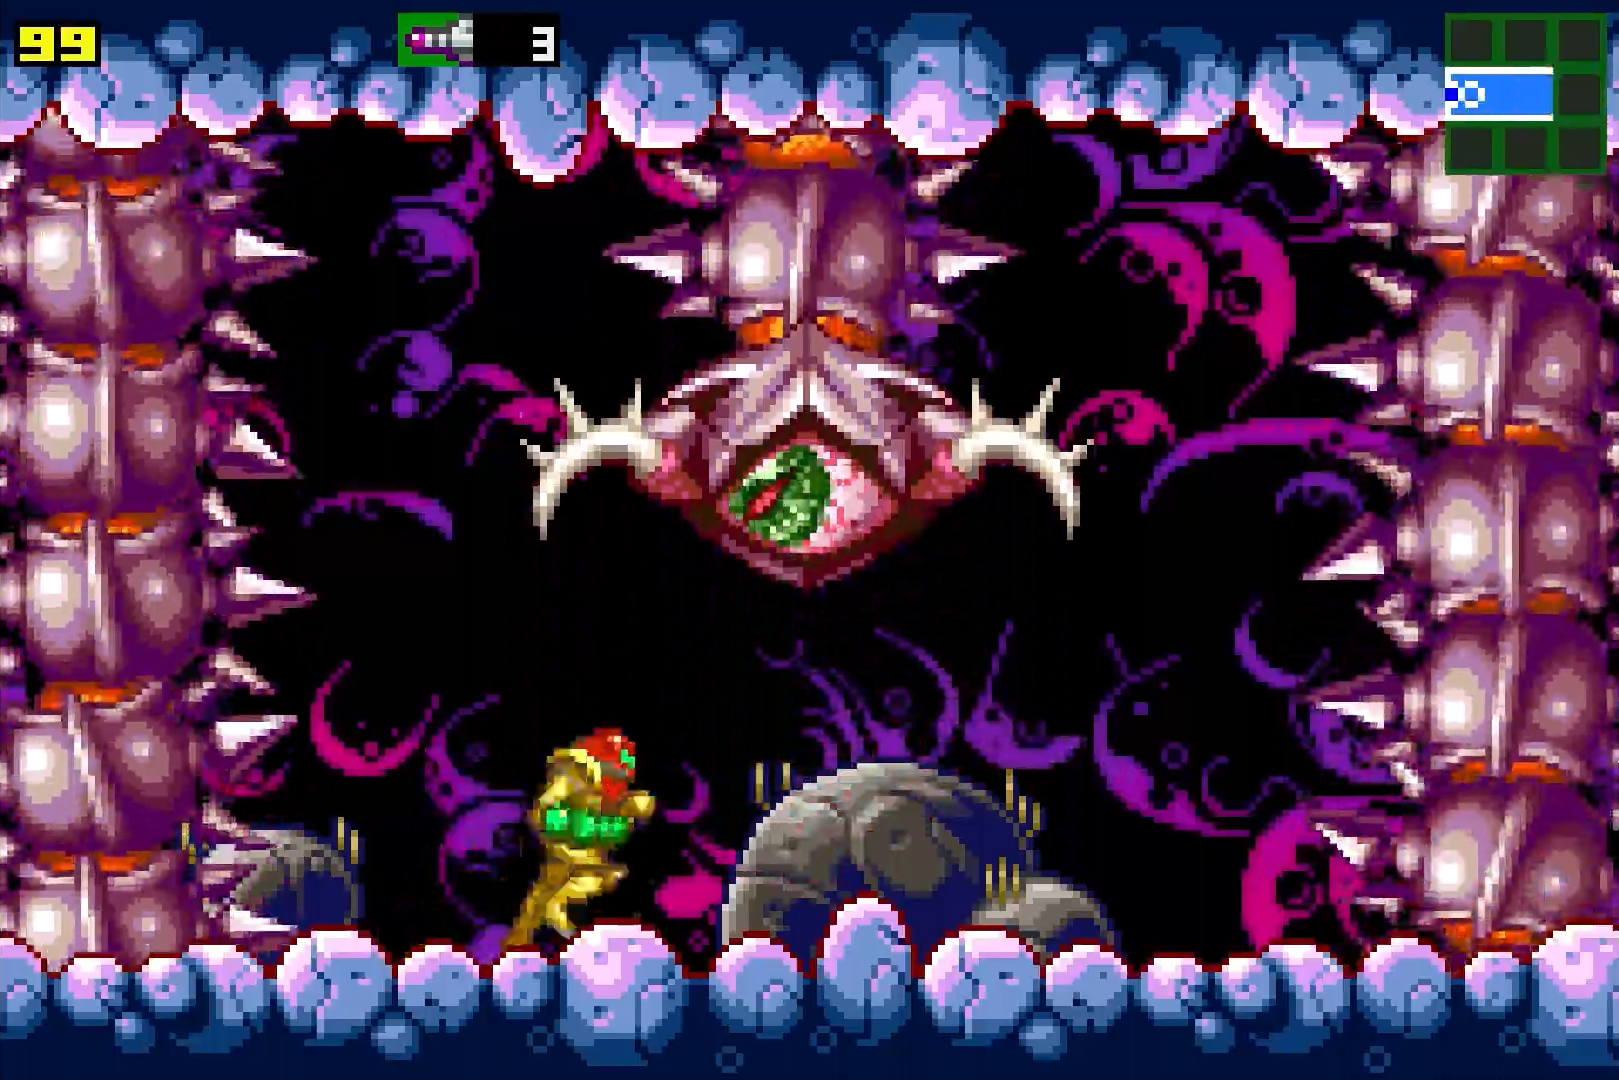
Kiru Giru
Up above is a Kiru Giru, ensnared by vines and foliage. This is a pretty easy and straightforward battle, but just to set the stage: you’ll see a Ripper that’s flying around the room lackadaisically; pay close attention to where it is, since its positioning in this room will be key to victory. You should also see a bunch of thick looking vines above Kiru that are holding it up. As you no doubt guessed, the key to victory here is to shoot down the vines supporting poor Kiru Giru and have it fall to its death.
Ensnared Kiru Giru only has one attack, and it’s very easy to dodge. Every three-to-five seconds, Kiru will shoot off five spores that travel in a semi-circle shape. These can ding you, but they really won’t hurt very much, and better yet, you can just shoot them for health and missiles. Defeating Kiru is simple: wait until that Ripper is in position somewhere along the upper right side of the screen, freeze it, and then jump on. Jump up and fire off some missiles at the vines holding up Kiru. You probably want to keep this rhythm going where you jump once, firing at the vines, jump twice, firing at the vines, and then jump a third time, firing downwards at the Ripper to re-freeze it, keeping your position. The vine in the middle is indestructible, so you’ll need to switch sides once one side is destroyed.
Dodge or destroy the spores, and then repeat this process on the left side of the room, and you’ll send Kiru Giru crashing down to the ground. One piece of advice – don’t stand directly under the big slug before he starts to fall.
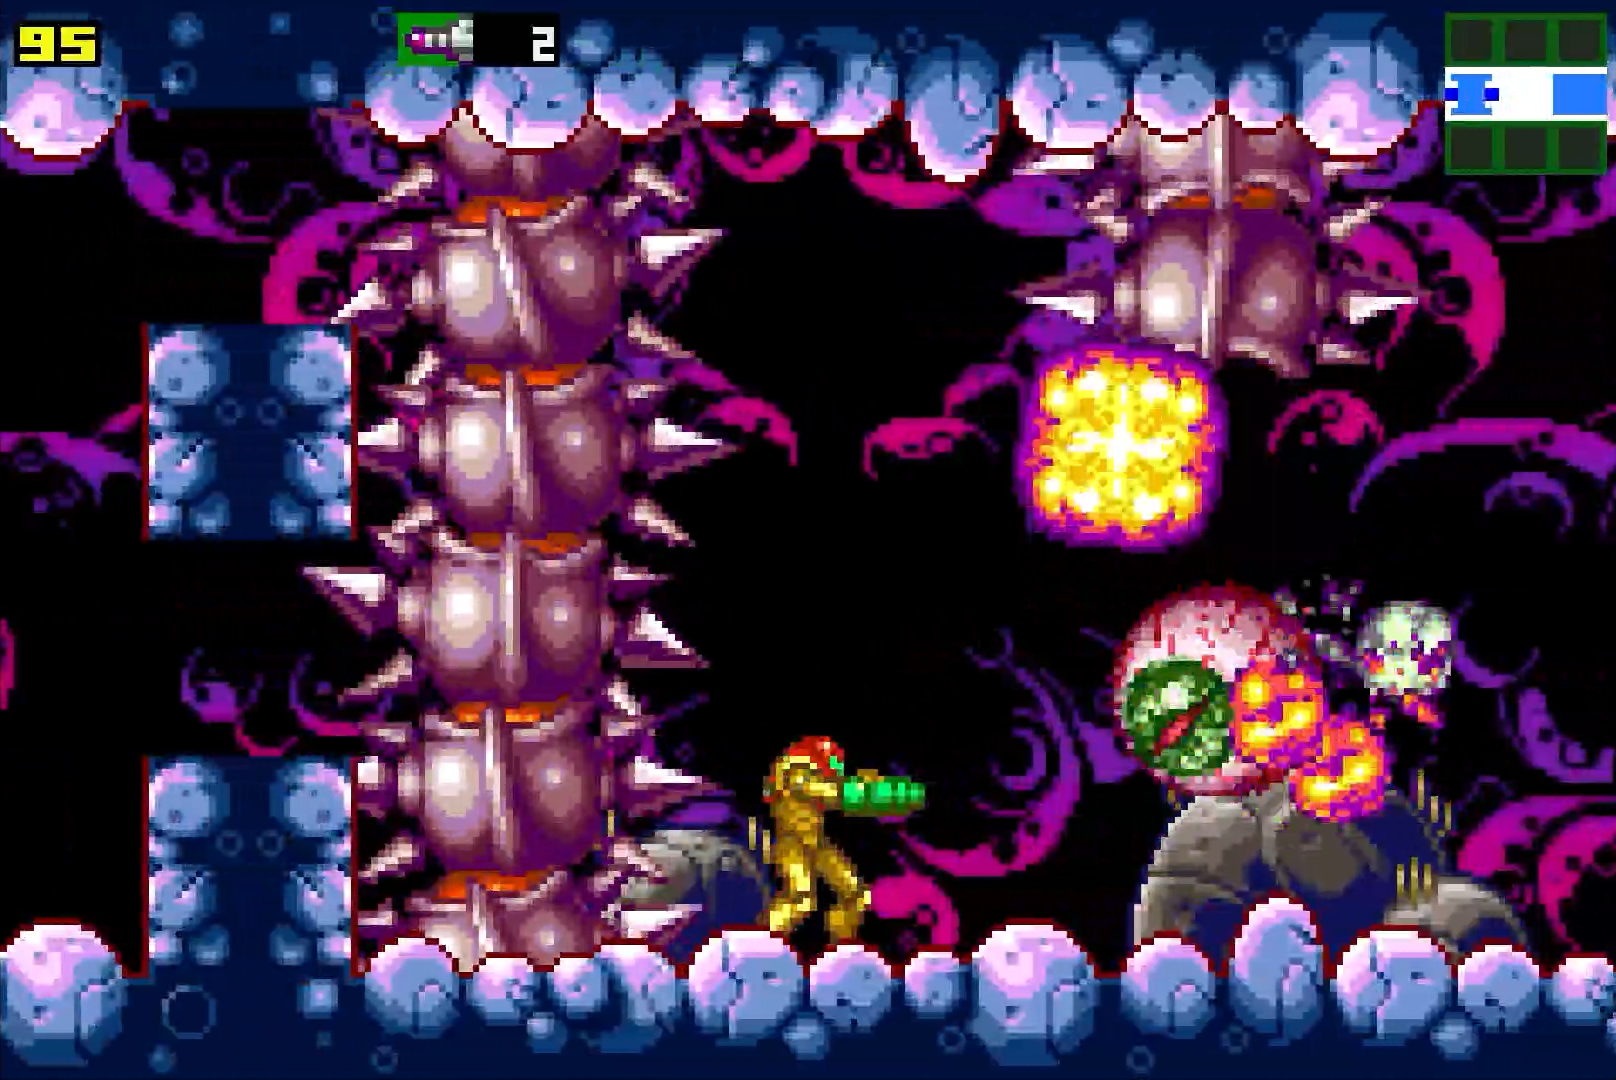
Imago
We’re starting off hot in the incredibly hostile Ridley’s Lair by taking on a boss almost right away. The routing here is a little convoluted, so stay with me. Once you get off the elevator, head left and enter the Save Station. Save your game, and then head left again. Again – I know we have Super Missiles, but I want to guide you in the way that the game intended, so ignore that green blast door in front of you for now and instead, head up. You’ll see that you’ve reached a dead end. What you need to do now is actually hop back on the elevator and take it back up to Norfair. Head back to the Ensnared Kiru Giru boss room and you’ll see that sucker has just kept sinking through the floor, creating a tunnel for you to fit through. Drop down, follow the path and once you’re in the big room, ready your missiles, because guess what – Kiru Giru didn’t die… it evolved!
Meet the giant fly-esque creature known as Imago. Imago looks kind of like a cross between a housefly and a bee, and much like a bee, it has a giant stinger by its butt. The good news is that Imago’s stinger isn’t as devastating as it looks. Infact, Imago doesn’t really use it at all, but rather, it just kind of flies into you with its whole body. The bad news is that it still hurts when Imago bumps into you, but considering how nasty that stinger looks, I’d take that as a positive net gain. Even better, crashing into you is literally the only attack Imago knows how to do, so as long as you’re not standing still, you shouldn’t absorb a ton of damage here.
Now, on to how to damage the big bug. What should have been Imago’s biggest strength is actually its biggest weakness. The stinger is where you want to focus your fire, and you’ll want to do this in a very specific way. You’ll notice that the room is a big slope, starting off pretty high on the left side and sloping downwards the further to the right you go. We want to lure Imago into a trap that will leave it completely defenseless to our weaponry.
Roll towards the left side of the room and wait for Imago to follow you (Imago will be heading right-to-left here). Imago should fly up a bit, probably off screen. That’s fine, just wait patiently for a second. Imago will then swoop down and start flying left-to-right, or down the slope (you may have to lure it to get it to start flying downwards. A quick Morph Ball roll to the side and back should be enough).. As soon as Imago flies over you, QUICKLY pop up and start running to the right. You’ll be running directly behind Imago, and your arm cannon will be perfectly lined up with Imago’s stinger, so fire at will! Don’t get too close to it, because even Imago’s backside can damage you, but you should be in a prime position to pop off 5-10 direct hit missiles.
As soon as Imago gets out of reach from you, run back to the higher left side and wait for the big fly to come back to you. Worth noting – as Imago takes more damage, it will start to shoot little thorn bullets out of its stinger, but with our strategy, that shouldn’t be a problem. Rinse and repeat this strategy of luring Imago to the top left, running behind it, and blasting it with missiles, and Imago will bite the dust in no time flat. After the battle, go and claim SUPER MISSILE EXPANSION #2.
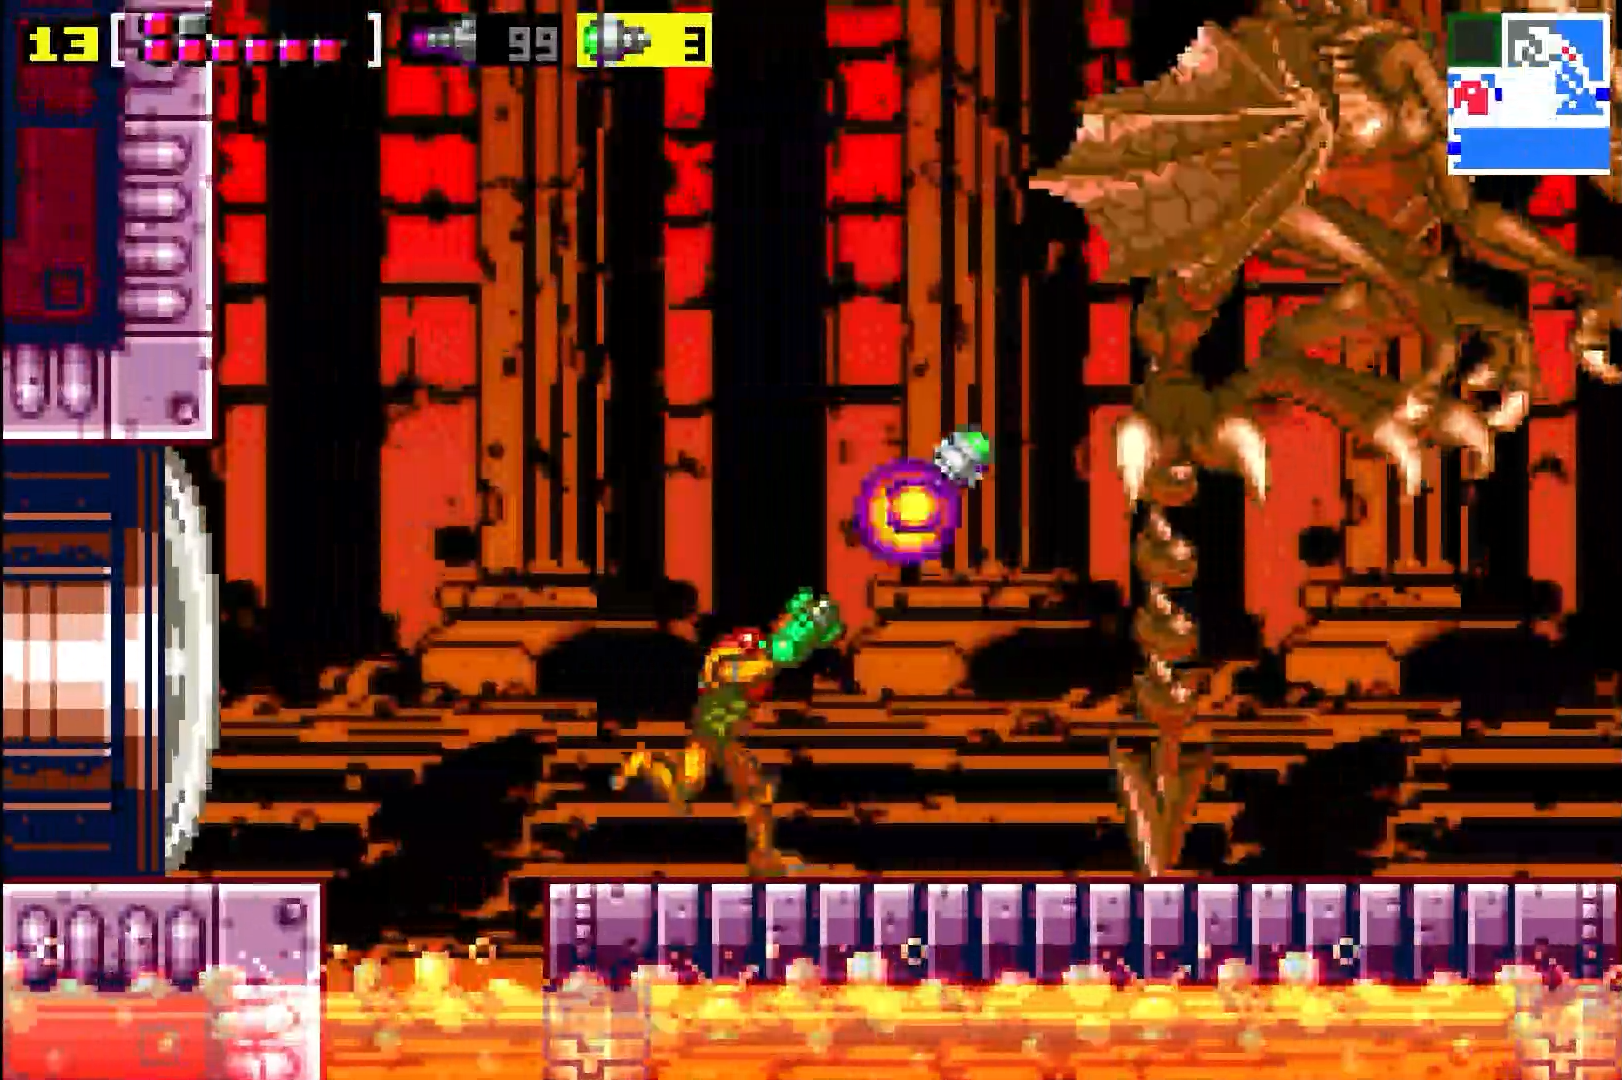
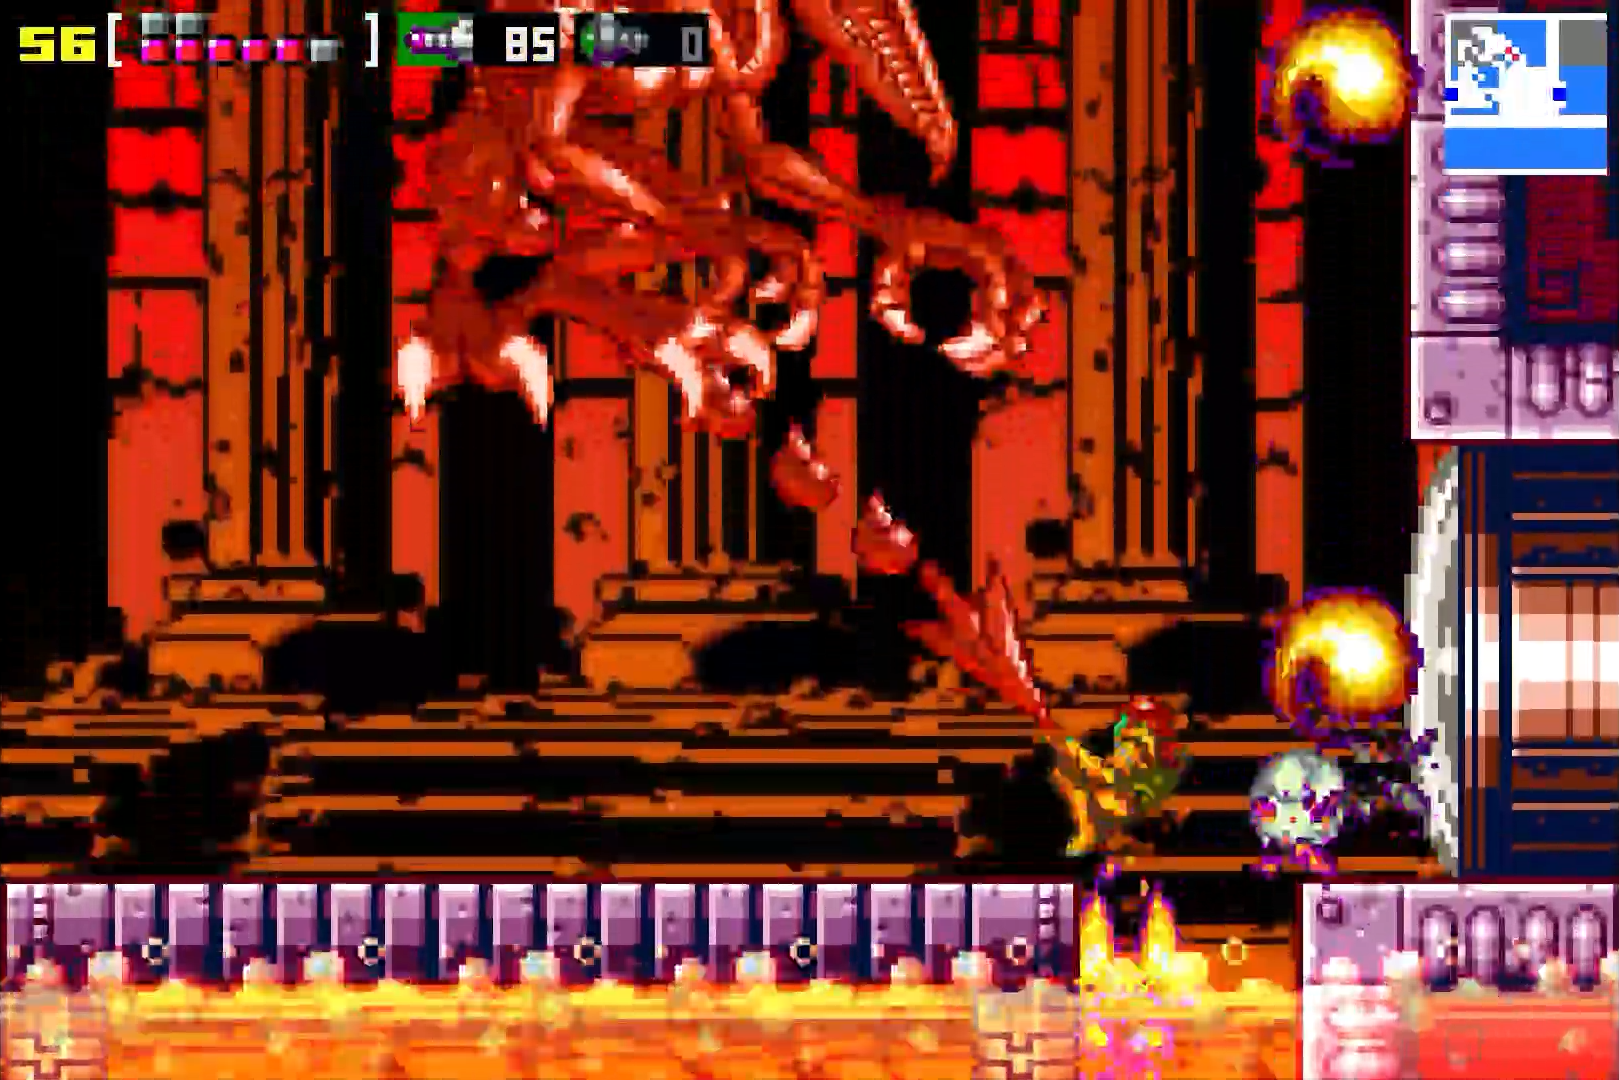
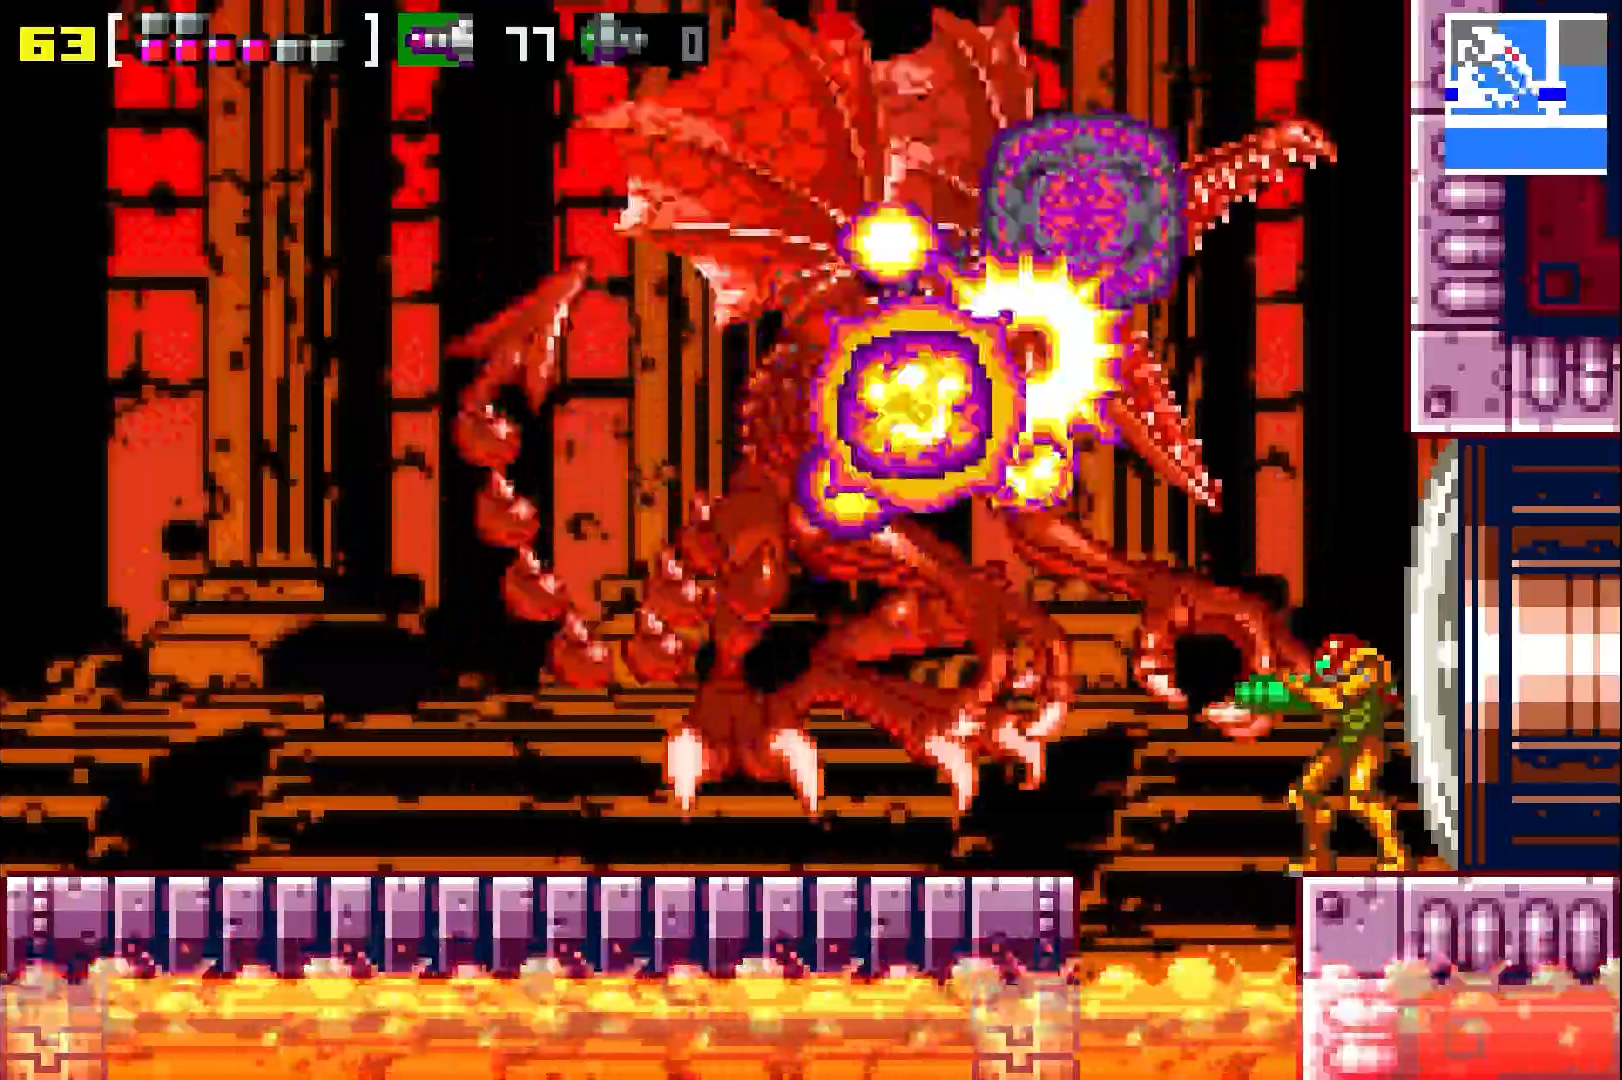
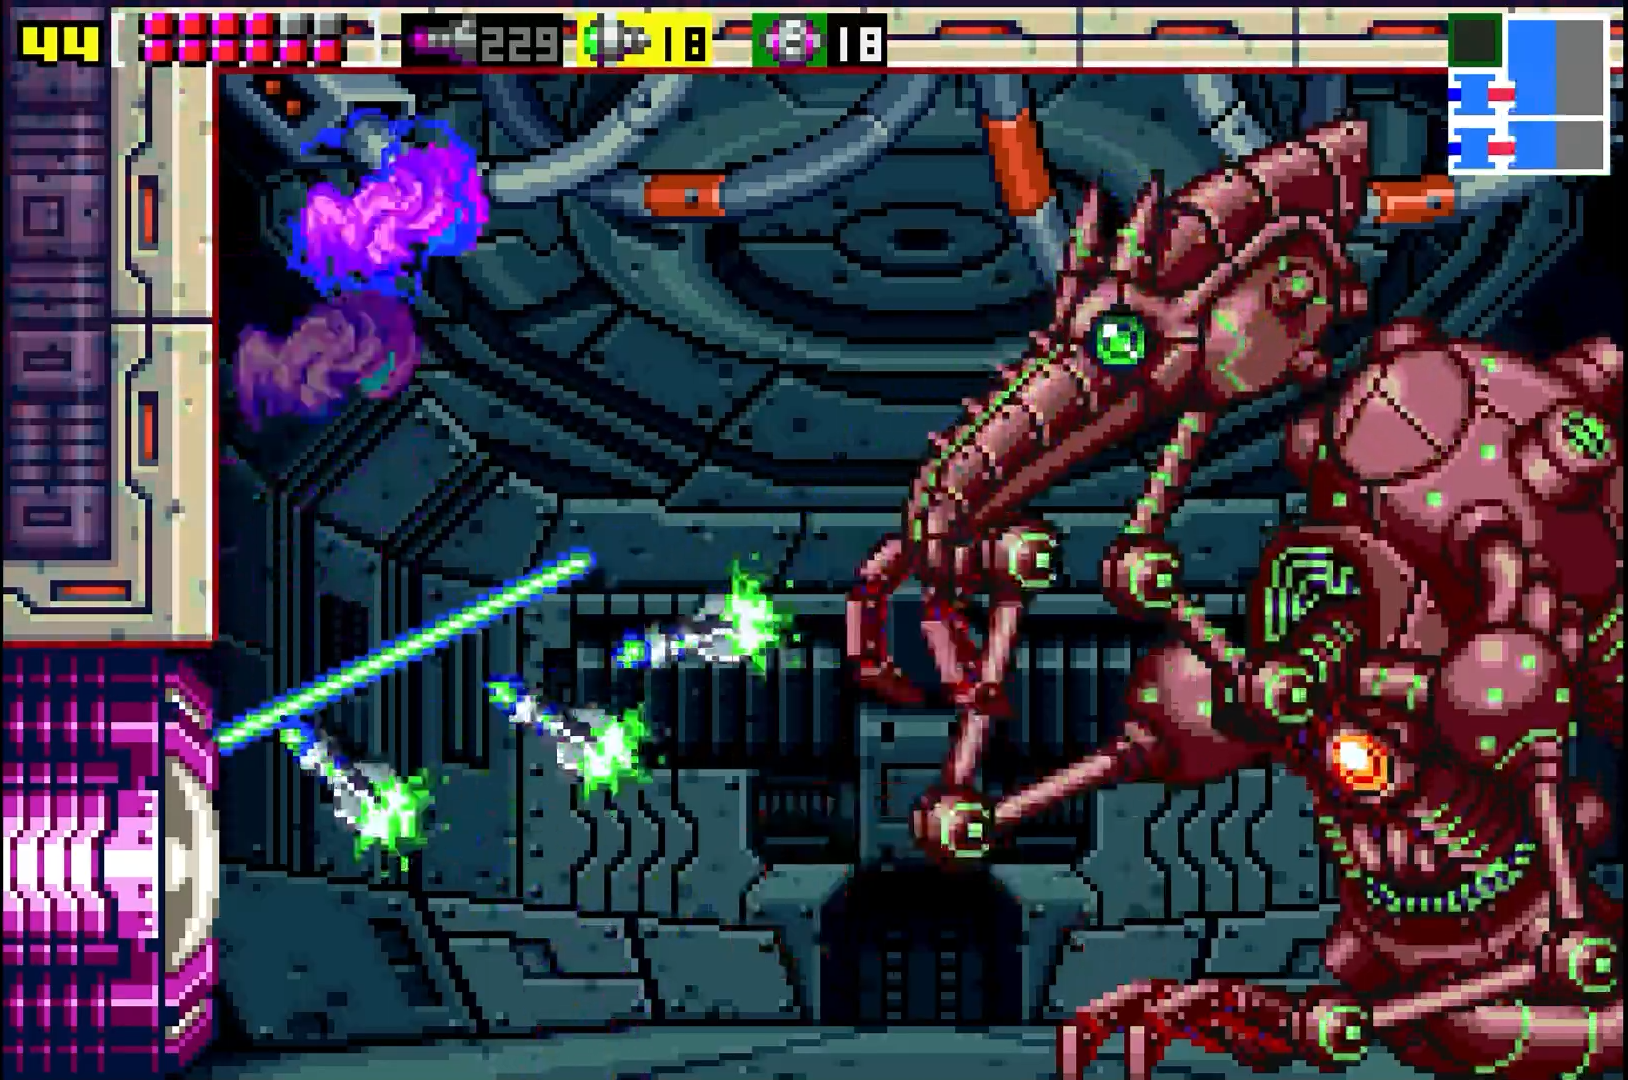
Ridley
HERE WE GO! Falling from the skies (in an incredible cutscene) is the Cunning God of Death, General of the Space Pirates, and Samus’s fiercest rival: Ridley!
If you’ve played Super Metroid previously, you’re in luck, since this battle is almost identical, with a key exception being that Zero Mission’s Ridley takes far fewer missiles to defeat. That’s no reason to get sloppy, however, so let’s take a deep look at Ridley.
The first thing you need to know is, like many other battles against Ridley in the series, this isn’t a boss you have to think too hard about damaging. There’s no weak point, no series of moves needed to make him vulnerable; you just need to hit Ridley. The only part of the Space Dragon you’ll want to avoid firing at is his tail. His tail is completely invulnerable, and it moves around at such an erratic pace that shooting anywhere on his backside is just a waste, so concentrate your fire towards the front side of Ridley. Another thing – don’t be conservative with your regular missiles! We’ve gone out of our way to collect a bunch of missile expansions, and this is the time to use them! This battle will be a sprint, not a marathon, and you’ll take damage, so just make sure that you’re dishing out more than you’re taking. One thing to note though – save your Super Missiles! I’ll tell you when to use them for maximum effect, so don’t waste them at the beginning.
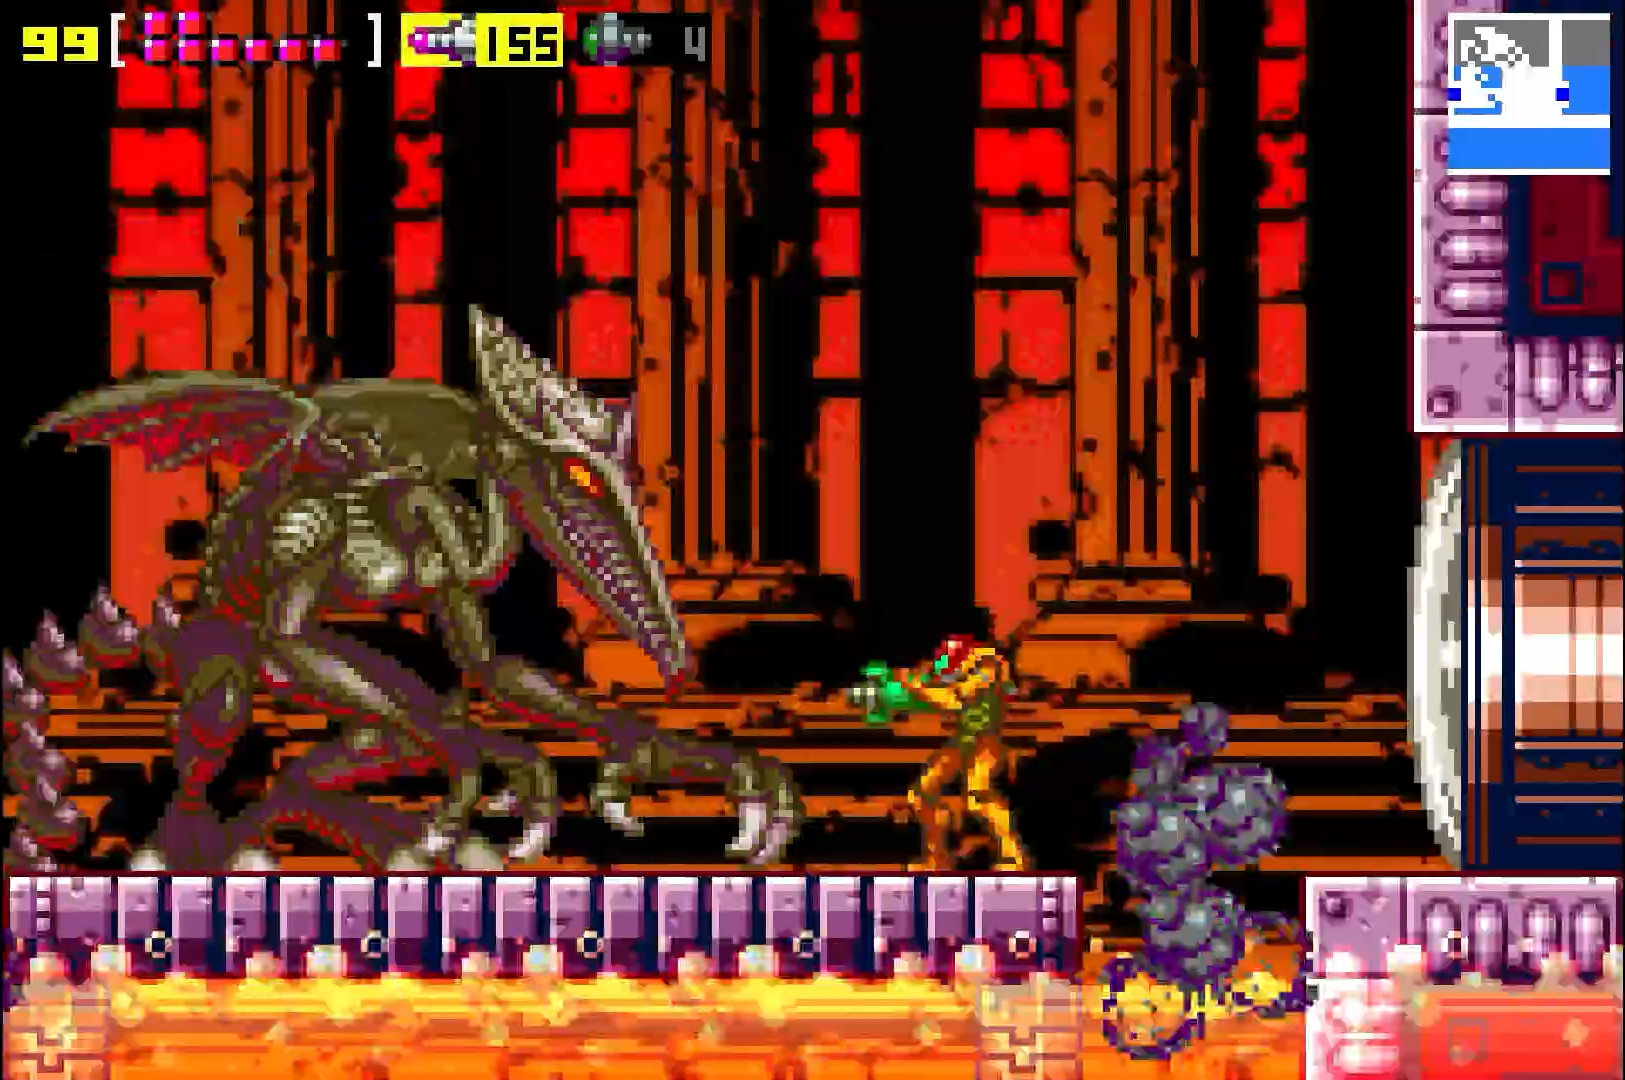
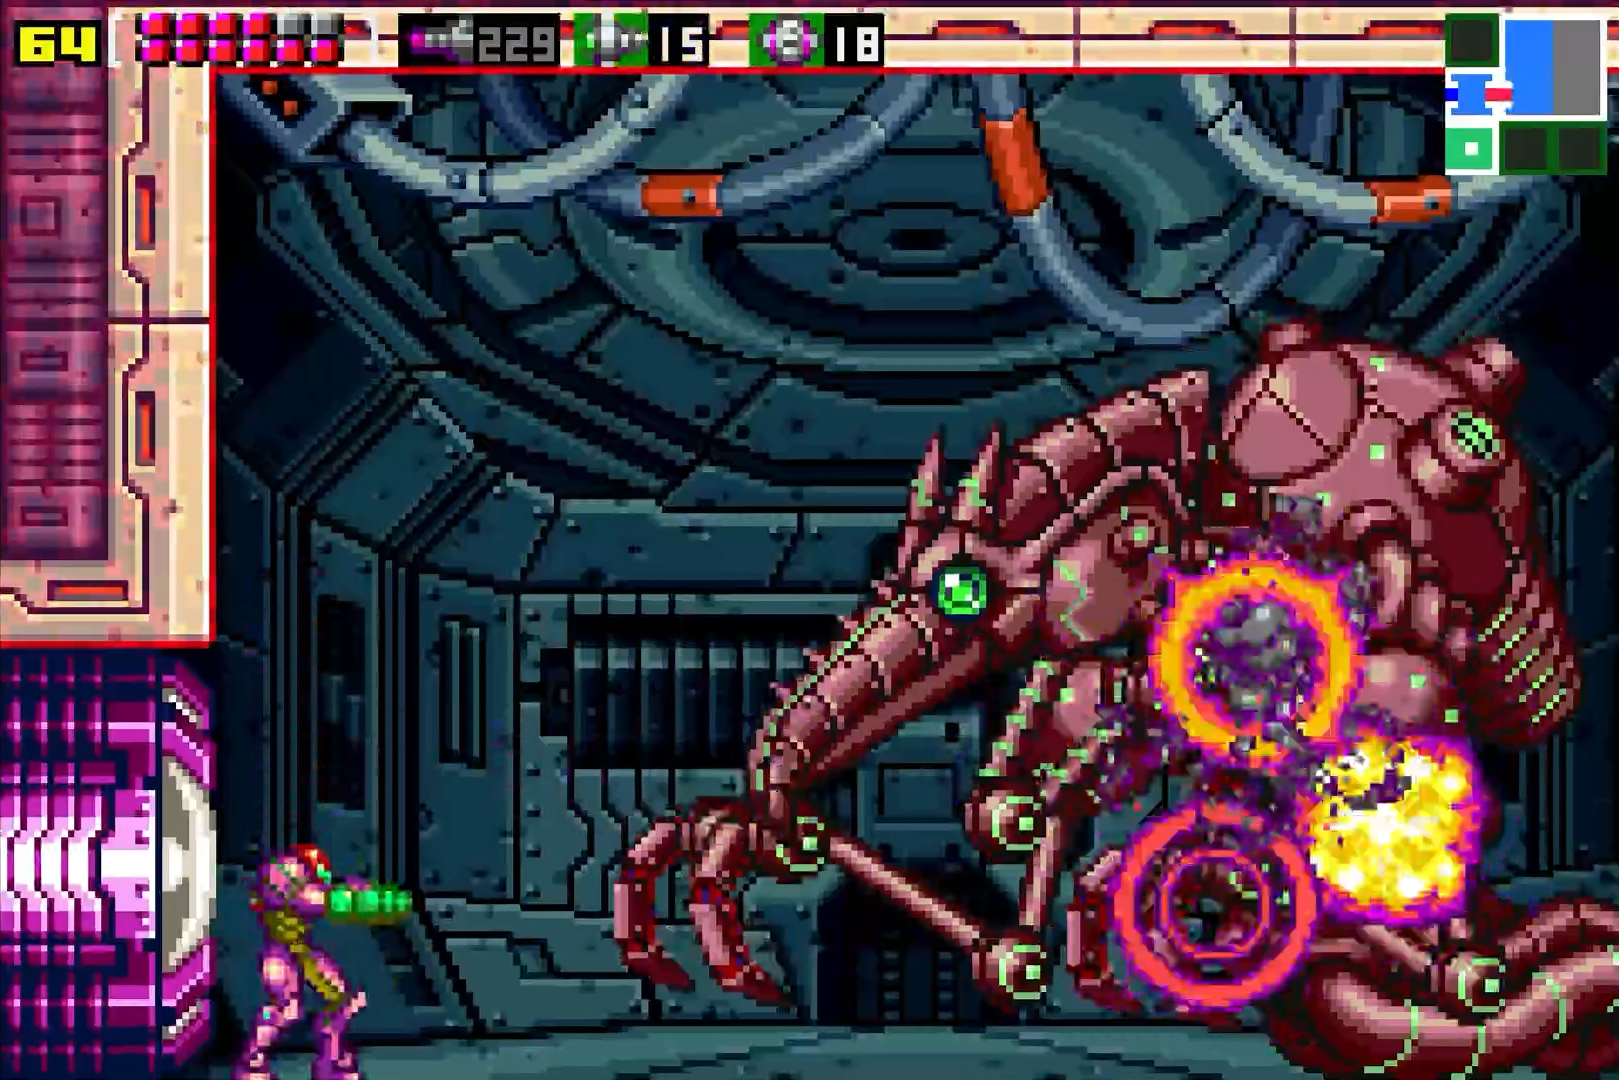
Ridley won’t just let us hit him of course, so let’s take a look at his attacks, and how we can actually turn one of his most fearsome attacks against him! First off – as is probably appropriate for a dragon, Ridley is going to use fire extensively to damage you. There are two different ways that he’ll spit out fireballs; the first is by shooting out smaller fireballs that travel in a wavy kind of pattern towards you. Avoid those as best you can, but it is a little tricky. Basically, just try and run under or around him. The second fireball attack is a little easier to dodge, luckily. Ridley will shoot out five or six bigger fireballs that travel in more of a straight line, making them easier to jump through. It’s worth noting also that either side of the arena has an opening in the floor with a bunch of lava under it, so don’t go falling in!
As mentioned earlier, Ridley’s tail can be a nuisance, and avoiding it is important, since it deals massive damage. Ridley’s tail will be swinging in circles, stabbing, flailing, and just going crazy in general, so keep an eye on it and try and keep your distance as best you can from it. Ridley will also use his tail to perform his trademark “pogo” attack – essentially, this is where Ridley points his tail downwards like a big sword and starts bouncing around trying to stab you in the head. Ouuuch. The Pogo is easy enough to avoid, however; you just need to have your timing right. When Ridley bounces back up, quickly run underneath him to the other side. Typically, Ridley will start his Pogo attack with his backside facing you, so if you can run under and get to the front, you’ll have a couple seconds to serve him a nice helping of missiles with a side order of charge beam.
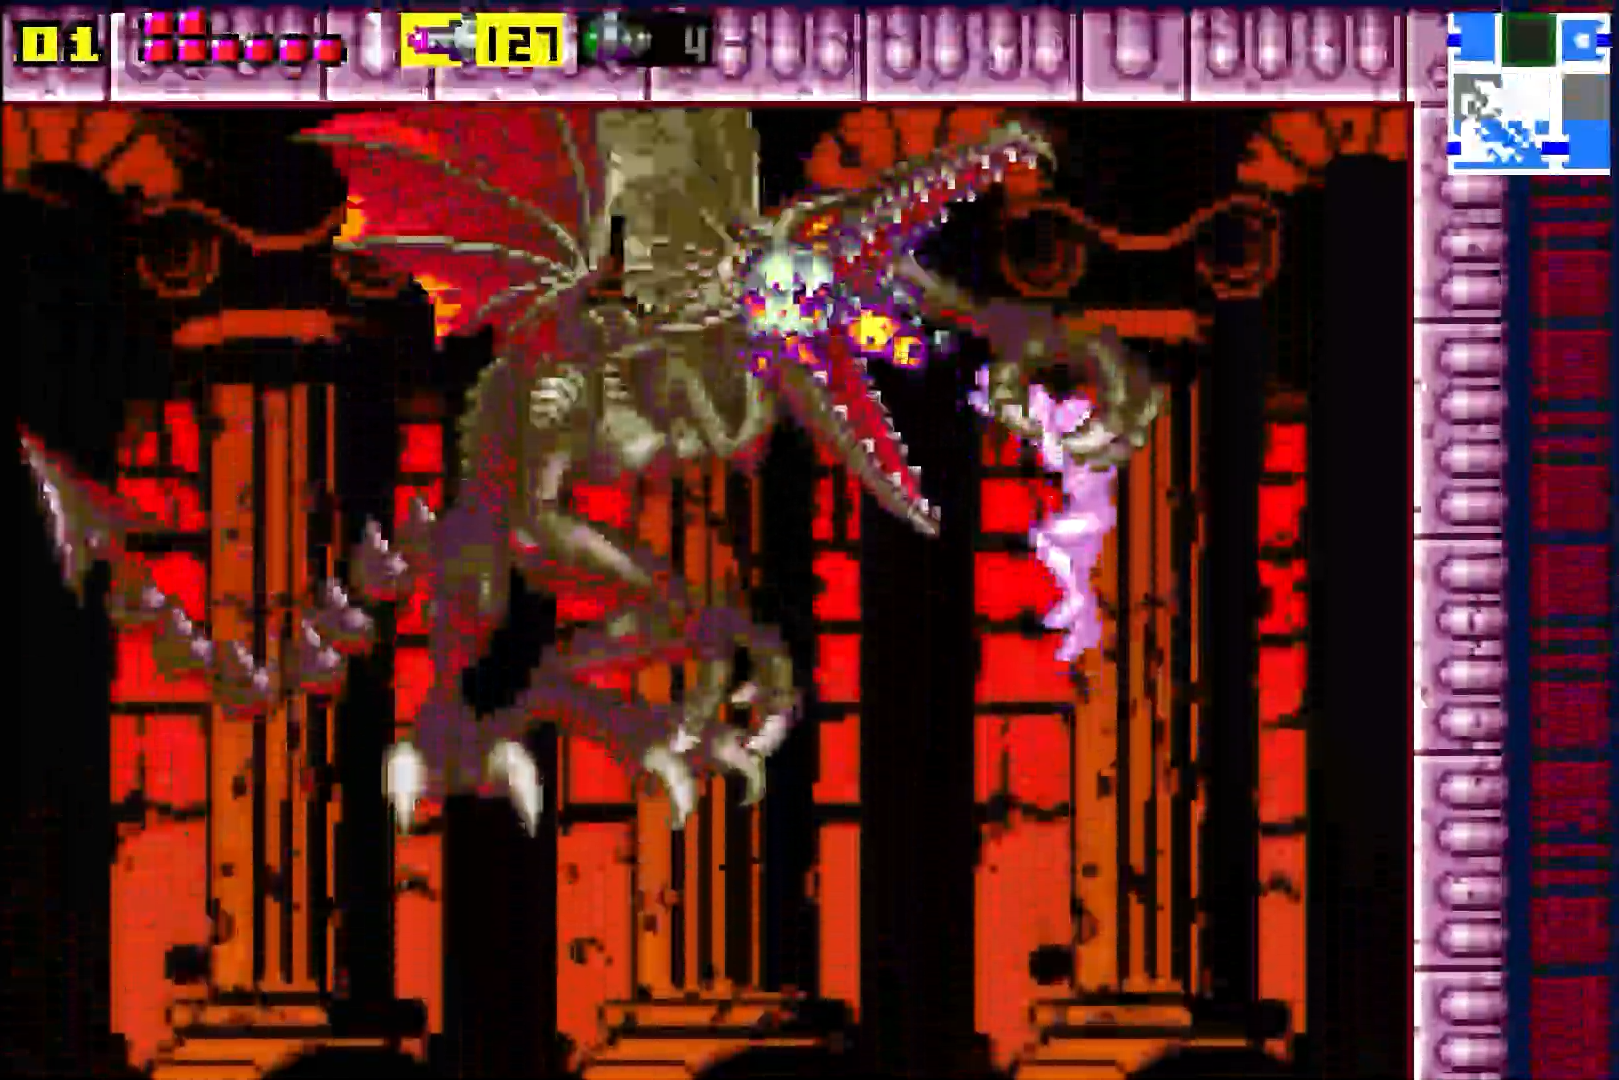
His last attack involves picking you up with his claws, flying to the top of the battlefield, and shooting fireballs literally right in your face. This sounds pretty devastating, and it can be, but this is actually a great opportunity. As I mentioned earlier, we want to deal out more damage than we receive, and if you saved your Super Missiles like I suggested, now’s the time to use them. The battle with Ridley can be fairly chaotic, with a lot of movement in a small arena, Ridley’s tail going nuts, and lots of moving parts; this can make aiming a bit tricky, and when it comes to Super Missiles, we want to make these count. Fortunately for us, when Ridley picks you up and starts shooting at you, he himself stops moving and everything generally comes to a standstill. While he’s holding you, activate your Super Missiles and fire them directly into Ridley’s face as he’s pelting you with fireballs. Six direct shots with Super Missiles will put Ridley on the brink of death, which makes the damage that you took while he grabbed you totally worth it.
You can repeat this strategy again with regular missiles if you have enough health. If that play is a bit too risky, just keep avoiding all of Ridley’s attacks as best you can and pummelling him with missiles. Worth noting though is that the longer this battle goes, the worse off you’ll be. My suggestion here is the best defense is a good offense, so a degree of risk to accomplish that won’t be the worst thing, cause either way, you’re going to be taking heavy damage.
Keep it up, and in due time, Ridley will be destroyed.
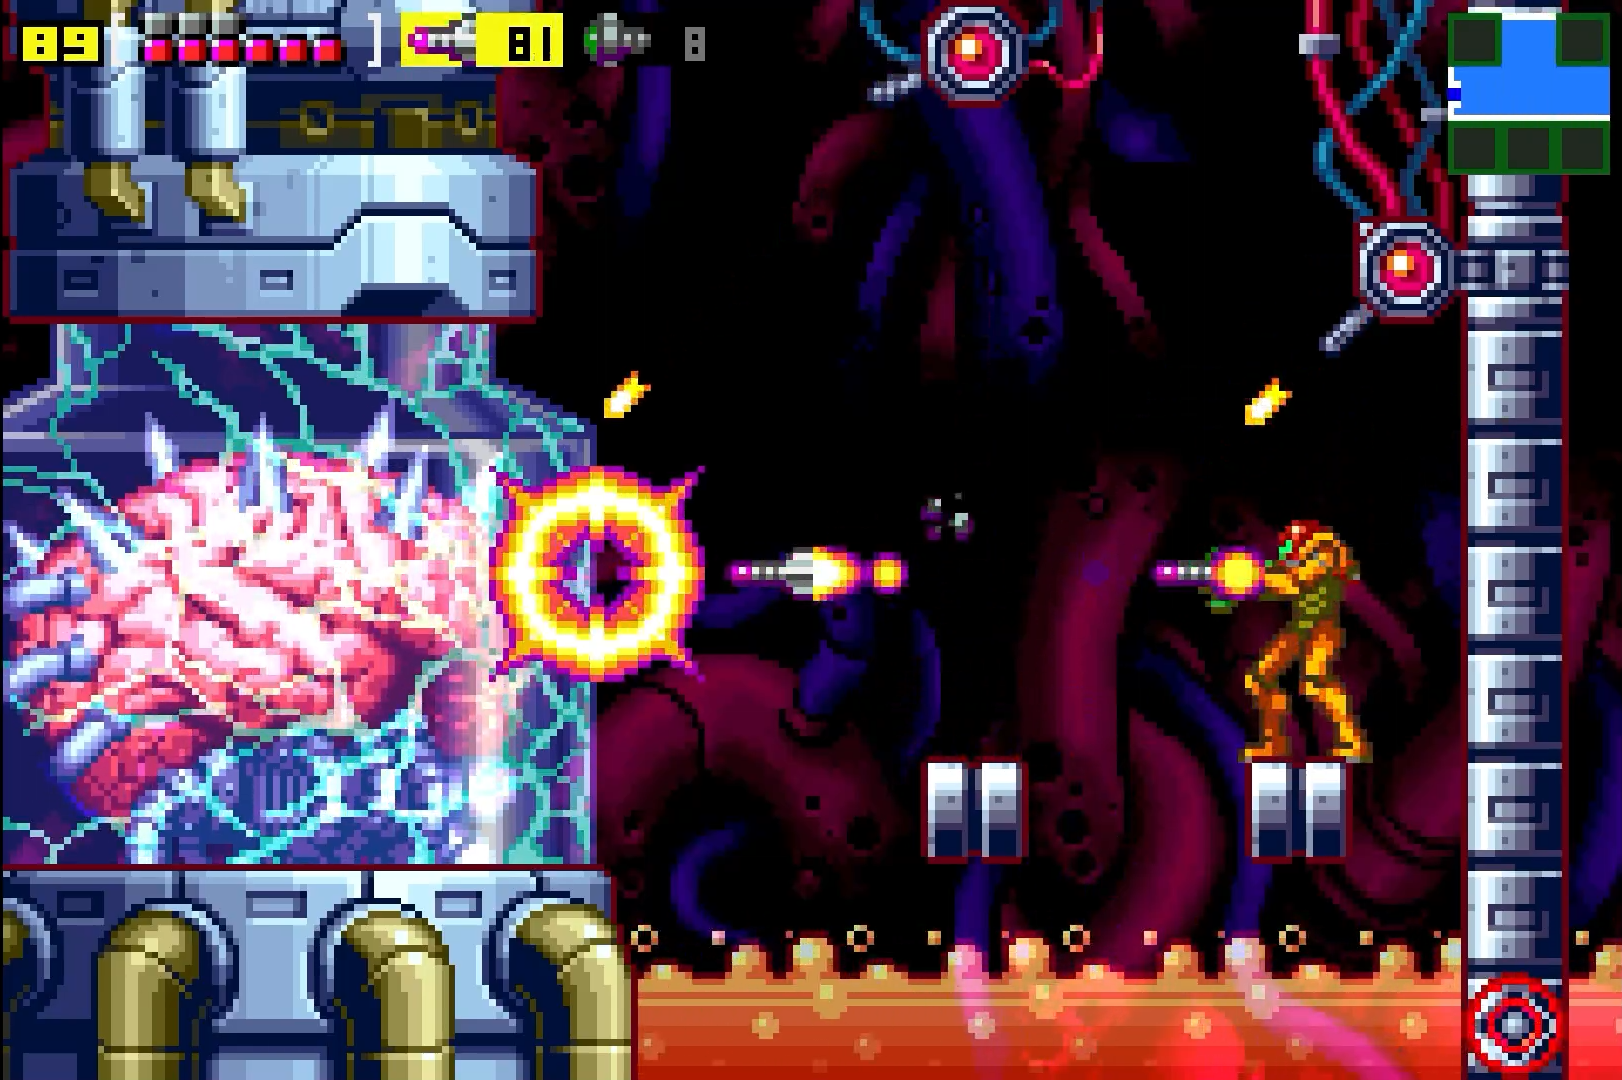
Mother Brain
It’s time to face off with the brains (ahem) of the Space Pirates herself, Mother Brain! This should be familiar to everyone, but just to set the table here – you’re going to have to deal with Rinka’s and turrets shooting unfreezable bullets at you the entire time. Just saying that now. You’re also going to have to contend with barriers called Zebetites that block your path to Mother Brain. These Zebetits can be destroyed with missiles, but be warned – if you don’t finish them off quickly, they will respawn and make you start from scratch to destroy them. Believe me when I say every missile is precious here, so make sure you make no mistakes on them.
I would personally save your super missiles for now, but quickly and cautiously destroy the Zebetites in front of you and press forward. I would be particularly swift with your missiles once the ground is filled with lava. Each Zebetite should take around 7-10 missiles to destroy it, so aim true, and try to avoid as much damage as you can.
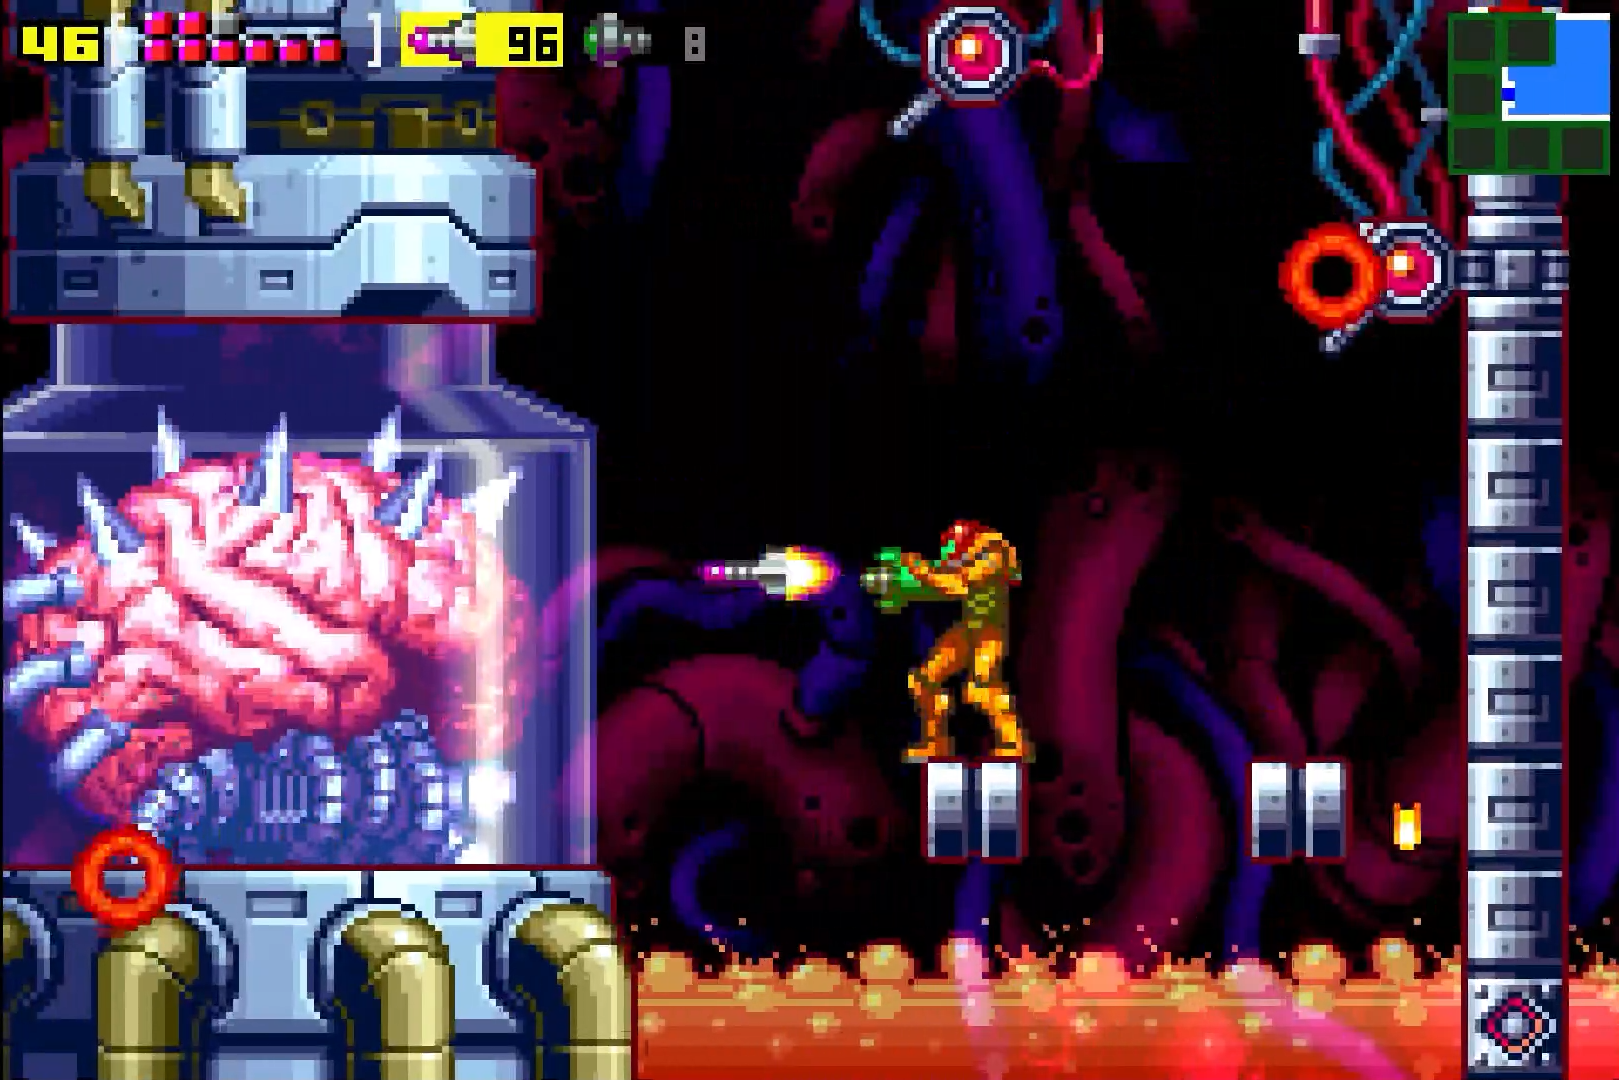
Once you destroy the final Zebetite, jump over the last pillar and you’ll be face to face with Mother Brain. You’ll have two incredibly small platforms to stand on, lava on the floor, and stuff coming at you from every which way.
A good strategy is to try and freeze the Rinka’s if you can. This was essential in NEStroid, and while the frequency of Rinka’s is lower here, it’s still a good idea to get rid of any obstacle that you can. When it comes to the turrets, there’s no way to destroy them, but you can Screw Attack jump through their bullets and they won’t damage you. Your best bet is to keep an eye on them, and when they shoot, jump over to the other platform.
As for Mother Brain herself, pump the glass tube with as many regular missiles as you can. Eventually, the glass will shatter and she will be exposed. Hold on to your horses though, because you’ll need to attack Mother Brain in a specific way to damage her. Once the glass shatters, you’ll still have to contend with all the other threats, but this time, Mother Brain herself will attack you.
From her one eye, Mother Brain will shoot a big laser at you. Now, this is actually fairly easy to avoid and it’s telegraphed ahead of time, so you shouldn’t get caught. You’ll have a second or two after she shoots to crouch and quickly line up a missile shot. Now is the time to use your Super Missiles. Hit her right in the eye and keep moving after. You’ll want to be patient here; you’ll only get one direct hit per eye laser, so take your time and don’t waste any Super Missiles.
Six Super Missile shots to the eye will be enough to destroy Mother Brain and activate the self destruct sequence.
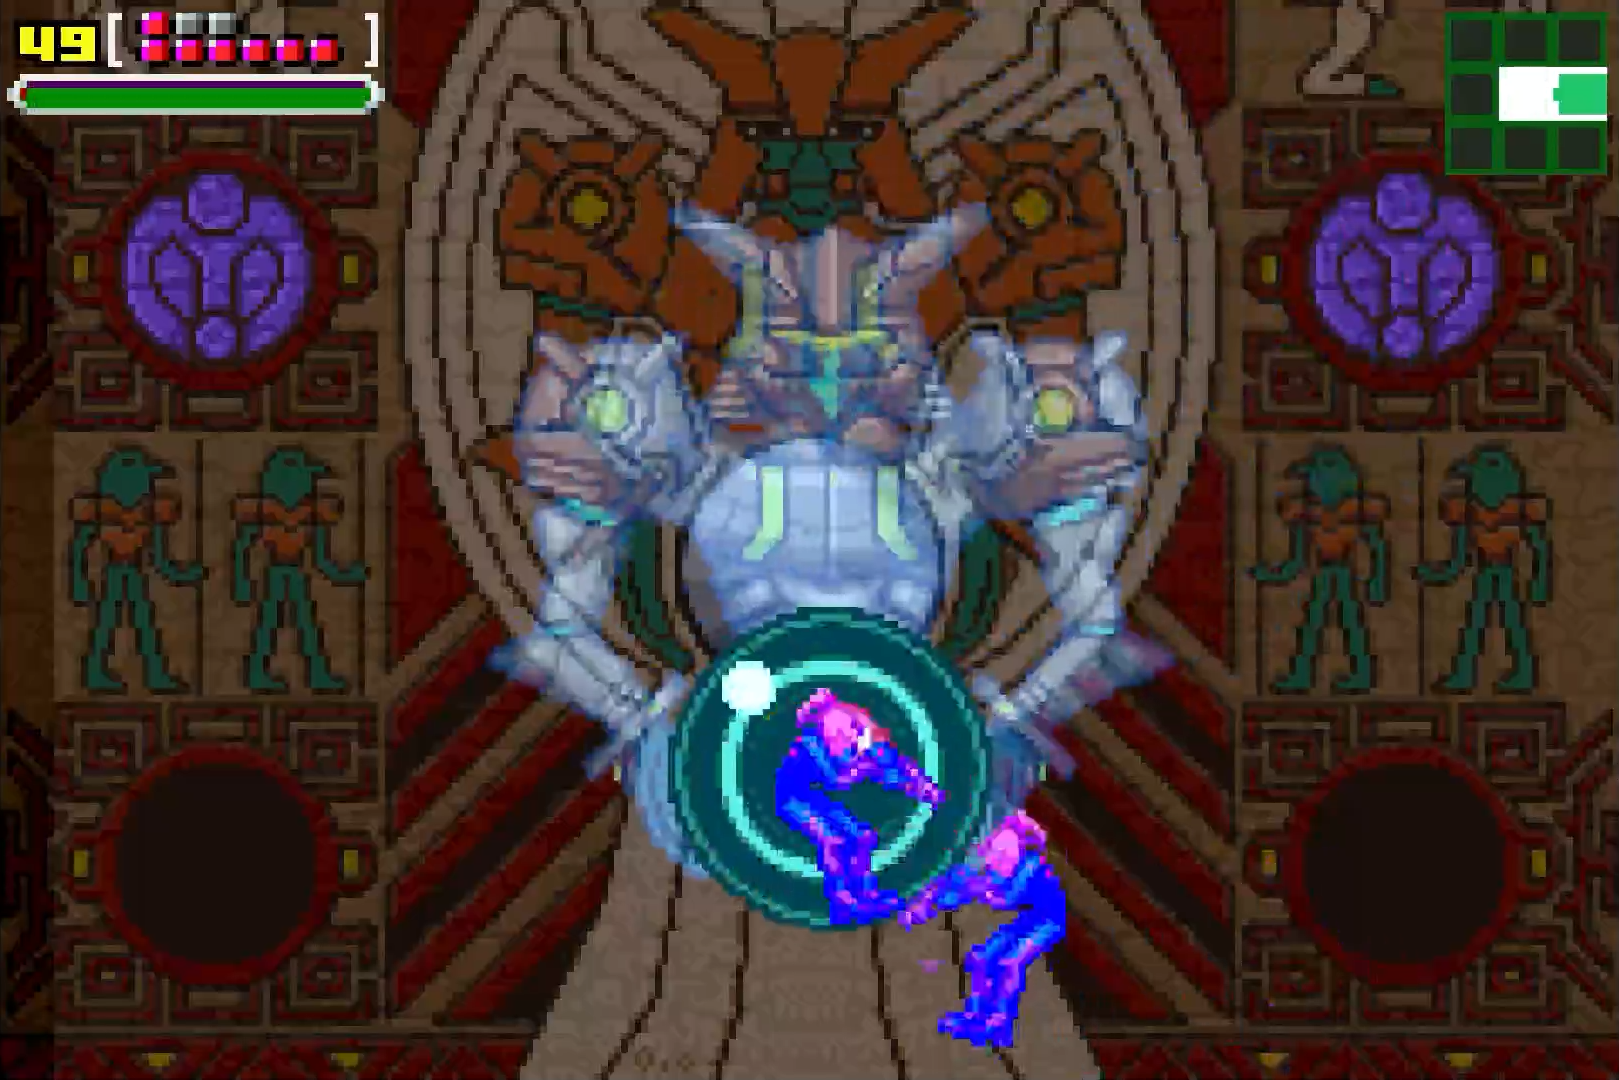
Chozo Test
Follow the hallway up and you’ll come into a new room where a cool cutscene will start playing. There will be lots of Chozo imagery, and maybe most intriguingly, some shots of Samus as a child, being raised by Chozo. Samus clearly remembers this room from her childhood, and for good reason: this is a boss battle unlike anything seen before or since in Metroid.
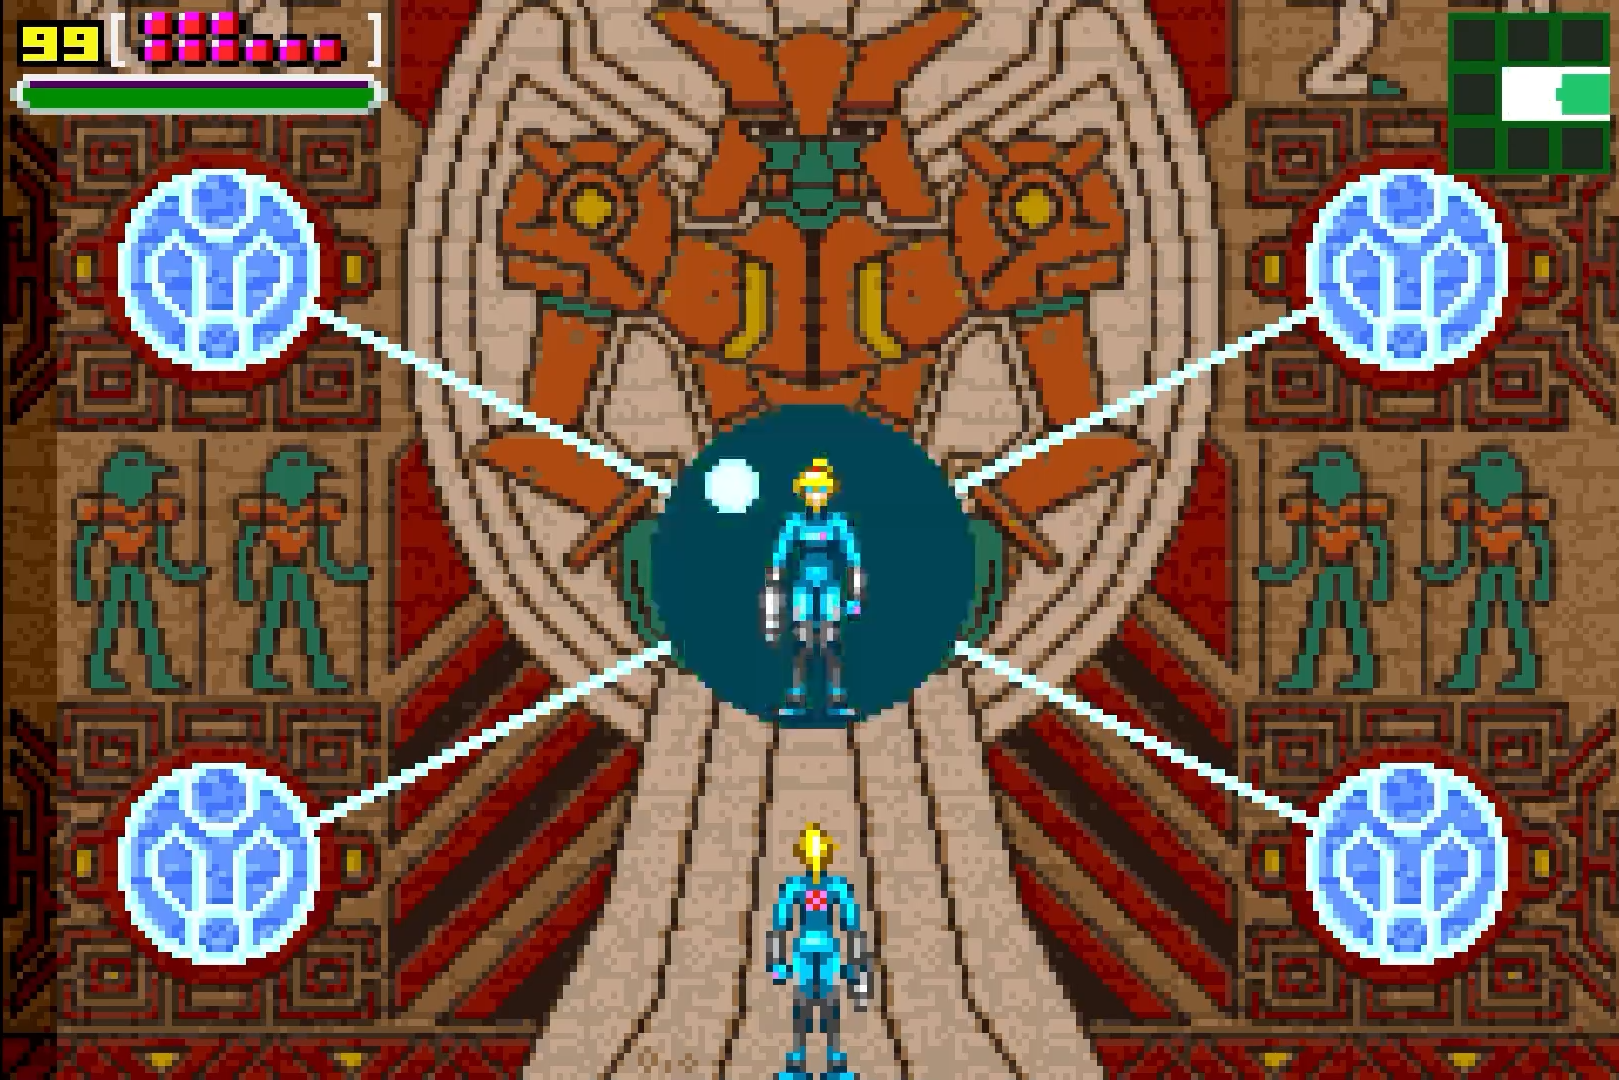
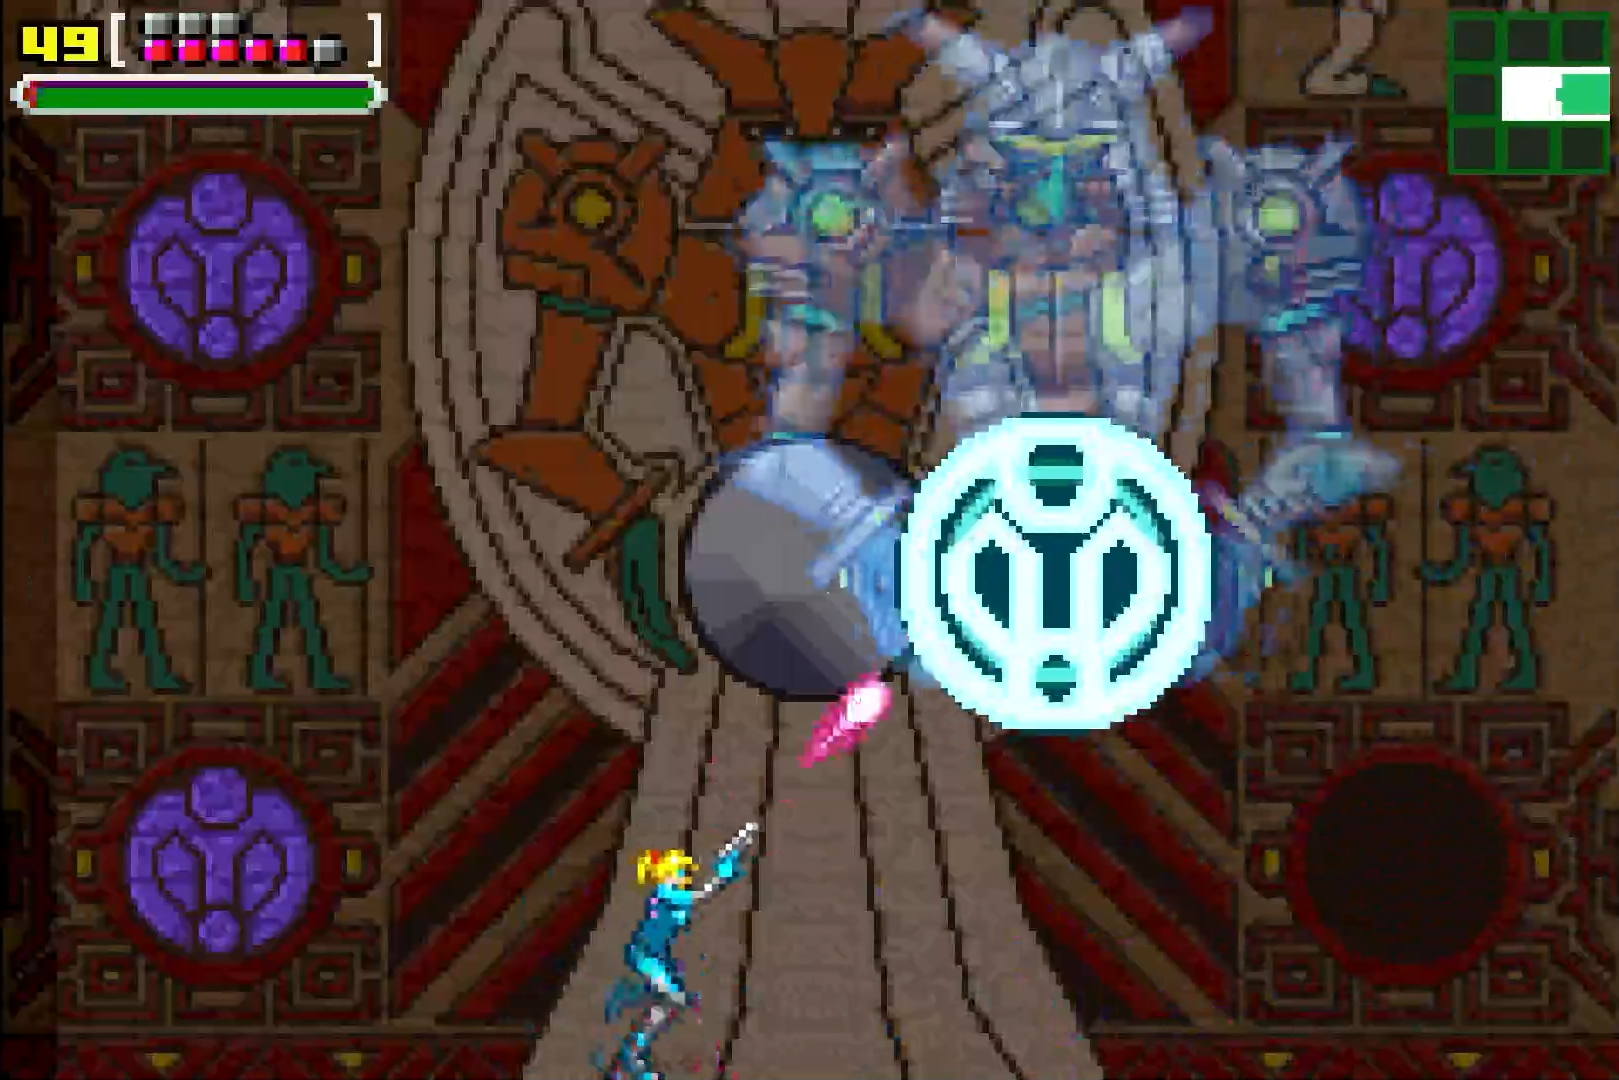
You’ll be in a room with a painting (hallucination is maybe the better descriptor?) that seems to be holding an orb. Inside the orb is a mirror image of Samus, and in each of the four corners of the room is a separate blank orb. What we’ll need to do is shoot the orb in the centre when it starts flashing and changes into a symbol. Shoot it when you see it change, and the first orb on the corner will be filled.
This seems easy enough at first, but once you hit that first orb, a hologram of this Chozo Warrior and the Samus orb will start floating around the room in different patterns. If you see the Chozo Test stop, then that means a bolt of lightning is about a second away from hitting you, so move! Furthermore, if you shoot the orb while Samus is still visible instead of the signal, you’ll take 50 units of damage to yourself, so don;t just go shooting willy-nilly. Lastly, hitting the Chozo Test itself will also damage you.
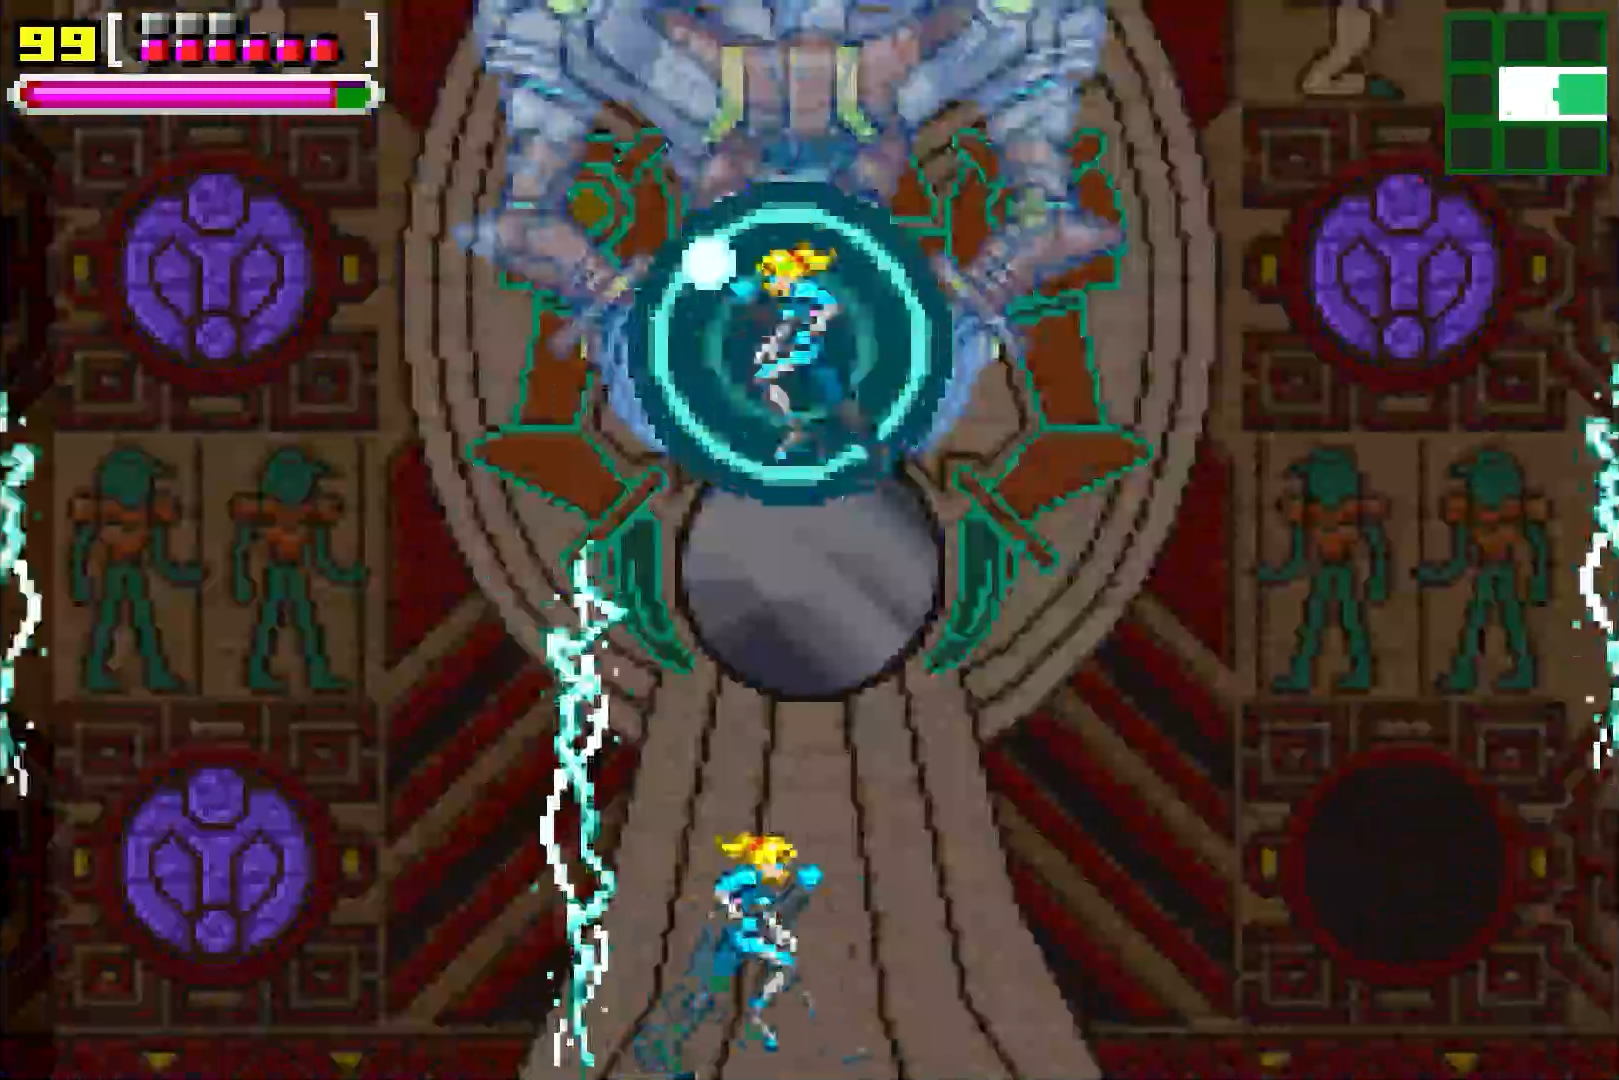
Hit the centre orb again to get the second corner orb to fill up, and repeat this again to fill the third corner orb up. Now things get a bit more tough. The Chozo Test should be moving very quickly now, so hitting and avoiding it will be tougher. Pay attention to how the Test moves, and you can kind of trace its pattern: it will swirl around the top right, swirl and move over to the top left, and then drop down and touch the bottom left corner, bottom centre, and bottom right corner of the room. It’s actually not that dissimilar to Ridley’s pogo attack. Just try and avoid it as best you can. Worth noting is that lightning will still fall down in this round, but there’s two different lightning attacks: one that will fall down straight over your head, and one that will strike the centre of the room, but send shockwaves across the floor when it hits.
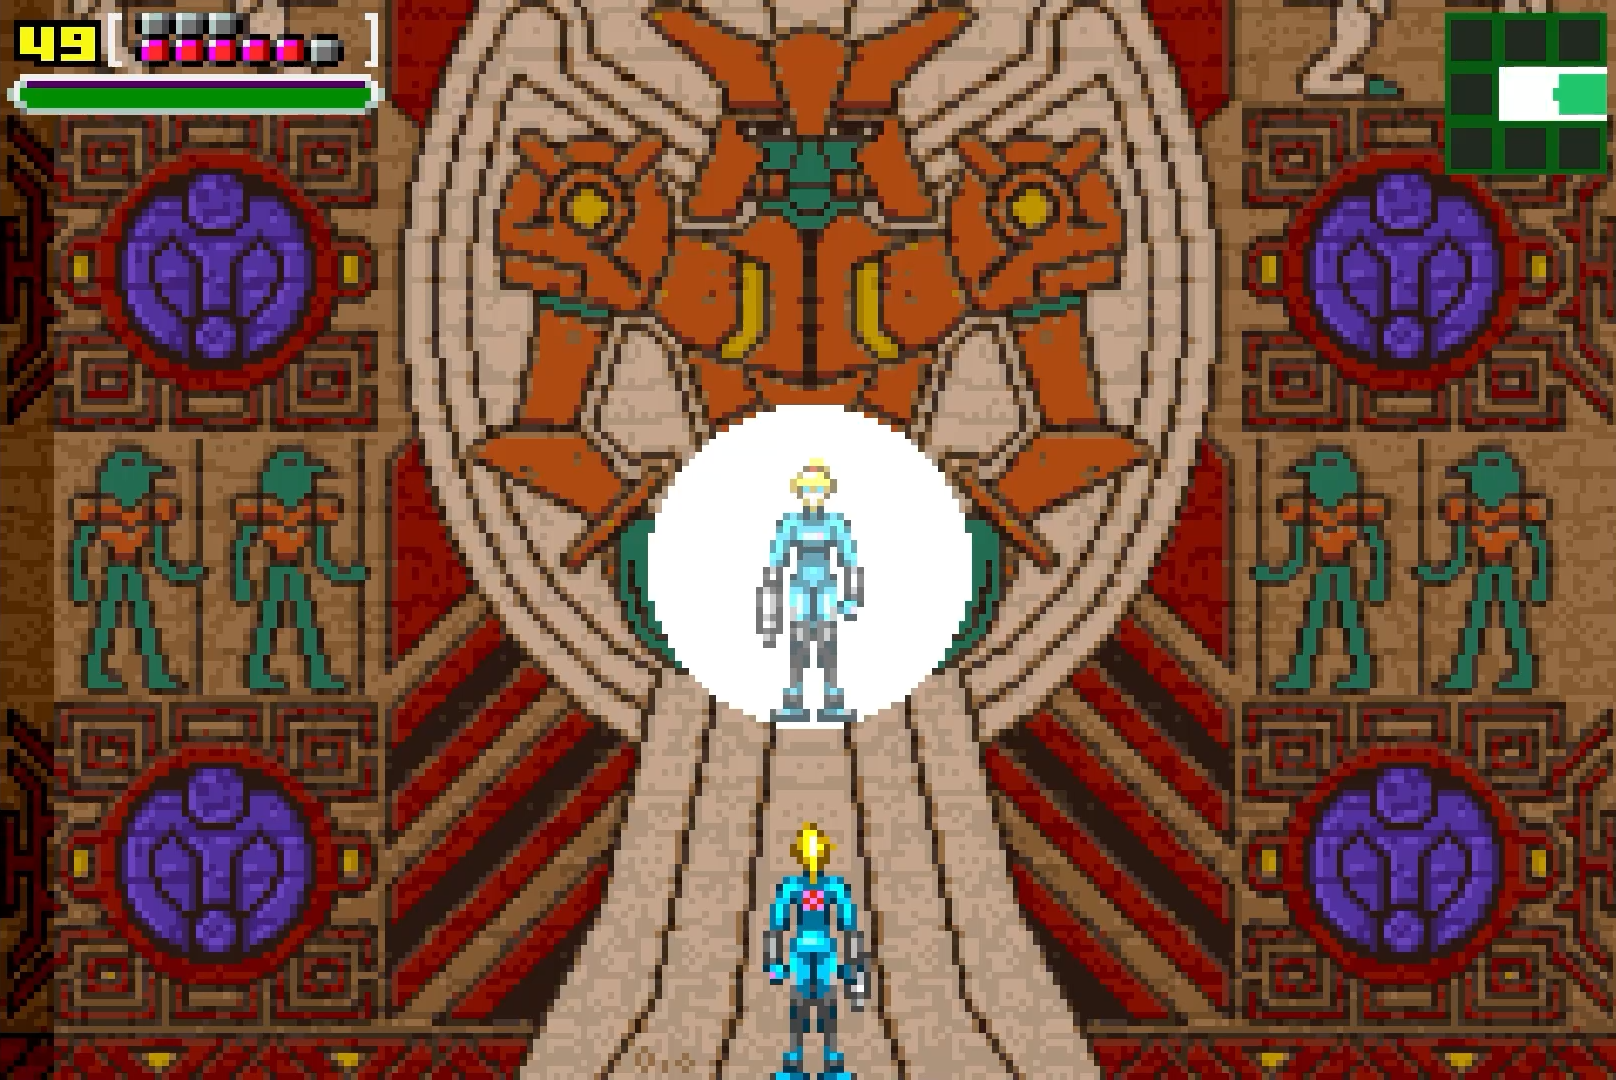
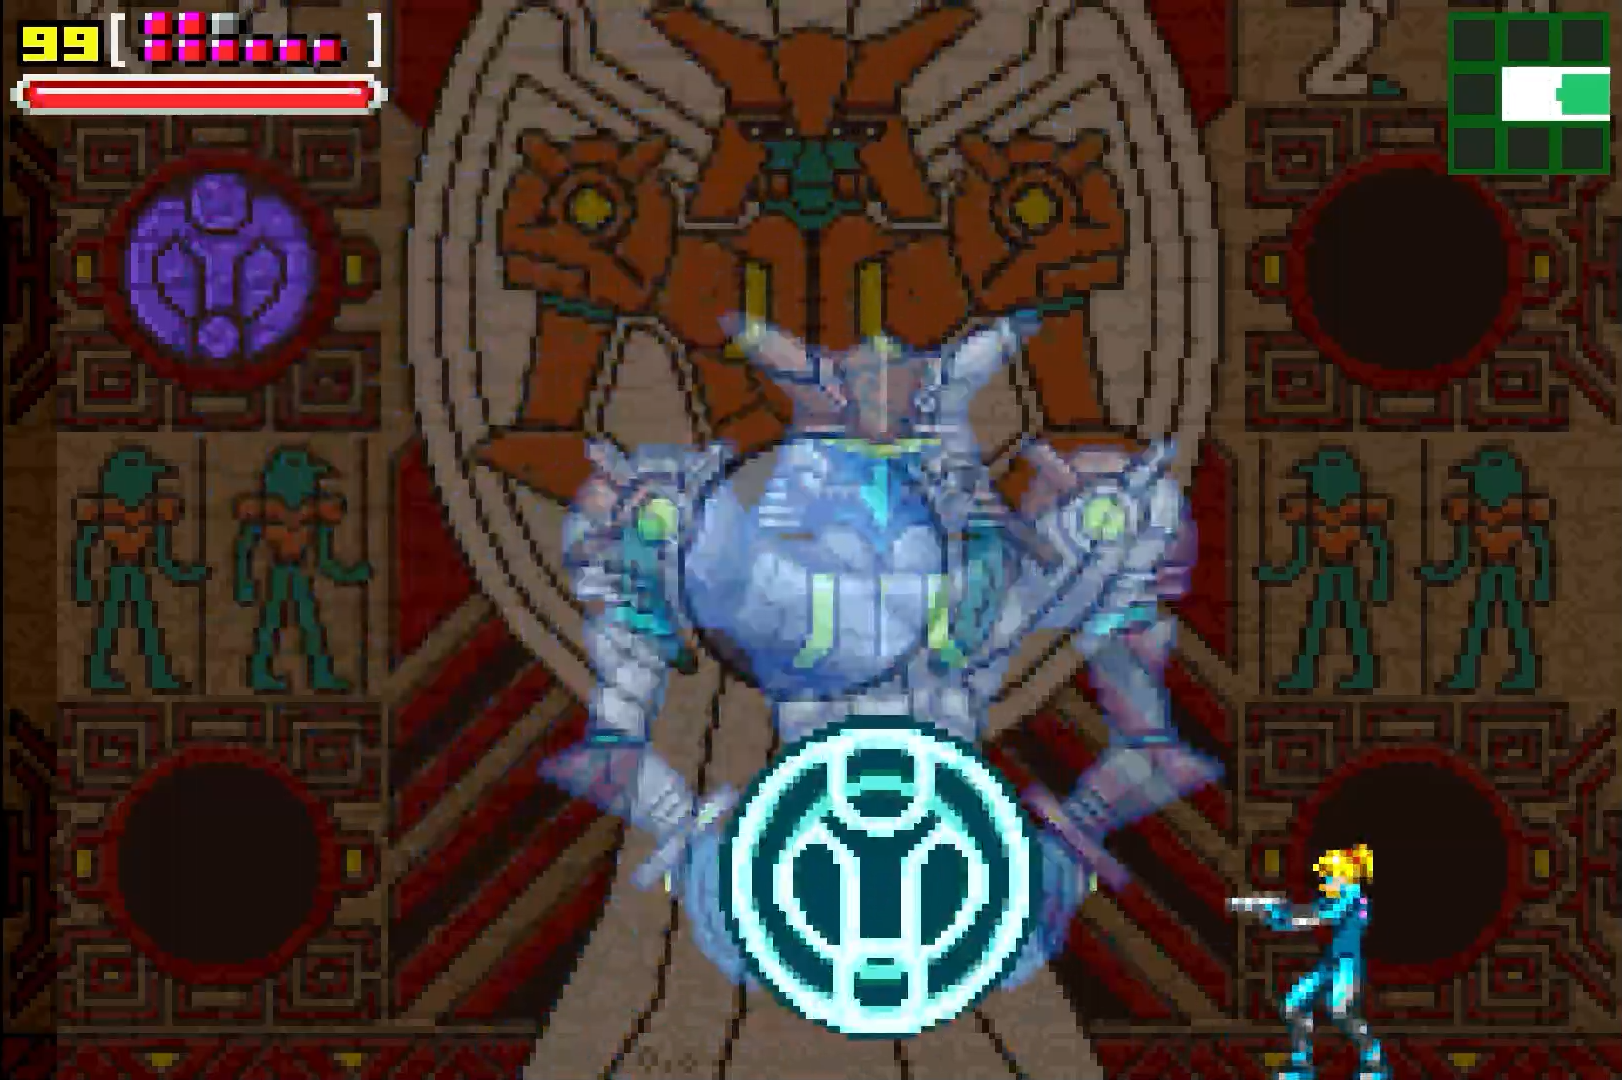
Hit the Chozo Test a fourth time and it will stop. With all four corner orbs now filled, Samus in the centre orb changes from wearing her Zero Suit to wearing her Power Suit. Your suit is back, and so are all of your abilities! Even better, all those items that you picked up that said they were Unknown Items? Not anymore! You are now at full power and equipped with the PLASMA BEAM, the SPACE JUMP, and the GRAVITY SUIT! Let’s go!!
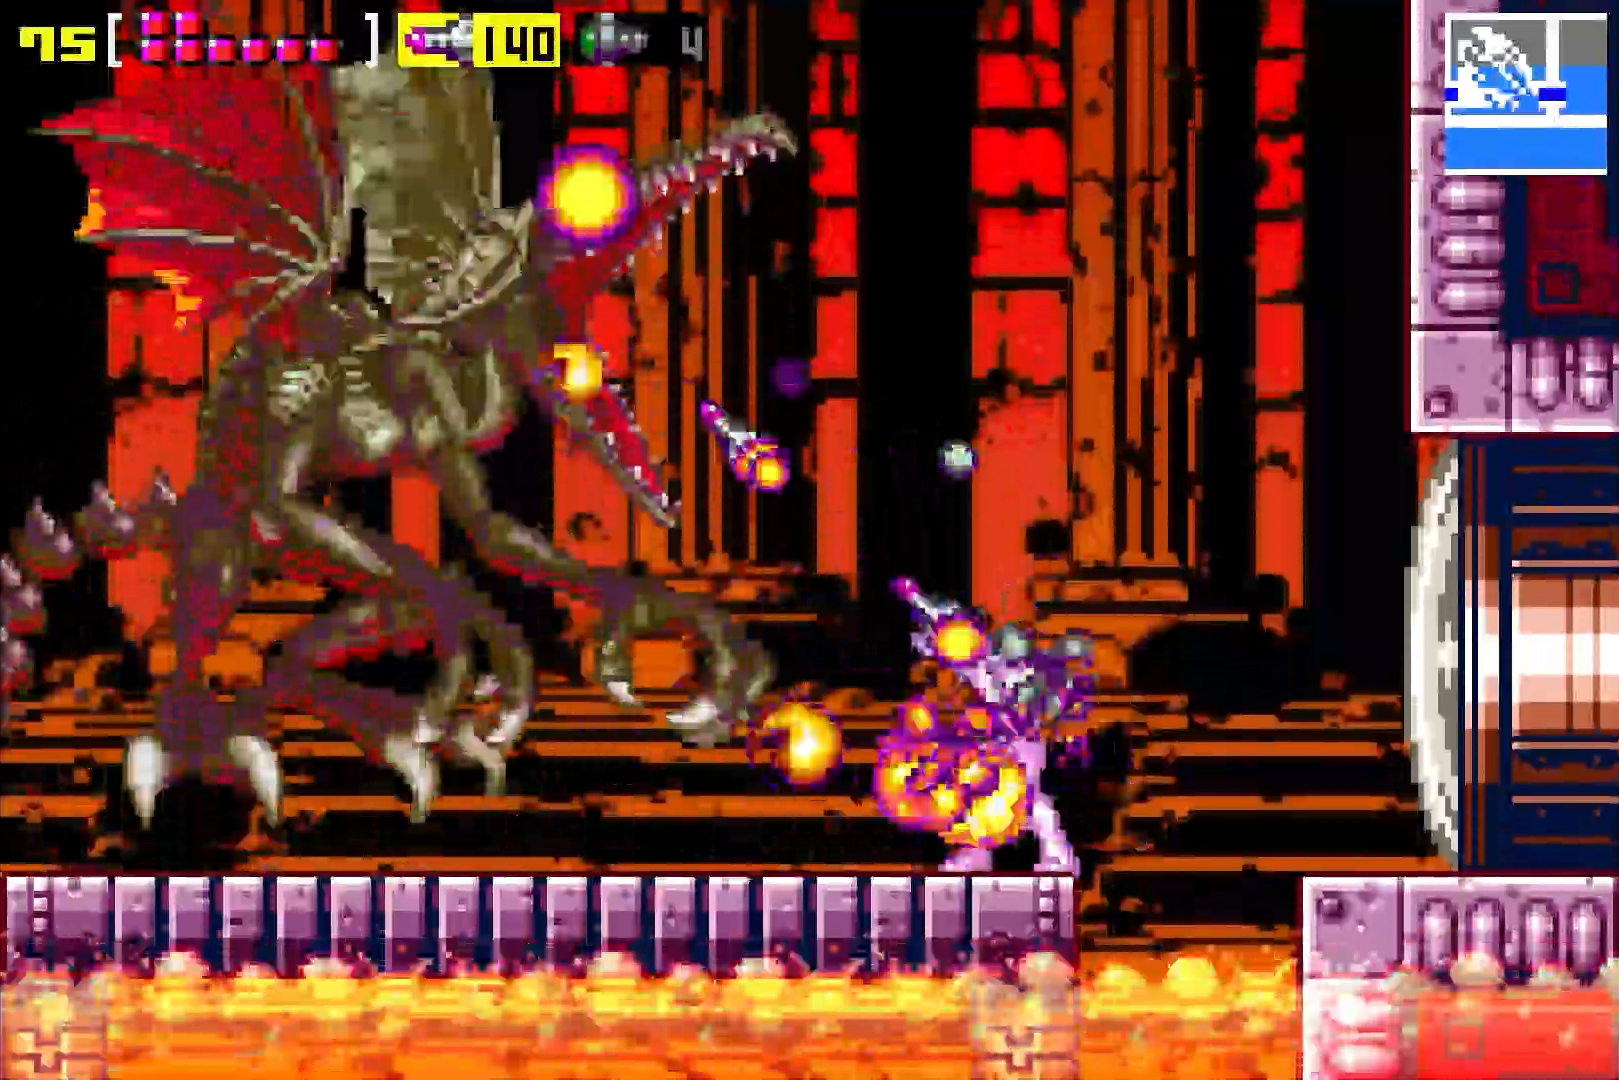
Mecha Ridley
This is where the Space Pirates will reveal their last weapon. This is where you will come face to face with the final boss of this game. This is where we meet the hulking war machine, Mecha Ridley.
The Space Pirates have built what looks to be a Meta-Ridley-prototype, complete with lasers, missiles, and devastating strength. Where Mecha Ridley differs, however, is in its agility. It’s actually fair to say that Mecha Ridley has more in common with Kraid than it does Ridley, as the robot will spend the entire fight on the right side of the screen, more or less stationary except for a few shuffles back and forth. Also, like Kraid and unlike Ridley, there is a specific weak point you’ll need to target; no guns ‘a blazing tactics here.
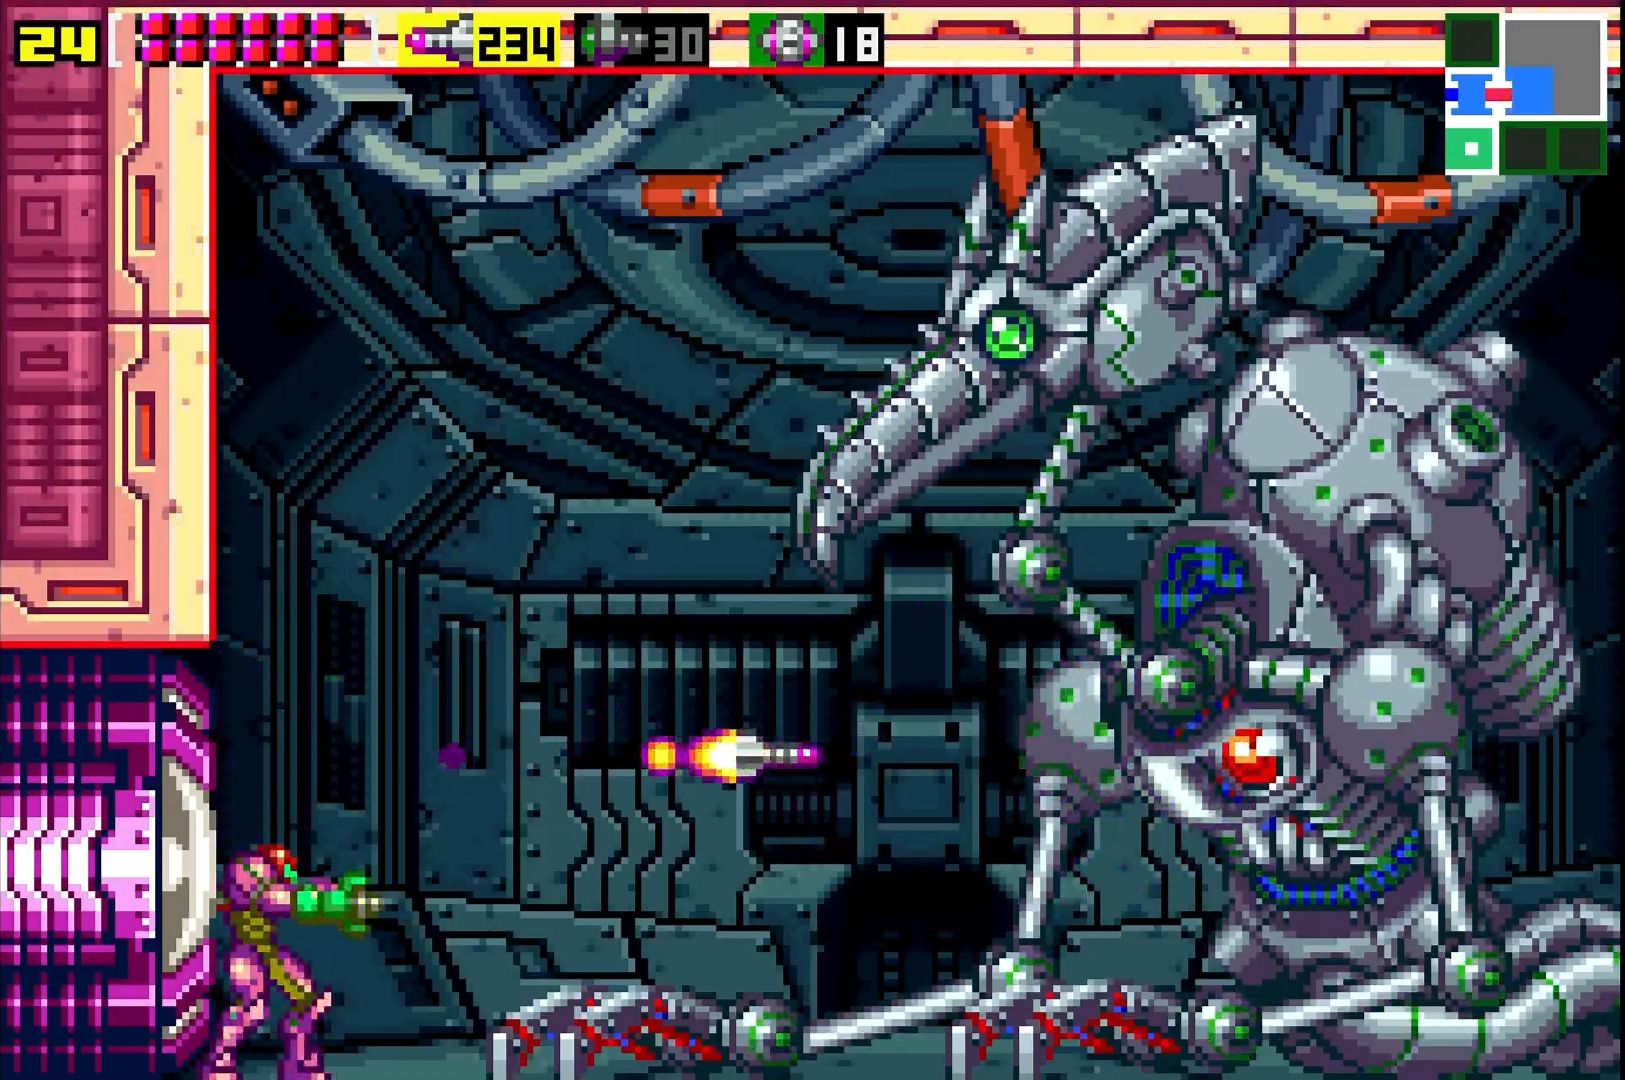
On the surface, Mecha Ridley looks incredibly formidable, but I’m here to tell you that, even without 100% powerups or health, there is no reason that we shouldn’t be able to easily defeat this final boss. If I can sound arrogant for a moment, I think there’s even a chance we could get out of this battle without taking a single hit. How? First, let’s break down the robot’s attacks.
Now, Mecha Ridley certainly has some tricks up its sleeve. Its go-to attack will be a simple but effective swipe of its claw. This will land for some big time damage and is really hard to avoid if you’re standing on the ground. Likewise, Ridley will shoot out fireballs at you that will be hard to avoid if you’re standing around. The fireballs will shoot in an upper-diagonal and lower-diagonal sequence, alternating between the two.
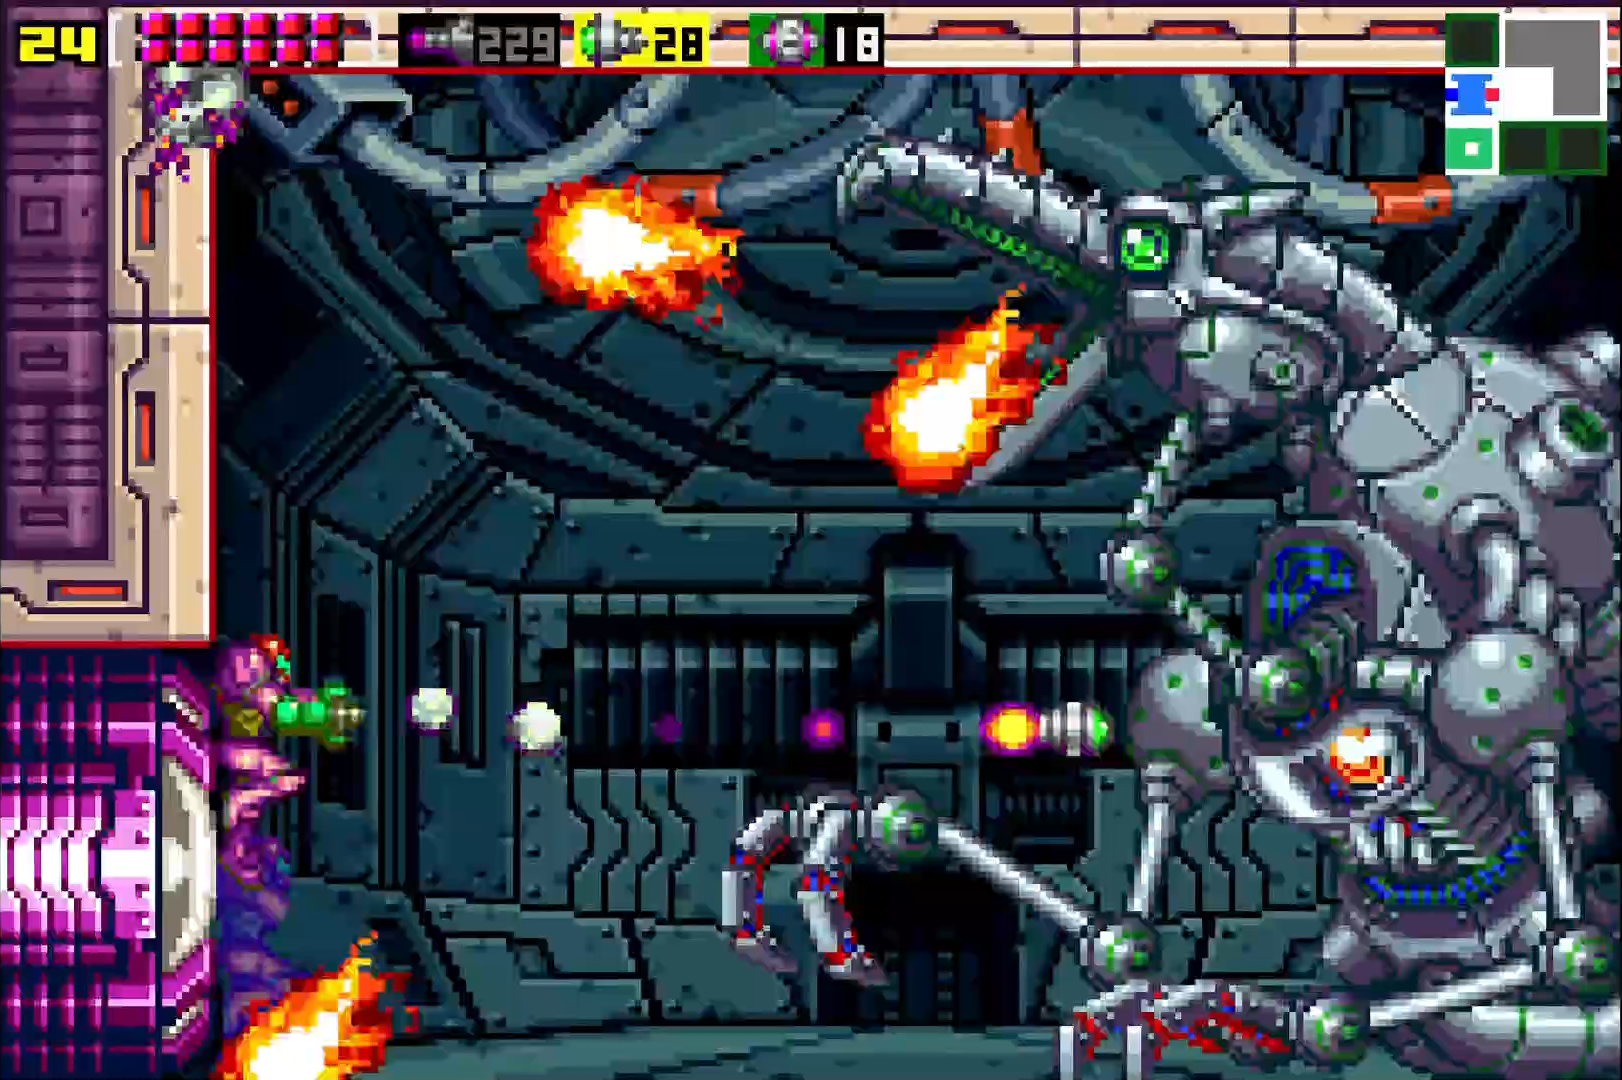
Mecha Ridley will fire off laser beams in almost exactly the same way as it does the fireballs. These, you’ll just have to avoid and the lasers will also be shot out in various directions. Lastly, once Mecha Ridley has taken some damage, it will release three homing missiles that will track you down and explode on impact.
This all sounds pretty bad, right? Don’t worry. You can dodge almost every single one of Mecha Ridley’s attacks by Space Jumping to the top left corner of the room.
That’s right. Essentially every single attack can be avoided by just jumping upwards. The vicious claw swipe? Just Space Jump in place at the top left corner and it won’t hit you. The lasers and fireballs? Space Jump in either the top left corner or middle wall – this one you’ll need to move slightly – and you should avoid it. And best of all, the missiles Ridley shoots at you? Your Screw Attack will destroy them AND they’ll drop health and ammo. Avoiding Mecha Ridley’s attacks is easy and doesn’t require much precision with your jumping.
As mentioned, this war machine has a single weak point: a flashing orb on his chest, again, very reminiscent of Meta Ridley. There will be a glass casing protecting the weak spot. You can either use Missiles or Super Missiles to break the casing, up to you, but I might suggest saving your Super’s for after the case is broken. Dodge all of the attacks and fire a few missiles at the casing and it should destroy.
Once the weak spot is exposed, switch to your Super Missiles and let ‘er fly. We didn’t acquire all of these expansions for nothing, so don’t be shy about letting your most devastating attacks go. You won’t need missiles after this, so go to town. You’ll need to aim carefully, but not so carefully that you’ll likely end up missing shots.
As long as you keep Space Jumping and avoiding the robot’s attacks, and as long as you keep peppering it with Super Missile after Super Missile, Mecha Ridley will fall in short order, setting off the Pirate Ship’s self-destruct fail-safe.