


Metroid: Samus Returns Walkthrough – Area 6: Diggernaut’s Domain
Walkthrough
- Return to SR388
- Area 1 – Ancient Chozo Ruins
- Area 2 – Hydroelectric Station
- Area 3 – Aeion Mines
- Area 4 – Crystal Caverns
- Area 5 – Flooded Greenhouse
- Area 6 – Diggernaut’s Domain
- Area 7 – Chozo Laboratory
- Area 8 – The Nest
- The Last Metroid
Metroids in Area 6
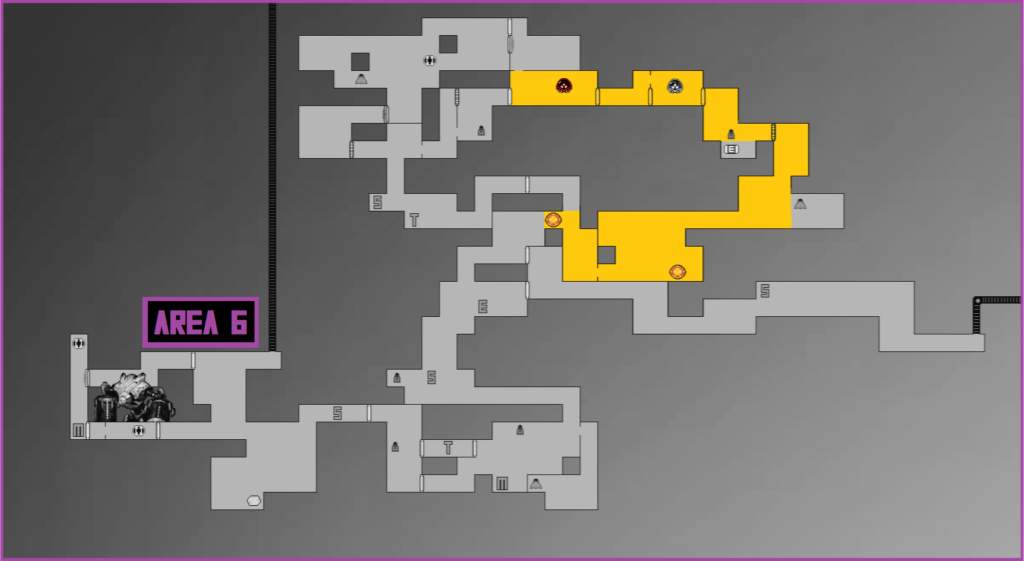
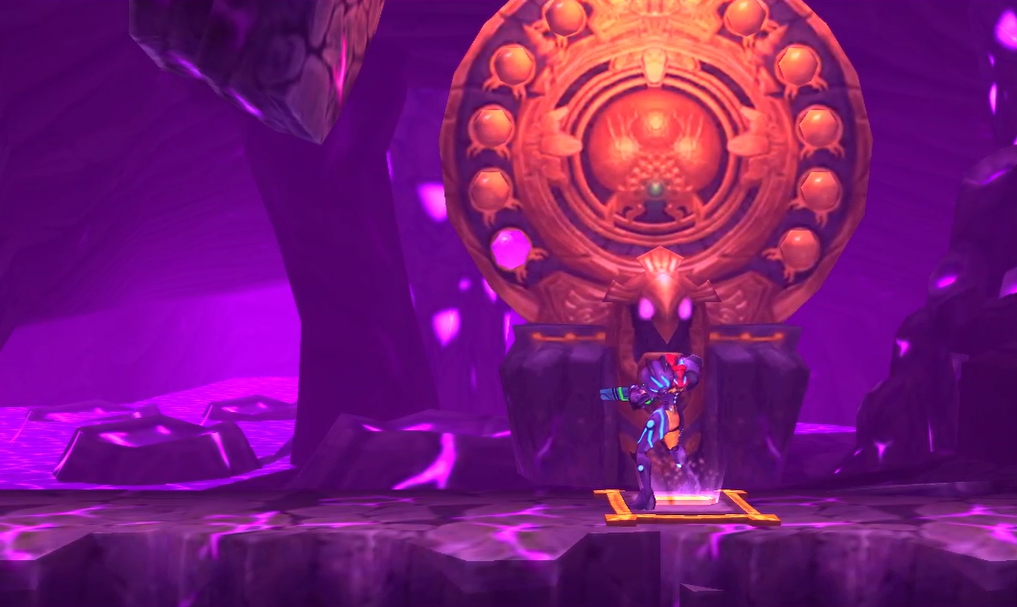
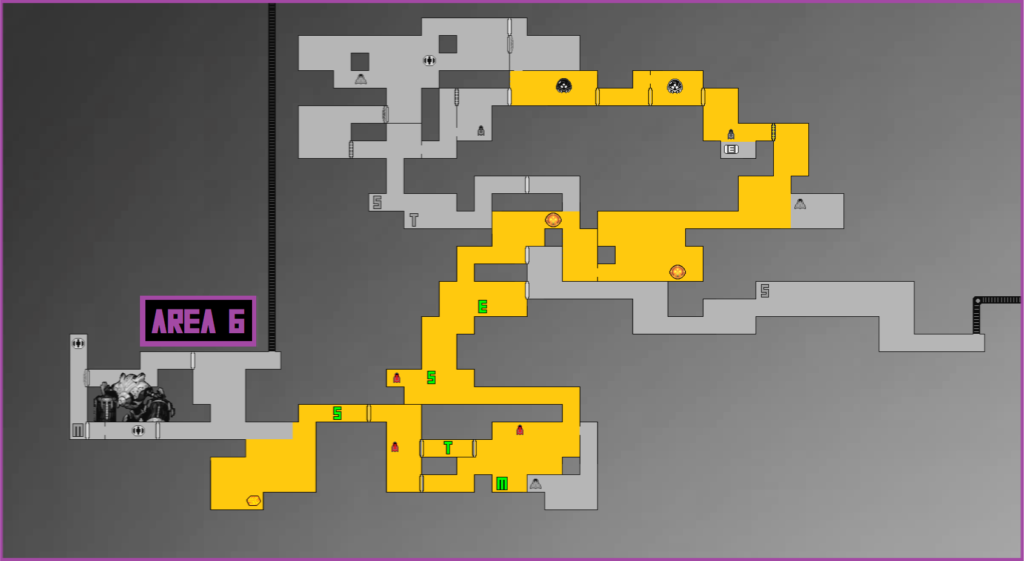
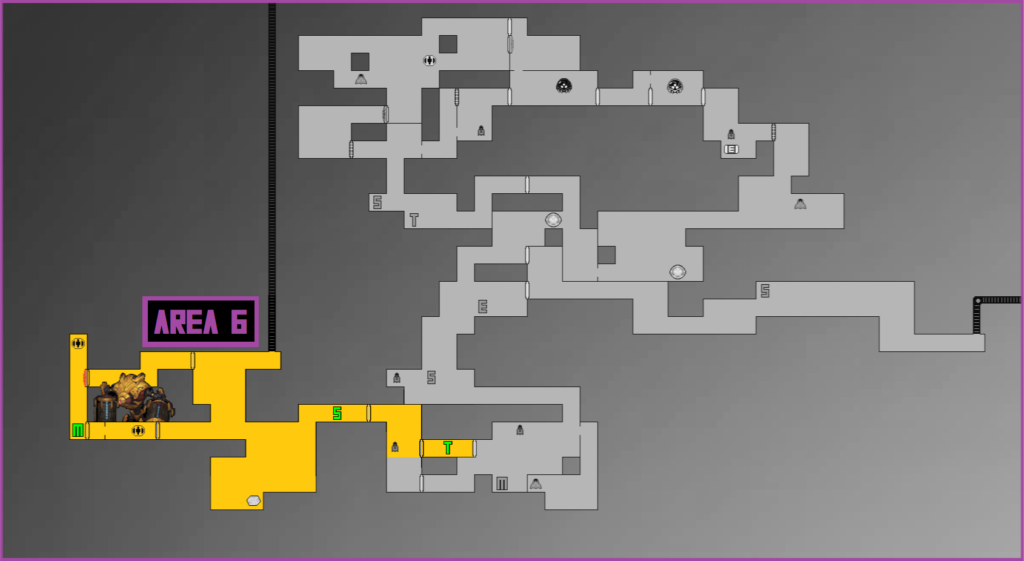
Deeper and deeper we go… Area 6 has all the familiar purple caverns and acid in its initial landing area, although this particular cavern is full of giant skeletons. Makes you wonder what used to live here – and what could have killed them off? Nevertheless, press forwards on the path until you reach the Chozo Seal (this is a much longer path than usual). I’ll leave it up to you to get there, but when you hit it, you’ll see that only one Metroid is needed for this Seal. Hmmm…
It’s pretty much a straight path forwards, so keep following it; you’ll run by a Teleportal, so make sure to activate that. Hit the Save Station and keep pressing forward. Go through the charge beam door in the top left corner and you’ll FINALLY be out of the purple caverns, although frankly, Area 6 itself isn’t much nicer.
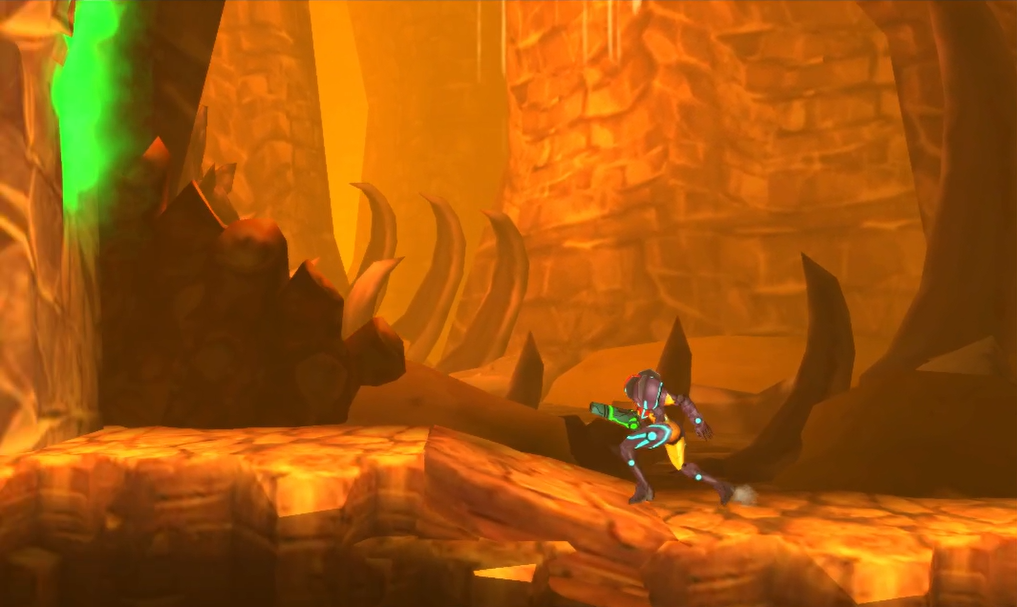
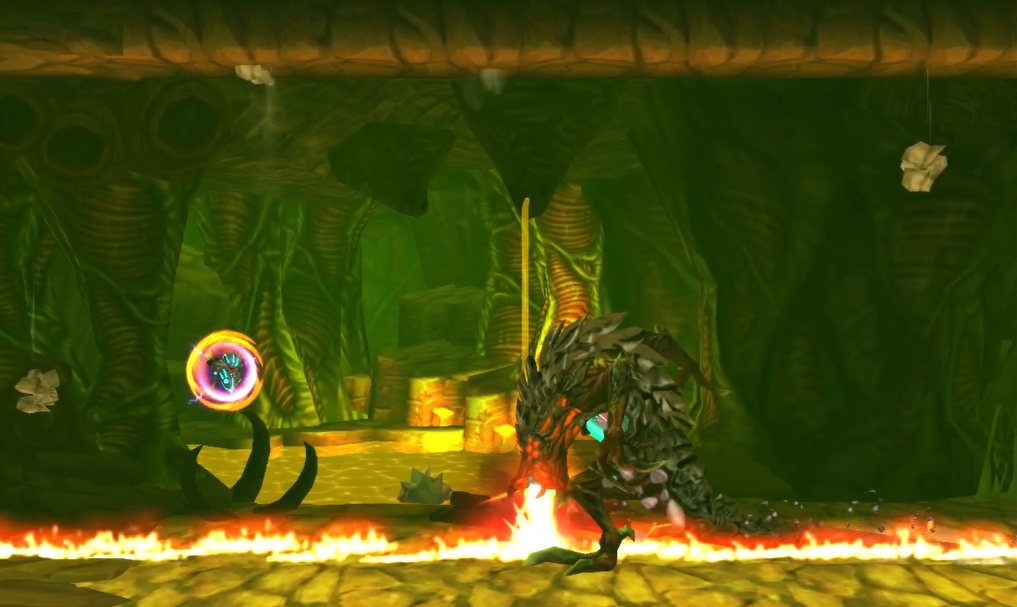
You’ll be in a big orange-tinted room with several massive skeletons in the background. Screw Attack upwards and destroy the red Blast Door shield; remember how I said earlier the Screw Attack Chozo Statue was the last one in the game? Well, that wasn’t strictly true, as a cutscene will play, showing another Chozo Statue, albeit, one that gets immediately destroyed by our old friend, the Diggernaut. Not only is the Statue destroyed, but the powerup it held has been taken by the colossal robot as well, so there’s nothing here for us anymore.
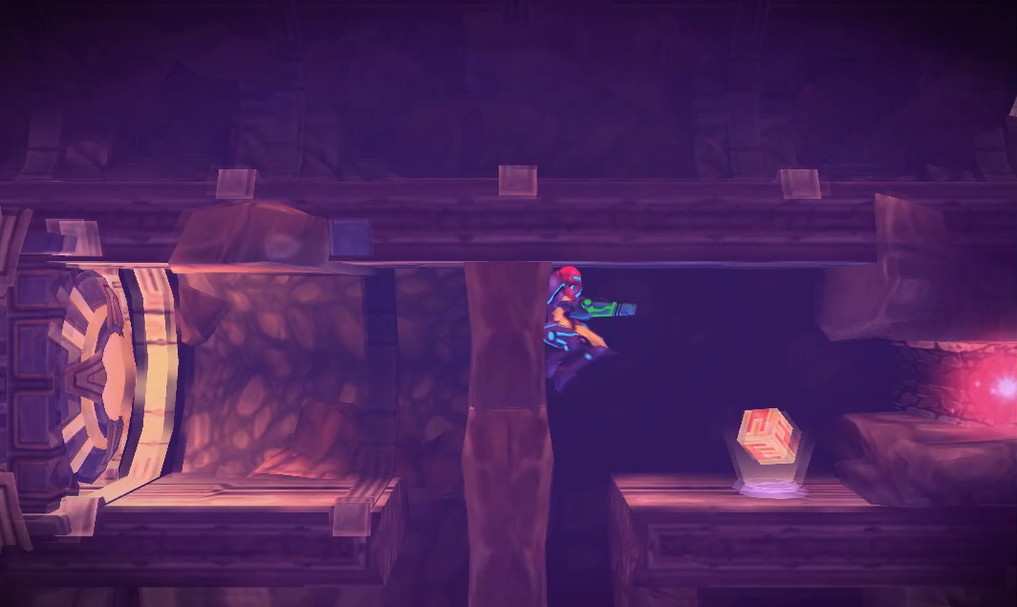
Jump upwards, minding the Glow Flies, until you reach the top. You’ll notice a pool of water on your left and maybe some expansions on your map; you can’t get any of those right now, so ignore them and press forward. Keep on climbing in this room until you see a familiar old Metroid husk. Proceed past it and enter the door on the upper right. Drop down, destroy a few Hornoads, drop down some more. You’ll land in a room that looks suspiciously like a perfect room to fight a Metroid in, but you’ll find it’s empty… for now. Take the door on the right instead.
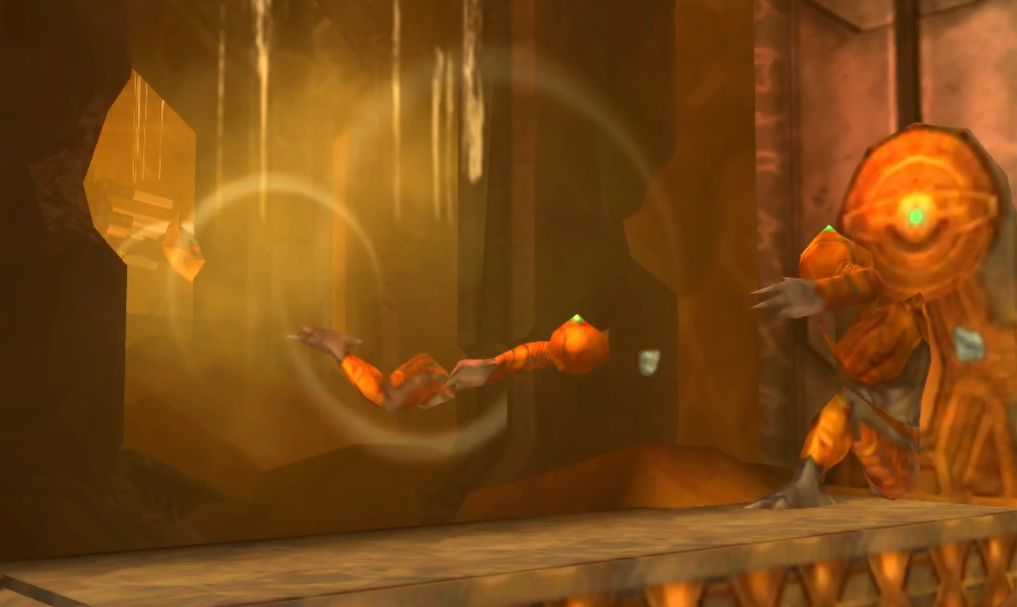
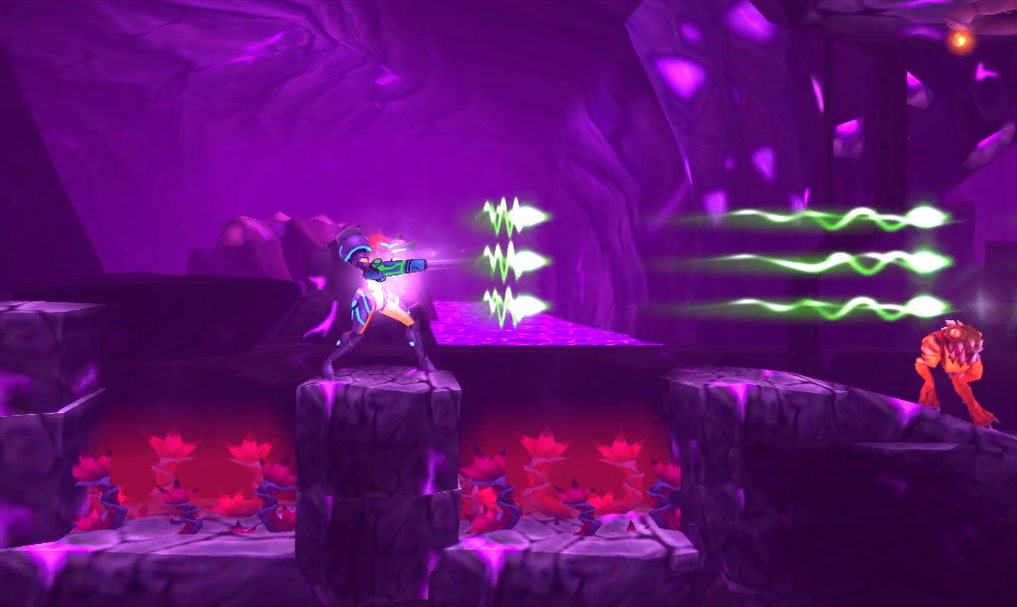
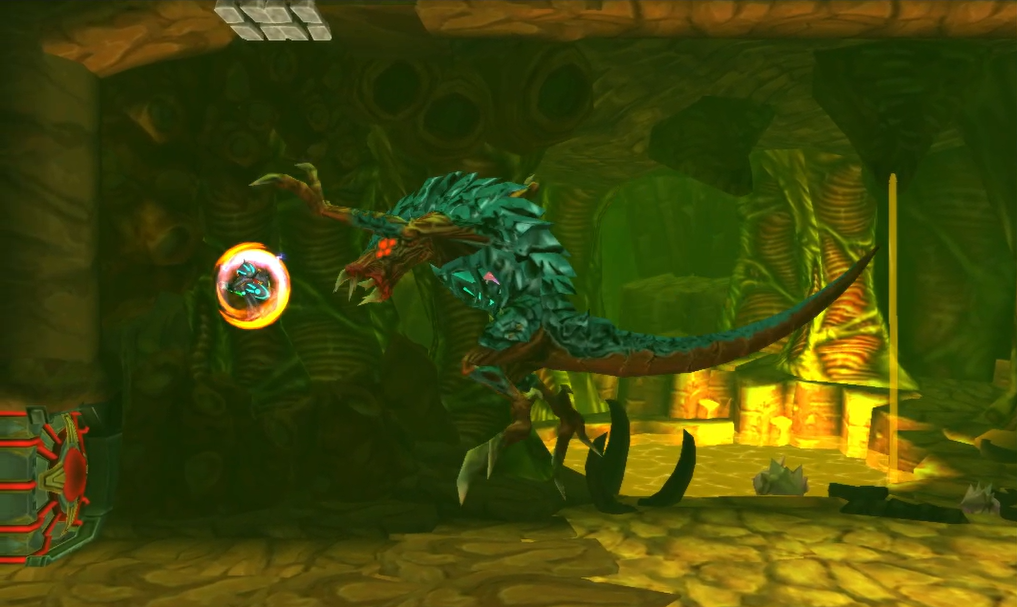
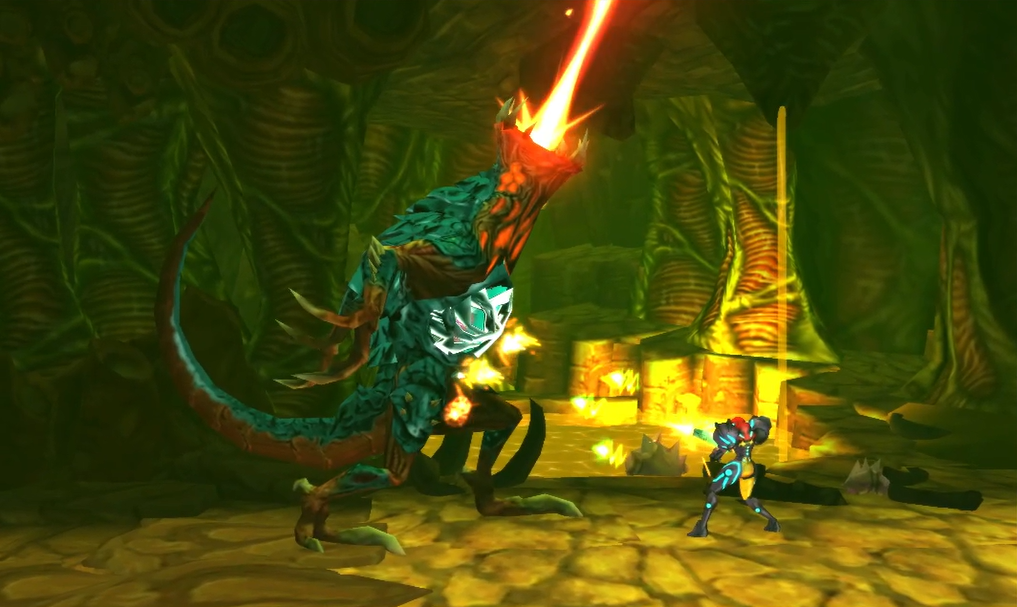
Press forwards through this new room and go through the door on the right again; you’ll be in another battle arena style room, and this time, there’s a ZETA METROID there to step up and oblige you for a fight. Same tactics equals same results, so take it to the Zeta and give it no quarter. Press through the door on your right when you’re finished.
Chapter 7.1 Route:
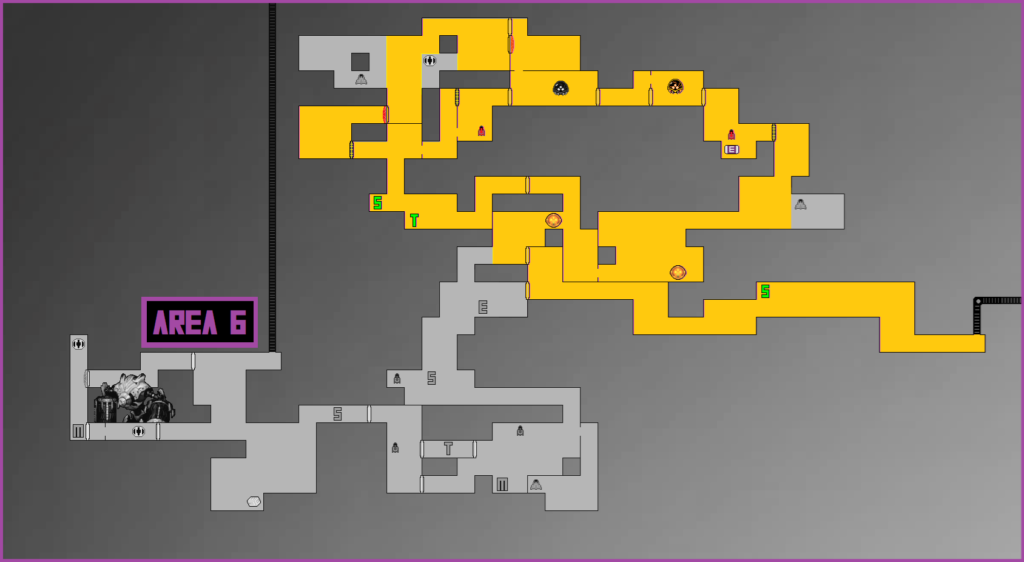
In the next room, drop down through the tunnel and you’ll land beside an expansion on the other side of a bridge with a fan blowing right in front of it, meaning you can’t lay a bomb to simply get it. No worries – roll across the bridge, which is made up of pitfall blocks, and just let yourself fall down. You should notice a block on the left side wall that looks funny – almost like when you’re playing Zelda and notice a portion of the wall that looks like a different color and could maybe be bombed. Shoot it to reveal ENERGY TANK #7! Use your Spider Ball to climb the left wall, tuck inside the tunnel and grab MISSILE EXPANSION #39 too! Once you’re done, head back from the door you came in from.
Backtrack a bit into the first empty arena room, and then take the door on your left. This new room will have an Aeion orb right in front of you; activate your Scan Pulse and you’ll see a block on the ground glowing to the left of the Aeion refill. Bomb it, slap on your Lightning Armor and follow the Morph Ball tunnel down through the red weeds to pop out right beside MISSILE EXPANSION #40. You’ll be back in the purple caverns now, so head towards the Chozo Seal and unleash the lone piece of Metroid DNA.
Once the acid drops, slip down the opening next to the Chozo Seal. Follow the path, going through some missile block and grapple puzzles, until you find yourself at a SECOND Chozo Seal, this one also only asking for one piece of Metroid DNA. Follow the pathway up, fighting your way through Hornoad’s, Gullug’s, and Glow Flies galore, until you reach a door that leads back into a familiar room. That’s right, you’re back at the pitfall block bridge!
Press forward through the room you faced the Zeta Metroid in, and your Metroid radar will start going off. Keep pressing towards the left, and buckle up – you’ve never faced anything like this…
Chapter 7.2 Route:
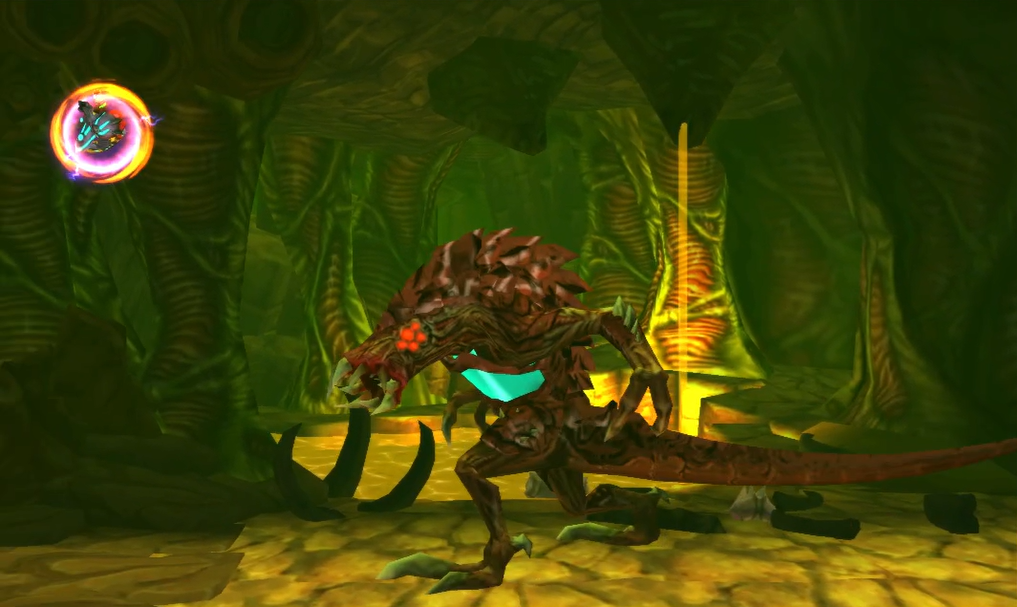
Omega Metroid
Step inside and the room will shake, as the final standard evolution of the Metroid line will reveal itself: the hulking, fearsome, indomitable OMEGA METROID! I mean, we named our website and podcast after this beastly creature, so it must be pretty impactful, right?
All those other Metroids you’ve faced have nothing on this monster. For starters, you’ll see the nucleus in its belly is covered with a protective skin – it can be blasted away, but needless to say, that will make things significantly harder. The Omega hits devastatingly hard too, so whatever you do, try to avoid getting into a fist-fight with it, as that’s a fight you’ll surely lose.
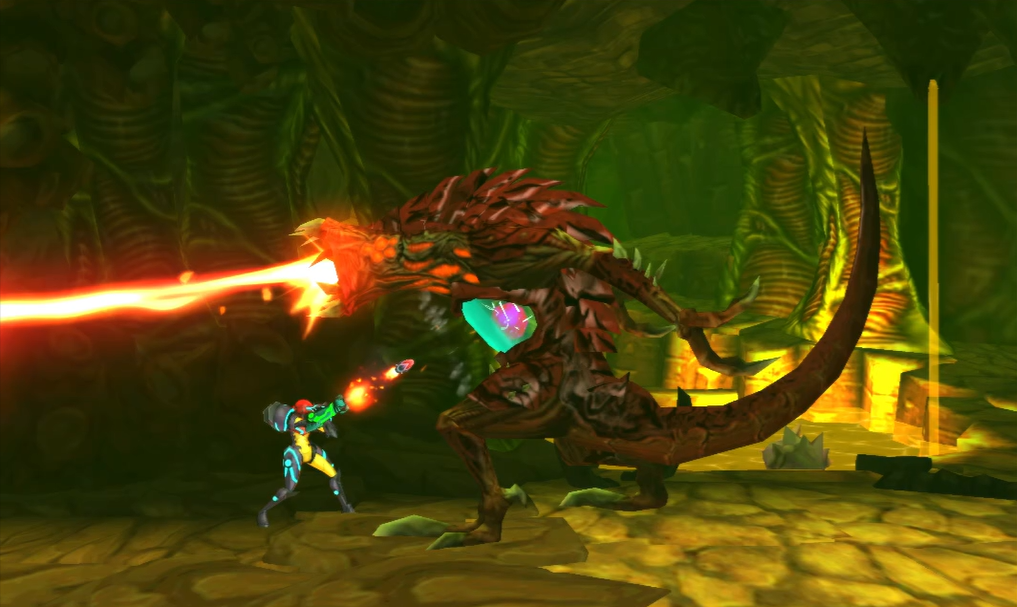
The Omega Metroid has several attacks at its disposal, and all of them hurt. As mentioned, the Omega will be the most physical type of Metroid you fight, as it will typically swipe its claws at you; depending on its damage level, it may swipe its claws once, it may do a one-two swipe combo, and it may even do a one-two punch and then spin around to whip you with its tail – sometimes twice in a row too! This is incredibly punishing, so either be ready to jump several times in a row, or play it safe and just Space Jump over and beyond the Omega. All these moves can happen on their own, too, so stay frosty. Be careful about getting caught in the corners, and this mammoth Metroid likes to just pounce on you as well, slamming you with its big body; usually, the Omega will do a little hop in place before it does this, so use this as your cue to move your butt before you get pummeled.
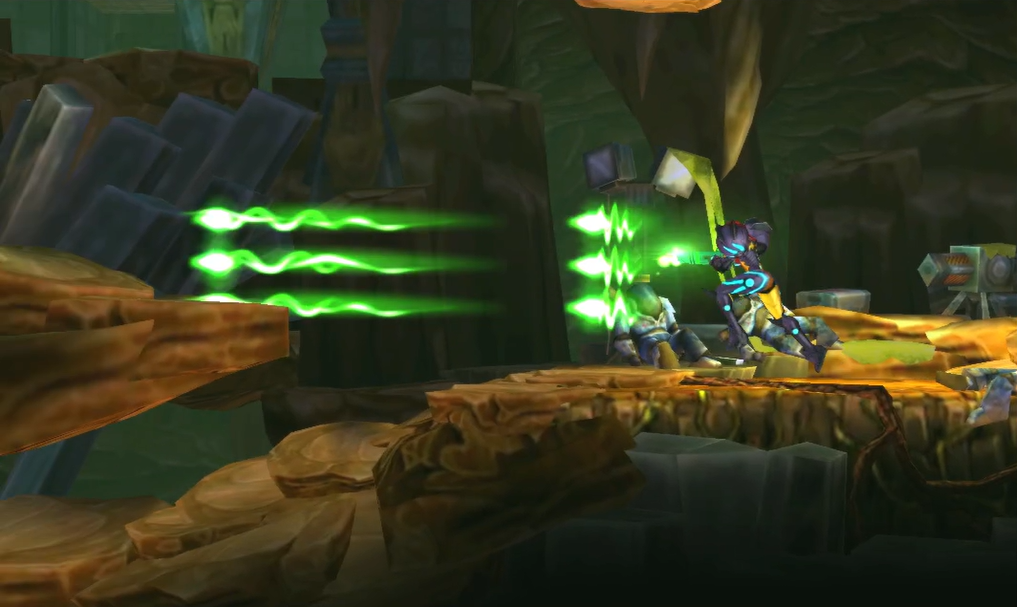
A typical move it will use to begin a battle involves it smashing its tail on the ground, causing rocks to fall from the ceiling. You CANNOT Screw Attack through the blocks, you’ll take damage, but you CAN shoot them with your beams to get some ammo, health, and Aeion. A good bet is to stand stationary and shoot upwards. As like the rest of the evolved Metroids did, the Omega has a fire beam it will shoot out of its mouth, so watch out for that: it can fire in a straight line, diagonally, or in a clockwise motion, starting from top to bottom. When it’s firing the laser clockwise, that’s actually a good time to get up close and upload your Beam Burst on its protective skin covering the nucleus.
Strangely enough, I’ve actually found the best defense in this fight is a good offense, so don’t be afraid to get up close and fire away at the protective skin and the nucleus. Your Beam Burst is a must in this situation, so get close and aim upwards, and as soon as you see the Omega start to move in any kind of offensive way, get out of there! Once you break the skin and free the nucleus up for attack, then you can really start to get going!
As always, your best opportunity to damage the beast is to melee counter it when it snaps its jaws at you. Get the timing right, and you’ll be treated to an absolutely sick sequence where Samus is flying everywhere, doing all kinds of cool acrobatic stuff, and pumping (ideally) Super Missiles into the Omega Metroids belly. Once you complete a melee counter, or after enough time, the Omega will respawn its protective skin.
As the Omega takes damage, its melee moves will all start to double up – double tail swipes, double claw strikes, etc. – so be careful! Things will really start to get spicy now, as the Omega Metroid will shoot its fire laser at the floor, meaning you have to continually Space Jump until the fire is gone. At the same time, it will be slamming its big tail on the ground, causing rocks to fall, so you’ll need to Space Jump around them. I won’t lie – this is hard, and one of the most lethal attacks this formidable foe has at its disposal. Try to jump in short, tight circles and ride it out; this attack usually lasts about ten seconds or so.
Get right under the Omega and stand close to its belly. You’ll do heavy damage to its protective skin or the nucleus itself, and the melee attacks from its tail and claws are manageable enough to avoid, so don’t be afraid to bring the fight to this hulking Metroid, as you’ll be better off the sooner you can end it.
Don’t be discouraged if you die a few times – this is a hell of an opponent, and one of the most physically imposing threats anywhere in the Metroid universe! Keep at it, keep attacking, and eventually, the Omega Metroid will fall.
Loading Up
Make your way back to the Chozo Seal and deposit the Omega Metroid DNA. Once the acid has dropped, work your way left in the purple caves to the left side of Area 6, by the Energy Recharge Station, and then drop downwards until you land on a Save Station. Lay a bomb on the wall beside the Save Station and activate your Phase Drift; quickly roll through the Morph Ball tunnel and you’ll pop out right beside MISSILE EXPANSION #41!
Follow the pathway down until you’re in a large room in the purple caverns; there will be an Energy Recharge Station at the bottom, which you may need after the Omega Metroid fight. Space Jump upwards and you’ll see an expansion behind a thin wall of rocks; activate your Phase Drift, use your Spider Ball to crawl on the underside of the floor of rocks, lay some bombs, and tuck inside to grab MISSILE EXPANSION #42!
Now take the upper door on the left and activate the Teleportal – keep this landmark in mind, as we’re coming back here in a second. Step through the door in front of you and activate your Phase Drift; if you’re fluent in the Metroid language, you could probably already guess these are pitfall blocks. Shoot ahead of you and then, before the blocks give out, quickly morph down and tuck into the small alcove to grab MISSILE EXPANSION #43! You’ll probably fall, so get back up this room again and Space Jump to the top left door. Go through it and use the Save Station, and then continue through the tunnels ahead of you.
There are a bunch of red weeds here, so navigate towards the left side tunnels until you hit the ground. Destroy the Grapple block and then jump up to the small nook in the upper left corner. Activate your Phase Drift, shoot the block directly in front of you, fire a missile to destroy the missile block across from you, and then roll over (the Phase Drift should be on for this still!). Yank the movable Grapple block over to the left and then drop down; roll up above the two pitfall blocks and drop down the newly opened tunnel to grab AEION TANK #6!
The good news is that there’s only four Metroids left; the bad news is that you can probably guess which type of Metroids the remaining ones are, not to mention the looming threat of the Diggernaut. It’s for this reason that the time has finally come to do one of the most proud and time honored traditions in the Metroid series: backtrack to area’s you’ve already been!
Now, you don’t have to do this – you can proceed ahead if you want to – but I’ll be writing this guide and numbering the expansions you collect assuming you’re following my advice here, and honestly, this won’t take too long; we’ll only hit a few areas to stock up on supplies. Make your way back to the Teleportal and get ready to hit up a few areas we’ve been to already!
Chapter 7.3 Route:
SR388 Revisited
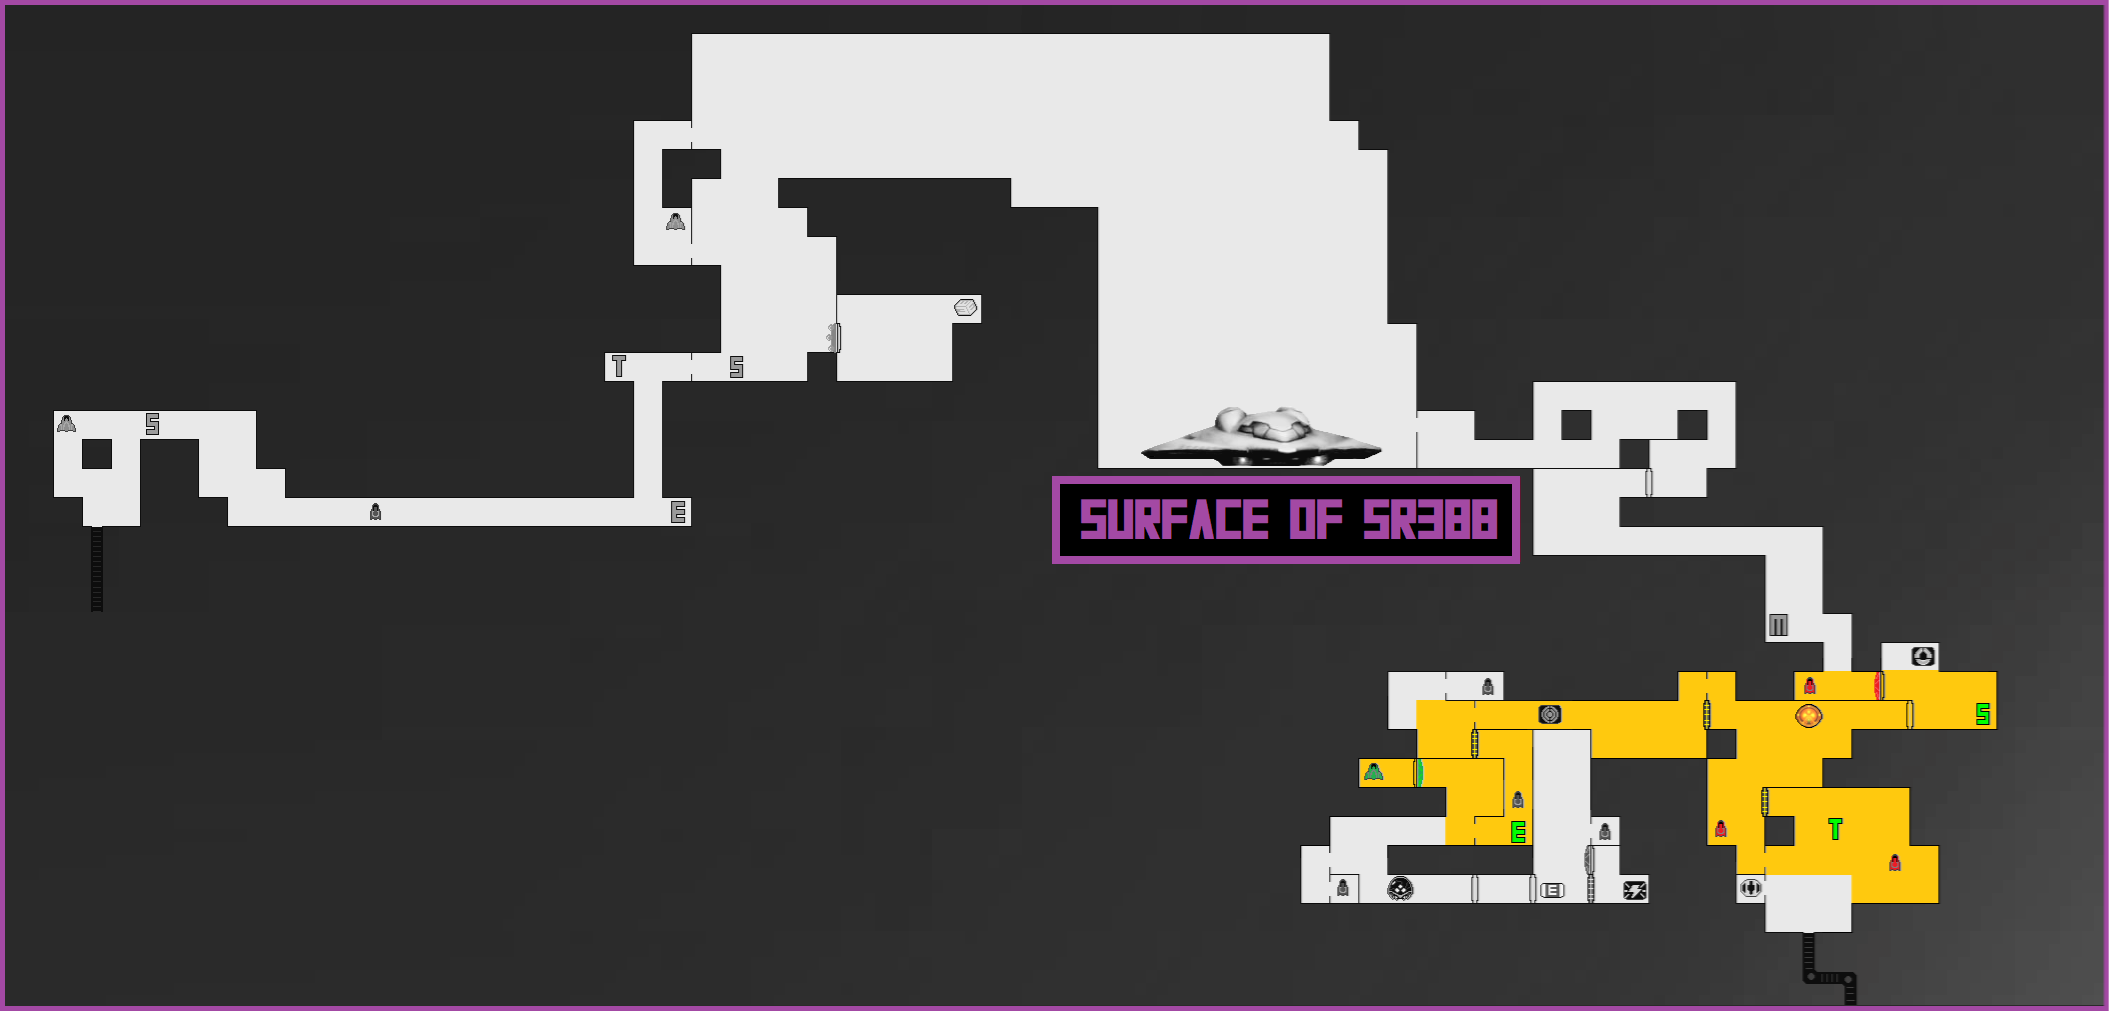
Select the Teleportal in the Surface Area and warp over. Let’s get to collecting some items, and let’s do this quick and dirty!
To the lower-right of the Teleportal is a Morph Ball tunnel; slip inside and roll to the end. Jump straight up and grab the ledge on the upper left; MISSILE EXPANSION #44 will be sitting right there for you! Head back out, and enter the Morph Ball tunnel on the under-right side of the Teleportal. At the tunnels end, jump up and grab MISSILE EXPANSION #45.
From here, make your way back to the Chozo Statue that gifted you the Morph Ball and exit out of the door on the left. You’ll see MISSILE EXPANSION #46 just begging to be taken in a small tunnel, so grab it! Now, make your way towards the Energy Recharge Station on the lower west side of the Surface; there should be a door just one room over with Gryncore on it; destroy it with the Plasma Beam, walk in the room, and grab SUPER MISSILE EXPANSION #10.
Head back to the Teleportal and warp to Area 1!
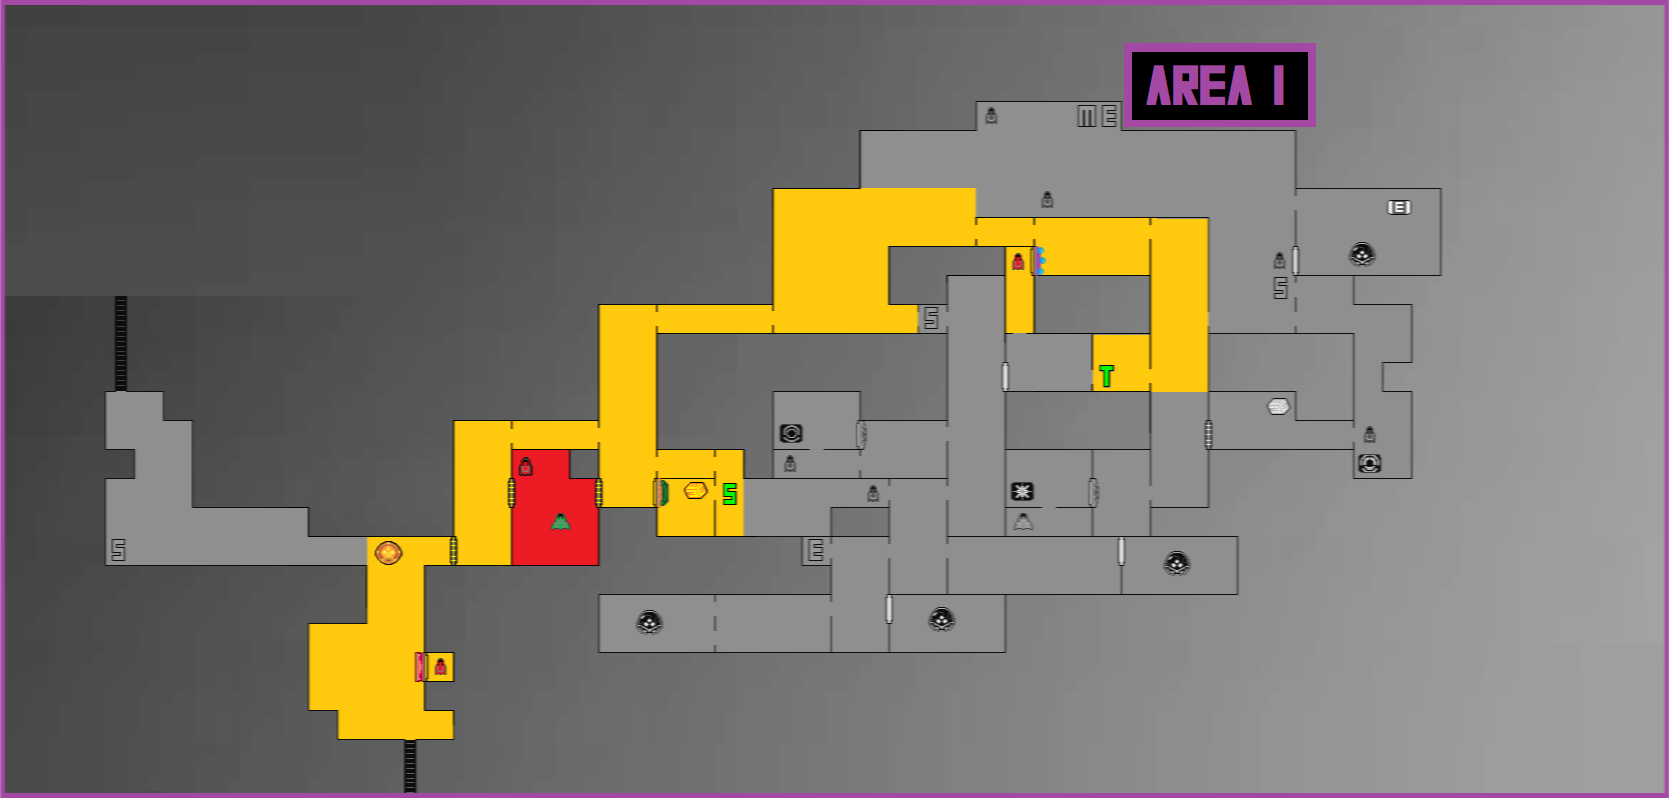
From the Teleportal, head right into the long shaft and jump upwards, opening the door on the top left side. Enter this new room and go through the Spazer Beam door on the bottom side; Space Jump over to the other side of this room (don’t touch the floor, as the ground is made up of pitfall blocks) and grab MISSILE EXPANSION #47. Exit back through the Spazer Beam door and then take the upper left door this time, bombing and rolling until you’re in the huge open temple room.
From here, take the leftmost door, keep heading left, and drop down until you’re near a hot zone door. Before you go in, you should see a Plasma Beam door and an Aeion Tank; shoot the Gryncore off the door using a combination of your Wave and Plasma Beam, and then activate your Phase Drift and shoot the door open again. Quickly run to the other side and enter the door before it closes. Keeping your Phase Drift on, drop down into the water, and when it’s up to your waist, fire a missile through the crack in the wall straight ahead at the block on the other side. A missile block will be destroyed, so quickly navigate your way over and up through the crystals before the missile block respawn to grab AEION TANK #7!
Destroy the red Grapple block in front of you and then go back through the same door you came in from. Enter the hot zone, jump in the lava, and jump upwards, where MISSILE EXPANSION #48 will be sitting on a ledge for you to take! Now, fully submerge yourself in the lava and you’ll see a little opening where you can jump up and stand on. There will be a Super Missile block in the lefthand wall, so blast it way and nab SUPER MISSILE EXPANSION #11. Now head to the Chozo Seal and drop down; eventually, you’ll come across a Wave Beam door on your right; use your Spring Ball to jump up and lay a bomb in the blocks surrounding MISSILE EXPANSION #49.
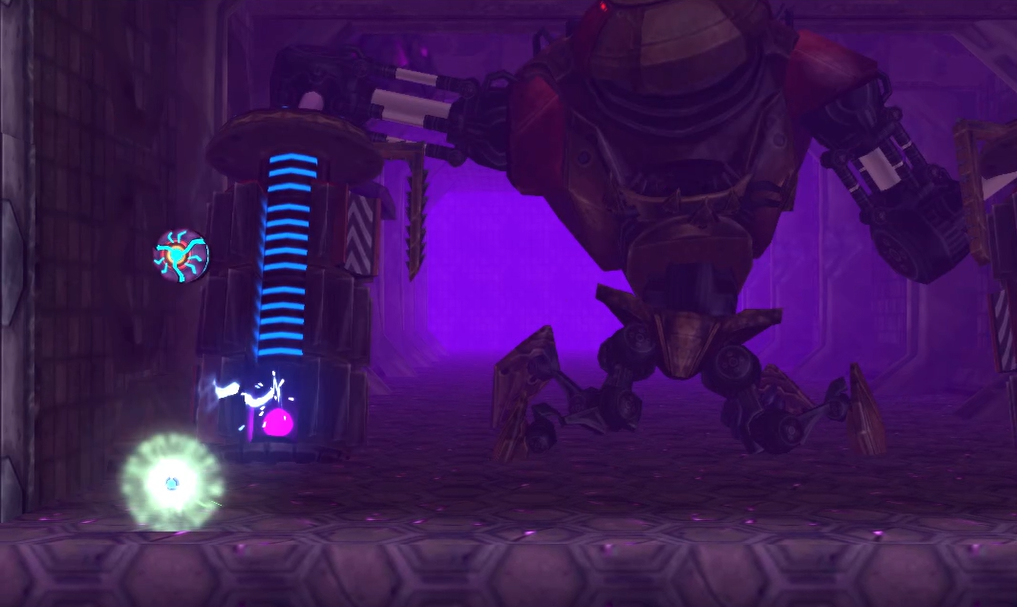
That’ll do it for Area 1, and I promised that this wouldn’t take too long, so let’s get back to business now that we have a bit more firepower! Get to your Teleportal of choice and warp back to Area 6. Make your way back to where you grabbed the Aeion Tank and press upwards; there are some Grapple blocks in the way, making the direct path upwards inaccessible. Instead, get to the leftside wall and use your Scan Pulse; you’ll see some blocks glowing in the bottom of the wall, so destroy them and roll through the tunnel. There’s a charge beam door to your left; make sure you’re ready before you go through it, as your toughest test yet awaits on the other side.
Chapter 7.4 Route:
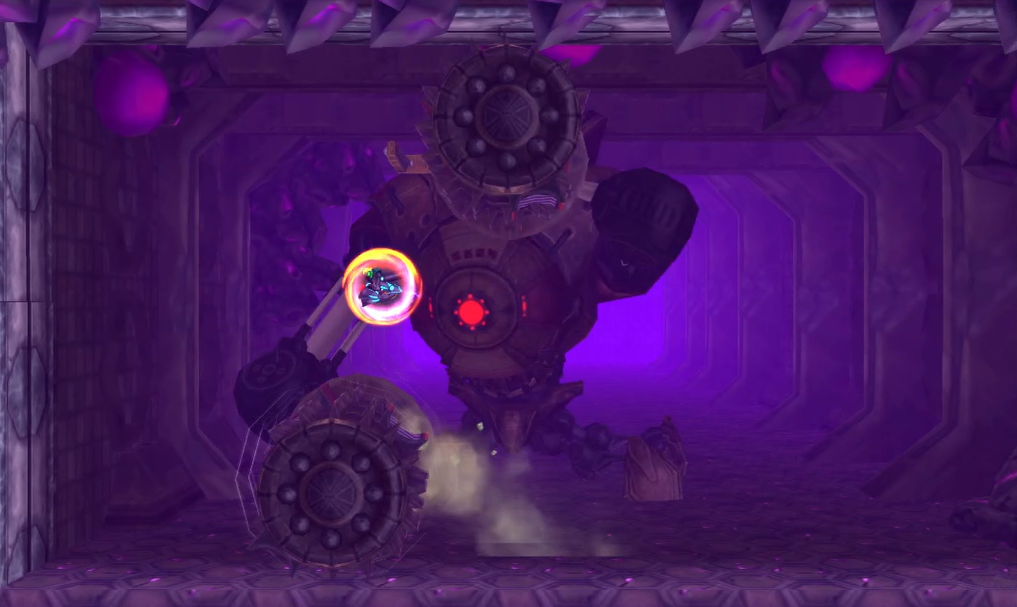
The Diggernaut
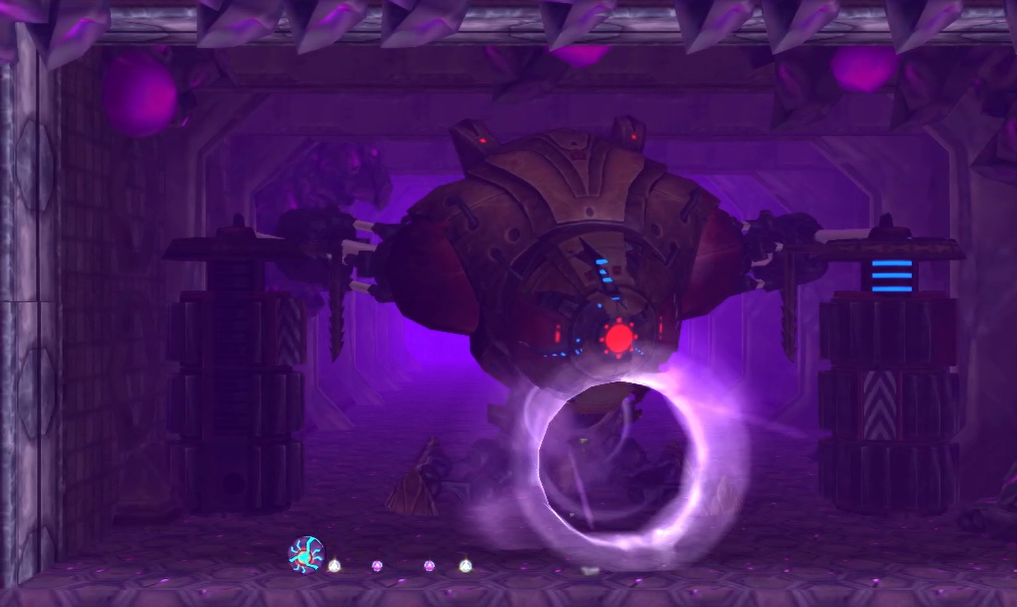
It’s finally time! The fight that Samus Returns has been building up to all game is finally here. Samus vs The Diggernaut! It doesn’t get any better than that! You ready? Let’s go!
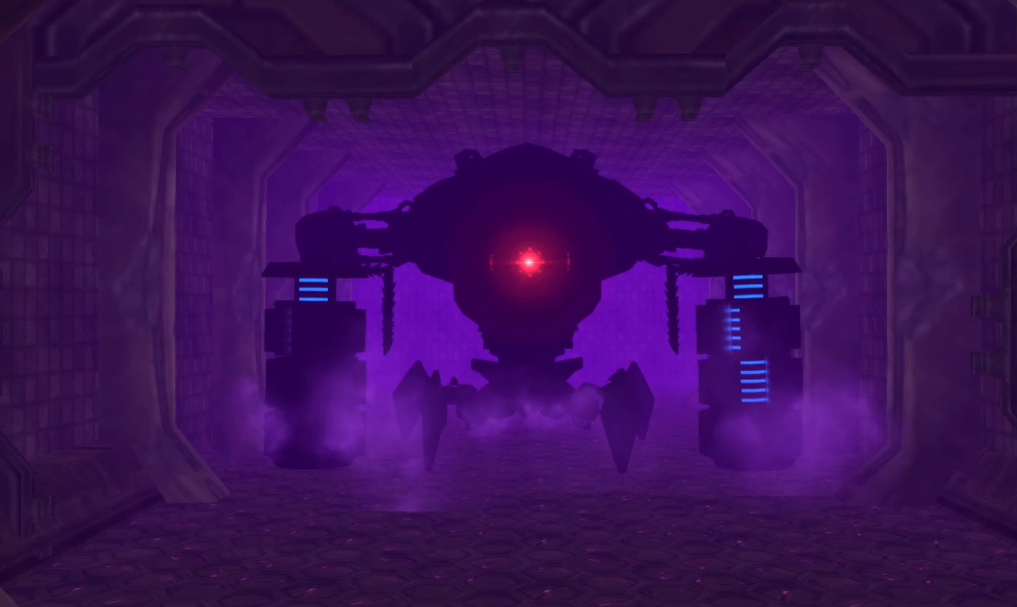

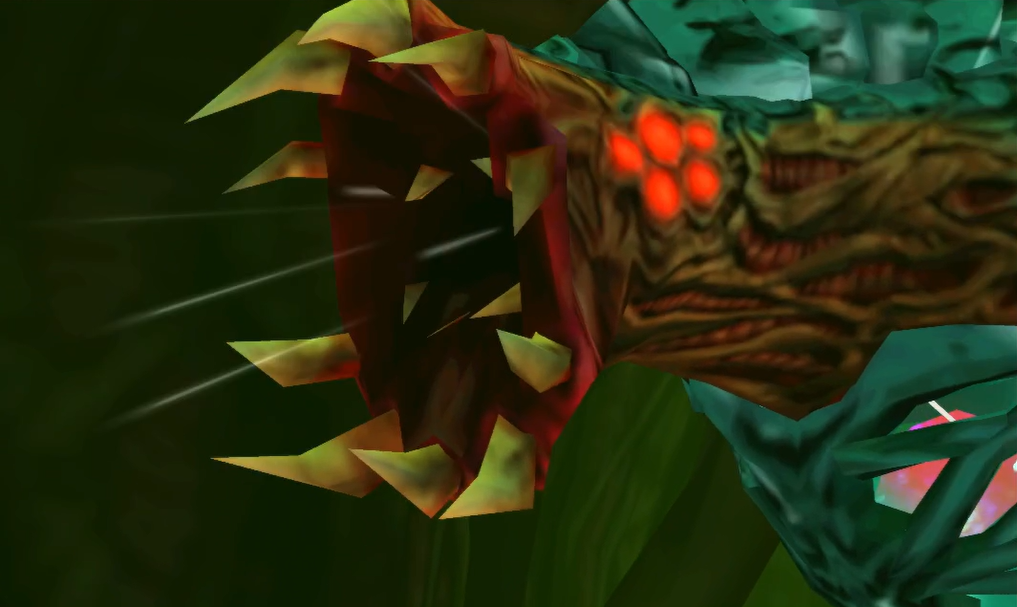
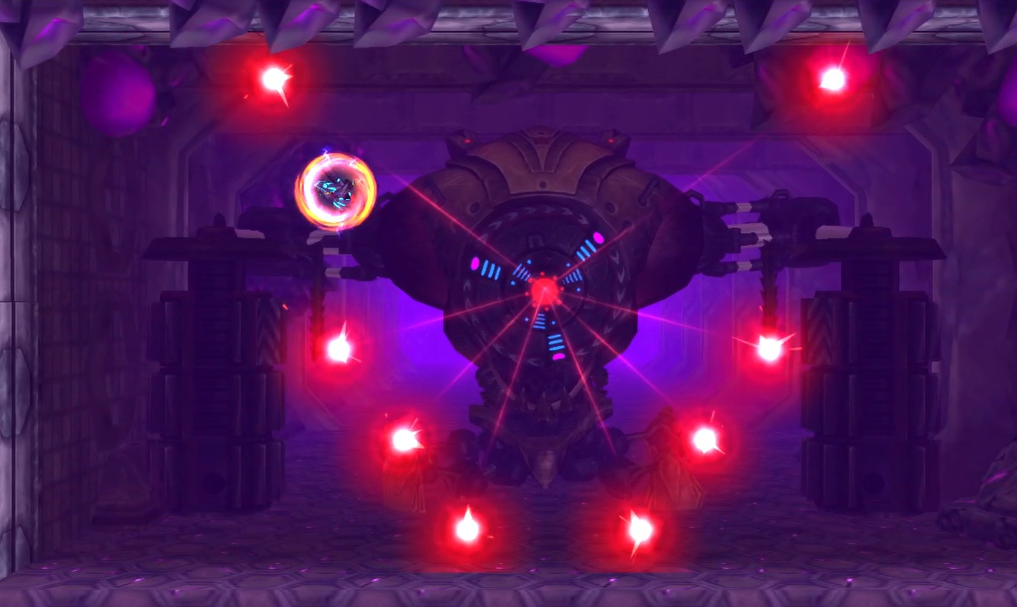
The Diggernaut will emerge from the background, its hulking silhouette and red laser eye coming out with you firmly in its sights. The Diggernaut itself will mostly stay in the background for the first little bit, really only bringing its drill arms out to do battle. You’ll have to wait for your opportunity to strike in this battle, so a large portion of the battle will be simply staying alive and avoiding the machine’s attacks.
The attacks will start right away, as a typical first move from the Diggernaut involves it sweeping its drills from side-to-side in the area. You’ll have a brief moment where there’s a gap in between the drills, so quickly jump through and get to the opposite side of the room when that happens.
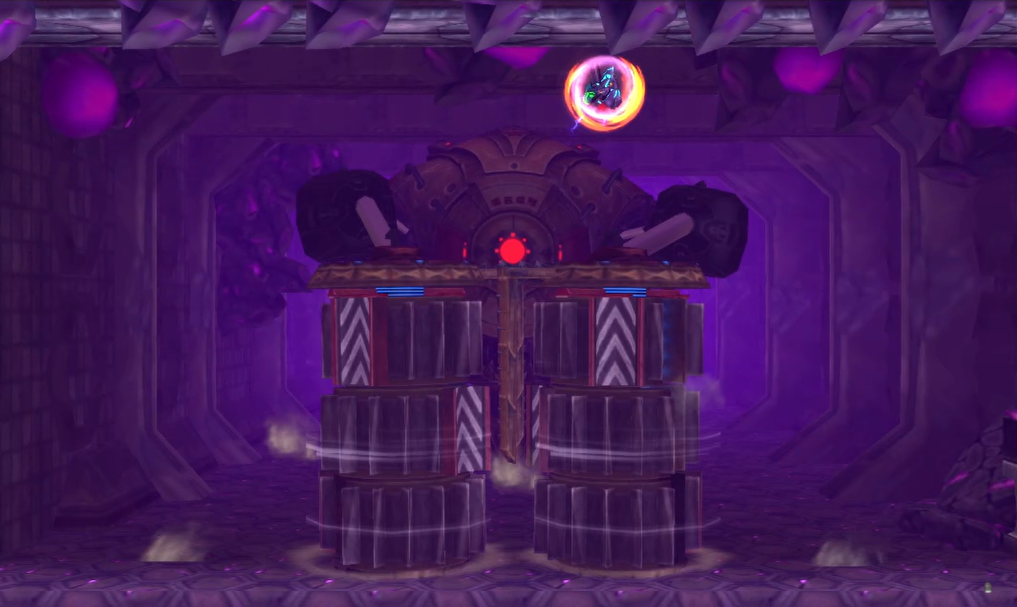
The Chozo Robot will then typically have its drills attack you again, but this time, in a more linear way; you’ll see the Diggernaut put both drills in the center of the room, which is your cue to Space Jump over them and hover in the air for a second. The drills will split and crash into both far sides of the room, and then come crashing back down into the middle; your best bet is to keep Space Jumping in short, small circles.
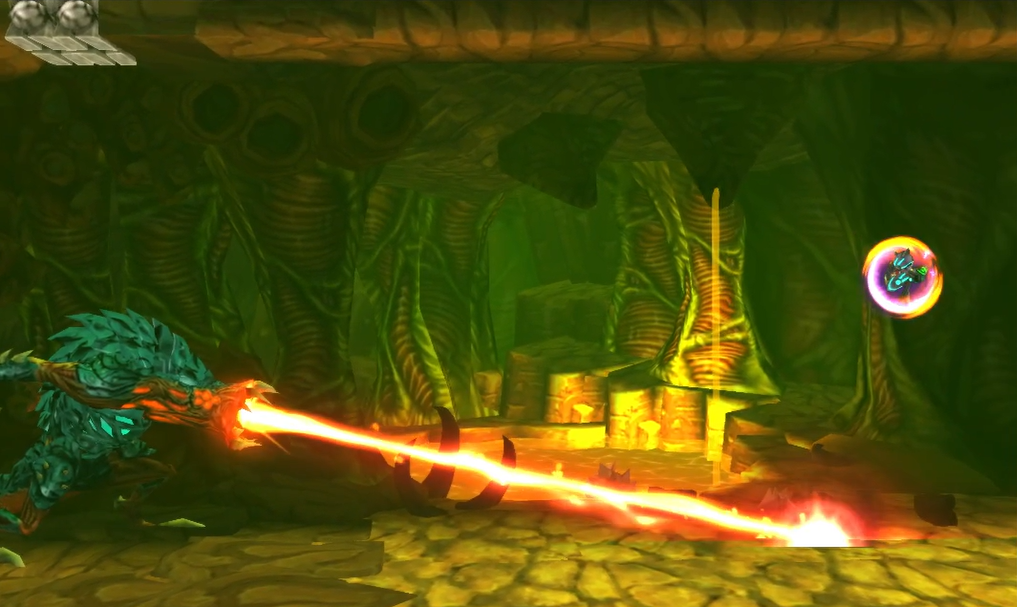
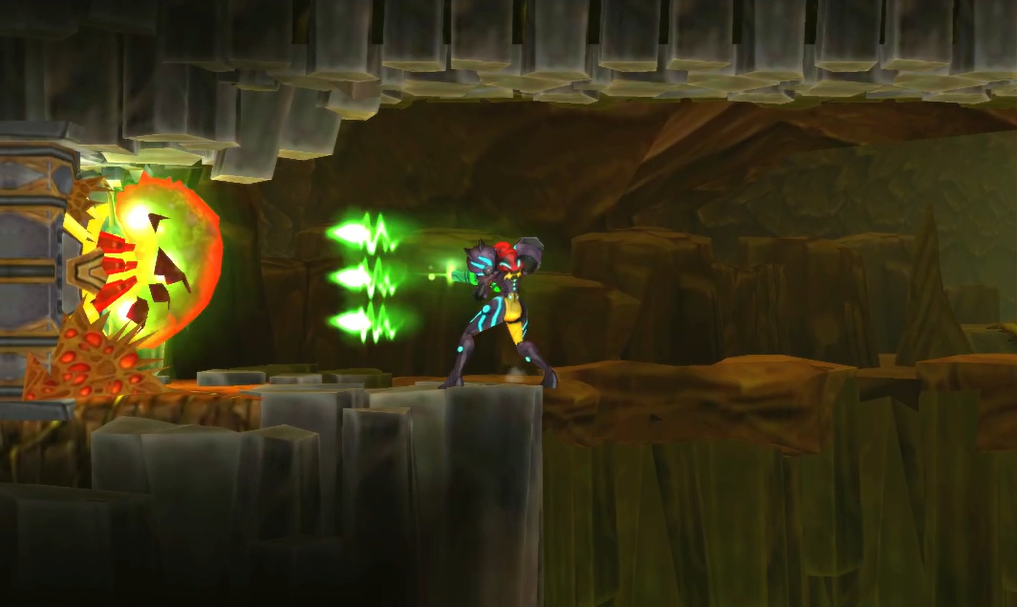
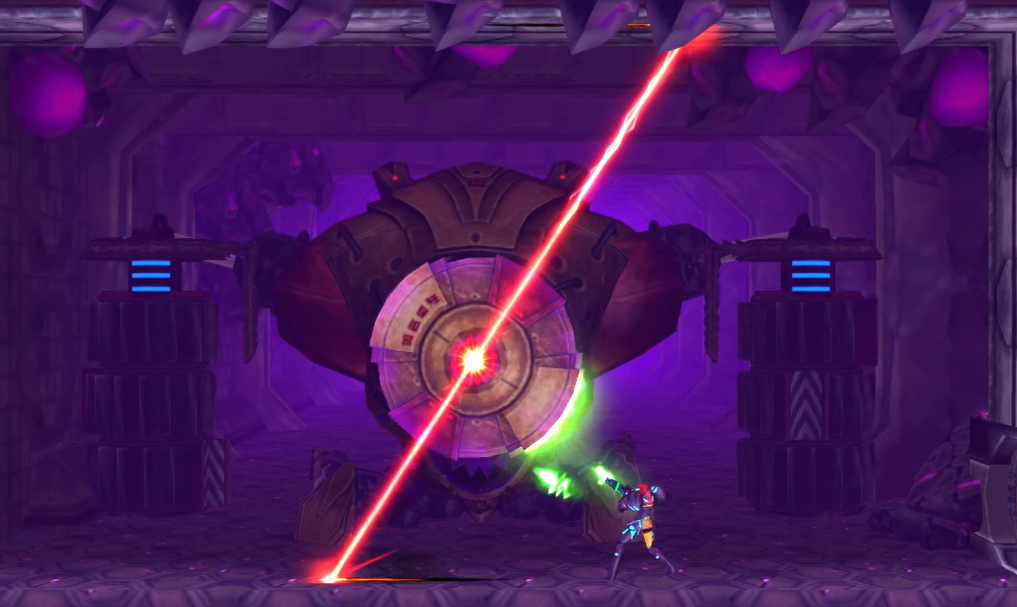
There’s more up this hulking machine’s proverbial sleeve, however! Once you land on the ground, the Diggernaut will stick its face in the arena and shoot out a laser from its eye; the laser is a straight line that will start to rotate clockwise, so just jump over the Diggernaut’s head to avoid it. This is a good opportunity to attack! Quickly land on the ground and fire off missiles, Beam Burst, charged shots, whatever your preferred method of firepower is, shoot it right at the Diggernaut’s head to damage it.
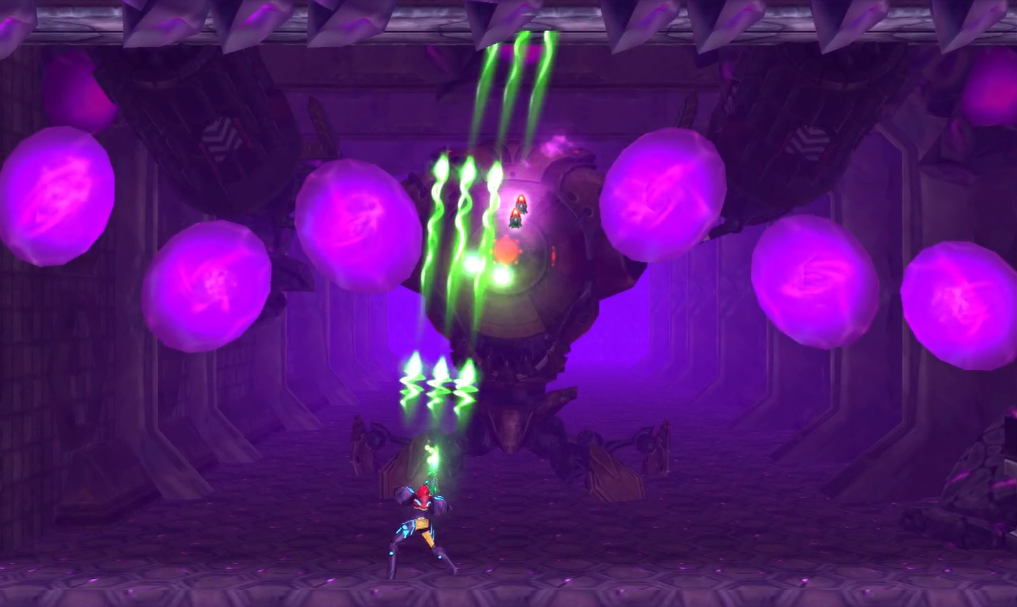
One final attack to look out for is the Chozo Robot smashing the ceiling with its drill arms. Instead of rocks falling down as you might expect, a bunch of purple blobs of acid will fall. These are slow, easy to avoid, and best of all, will give you health and ammo if you shoot them before they hit the ground!
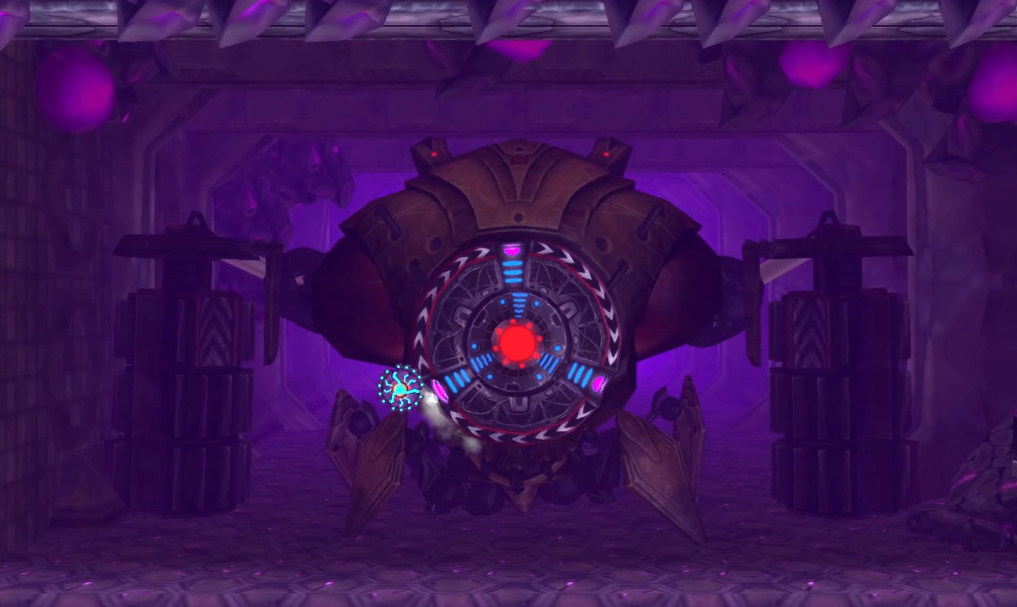
Keep the attack up, and eventually, you’ll stun the Diggernaut; this will cause it to drop both drills on the ground. You’ll notice each drill arm has three gears that are spinning; get into Morph Ball form and wait for the gears to line up that all have a Morph Ball track on it. Use your Spider Ball to quickly climb up and then tuck inside to the glowing blue track; quickly but CAREFULLY – don’t just drop right down! – wait for the blue track to line up and drop to the bottom. Lay a bomb in the purple slot and you’ll do major damage to the Mining Machine!
The Diggernaut will recoil, and phase two will begin!
A few things have changed now in phase two – when the purple blobs start falling from the ceiling, the Diggernaut will now target you with a trace lock-on missile, so keep moving to make sure you don’t get blasted. The lasers that now shoot out from the Diggernaut’s head are no longer a straight line spinning clockwise, but rather three separate lasers that look like a capital “Y”; you’ll need to shoot and jump in between. Keep the Space Jumps short, tight, and only shoot when you can; it’s more important to avoid getting hit than it is to attack.
The deadly robot also has some new tricks up its sleeve this round, too. One attack you’ll see a lot is the Diggernaut sucking in air into its “mouth”, like a mini tornado, sweeping from left to right and back again. This is easy enough to jump over, but this is also a great time to attack! Get into Morph Ball form and roll just ahead of the gust; lay some bombs and instead of sucking up you, the Diggernaut will eat your bombs instead, which must not taste great, as enough of them will stun the machine. Activate your Spider Ball to avoid getting sucked up yourself; whatever you do, make sure that does not happen as the damage will be lethal, leaving you with barely any energy left if not outright killing you.
Keep the attack up, and eventually, you’ll stun the Diggernaut again! Go into the opposite drilling arm as last time and carefully drop down, laying another bomb to damage the machine.
Phase three will now begin, and the hulking robot seems really ticked off now!
The Diggernaut will start slamming its drill arms into the ground, which will create shockwaves, so make sure that you’re jumping when the drills hit the ground. This will be done in bursts of three – the first time, with both claws in the center, the second, spaced apart a little bit, and the third, with either arm on the far side of the room. You’ll want to run under the drill arm between the second and third slam, jumping to avoid the shockwave.

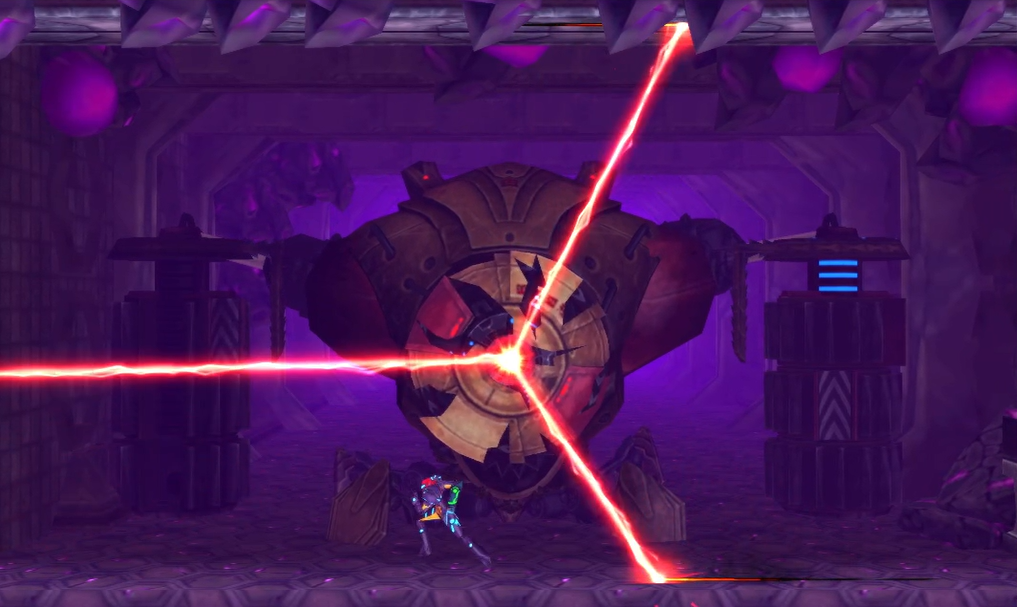
Next up is an attack right out of Resident Evil. The Diggernaut will fire out EIGHT laser beams from its eyes that you’ll need to Space Jump around. This will be difficult, but luckily, the lasers always follow the same pattern, so avoiding them should be okay once you get the hang of it.
The attack will begin with the eight lasers and will see four lasers on each side of the room in a straight line; they’ll start moving towards the center, starting from the bottom laser, so just Space Jump over top of them and then move to either side of the room. The lasers will then start moving from the center of the room back out, with the top four lasers heading straight up and over, while the bottom four head left and right; jump in between the lasers in the middle and get yourself to the middle of the room again. The lasers will once again shoot back out towards either side of the room, though this time, you’ll have enough space to jump in between the very top laser and the bottom three. Check out the below video for a more precise idea of the type of movements you’ll need to make!
The sucking air attack returns this round, however, the spinning “Y” laser attack does NOT, so make sure you’re dropping bombs when the Diggernaut is sucking up air. Eventually, just like before, you’ll stun the beast!
This time, once the Diggernaut is stunned, instead of crawling into its arms, you’ll want to wait for it to stick its face into the arena. The faceplate will glow blue for a few moments, meaning it’s electrified and will damage you, but when it’s not glowing, quickly morph down, jump up and use your Spider Ball to stick to the faceplate. There are three pink points, again in a “Y” formation, that will be spinning around the faceplate. BOMB THESE! This can be tricky, and it might take you more than a single try, so if you don’t get all three right away, go through the process again to stun the Diggernaut.
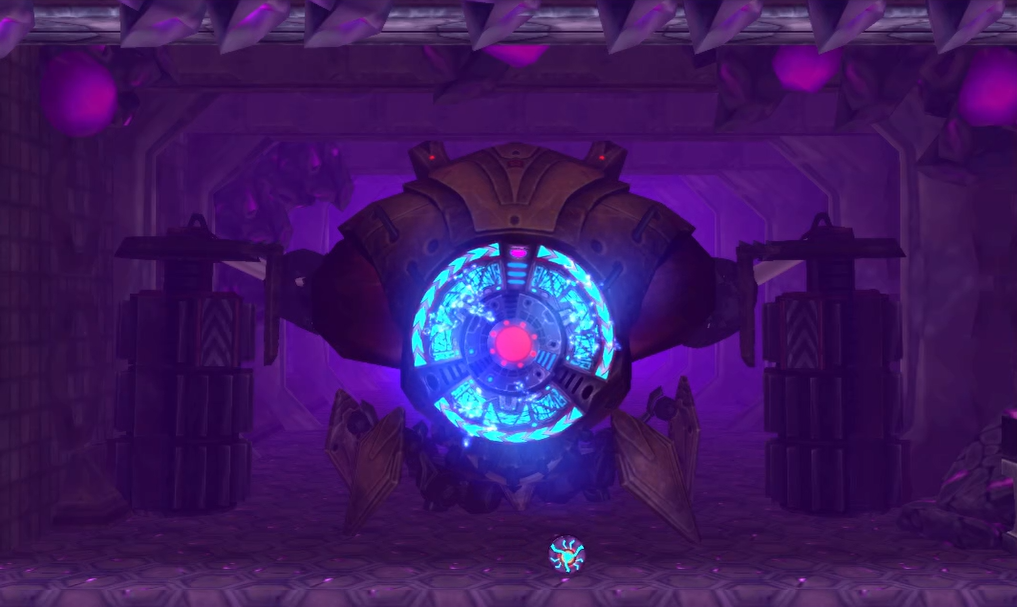
Once all three points on the faceplate have been destroyed, the Diggernaut will finally fall! Samus will give it one final shot to the face, and we’ll finally obtain our last powerup in the game: POWER BOMB EXPANSION #1!
Leaving Area 6
Phew. What a battle. Don’t feel bad if you need to take a quick break, change your sweat-soaked shirt, crack a cold one, whatever! When you’re ready, lay a Power Bomb near the Diggernaut’s carcass and as a final insult to injury, the massive robot will be blown to smithereens, not only gifting you some much needed health, ammo, and Aeion, but also clearing the path for you to move the the left.
Head through the door, recharge your ammo, and then get ready, because we’re going to pull off a cool trick. There’s a special ability that the game doesn’t teach you about that I will!
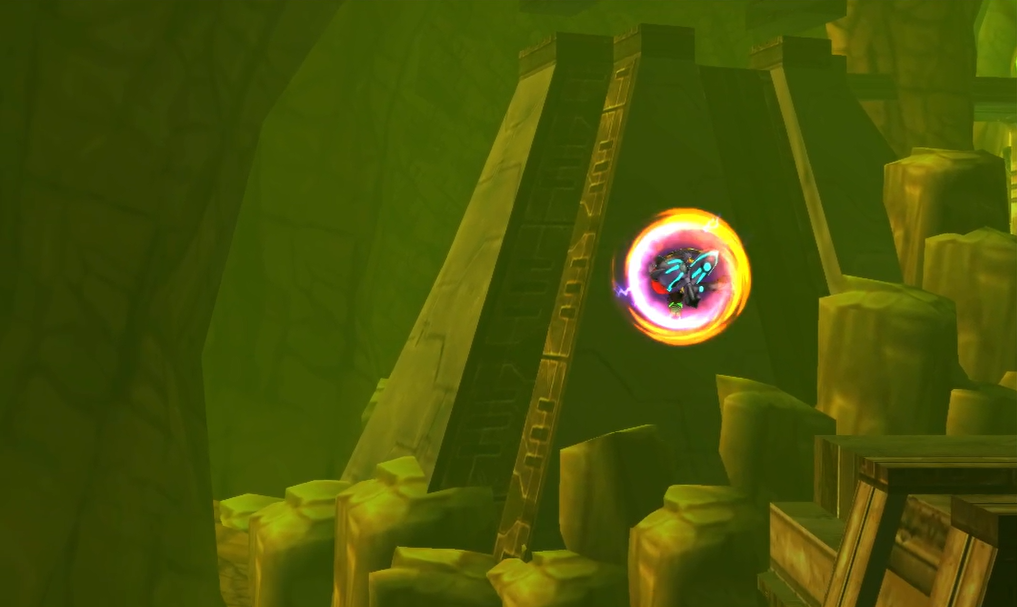
Get into Morph Ball form and activate your Spider Ball on the ground; line yourself up so you’re under the opening in the ceiling above you and then lay a Power Bomb. You’ll go shooting straight up to the very very top of the room, in between the orange spikes, and sticking to the top wall. Congrats – you have just performed a SPIDERSPARK! This isn’t the last time we’ll be using this technique, so see Special Abilities if you want to learn more! As an added bonus, we just shot straight up and landed on the ceiling, right next to POWER BOMB EXPANSION #2! Grab it and drop down, laying a Power Bomb to destroy the yellow blast shield on the door on the right.
From here, follow the path to the right until you reach the elevator. Take it into Area 7 – birthplace of the Metroids.
Chapter 7.5 Route:
Next Chapter: Area 7 – Chozo Laboratory