Super Metroid Walkthrough – Missile Expansions
Missile Expansions
Here you’ll find the location for every Missile Expansion in Super Metroid, as well as detailed explanations on how to get them and what powerups you’ll need. This list is ordered by way of progression; for a list of Missile Expansions by area, click here.
Missile Expansion #1
Location: Brinstar
Requirements: Morph Ball
This will be the first Missile Expansion in the game. You’ll get it by default. From the area you first acquire the Morph Ball, head left until you reach the blue doors. Enter the next room and roll down to the bottom, blast open the blue door on your left and claim Missile Expansion #1!
Missile Expansion #2
Location: Brinstar
Requirements: Missiles
From the room where you acquired Missile Expansion #1, exit the room and head up. Blast the pink door to your right open and enter. If you head all the way to the right of this room, roll under the rocks and emerge on the other side to claim Missile Expansion #2!

Missile Expansion #3
Location: Crateria
Requirements: Bombs
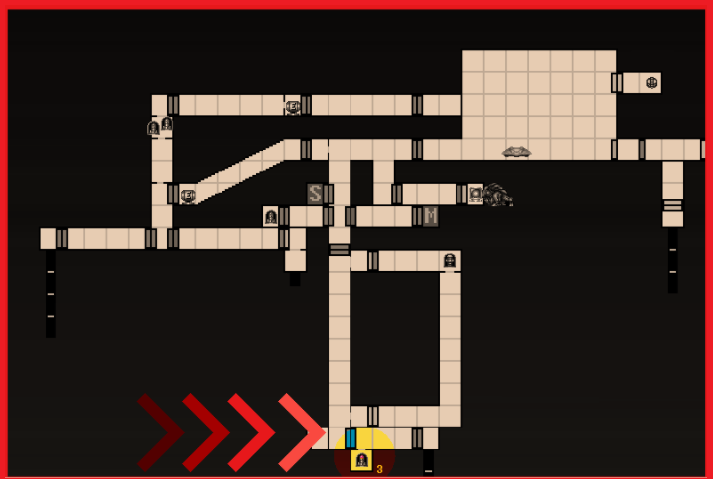
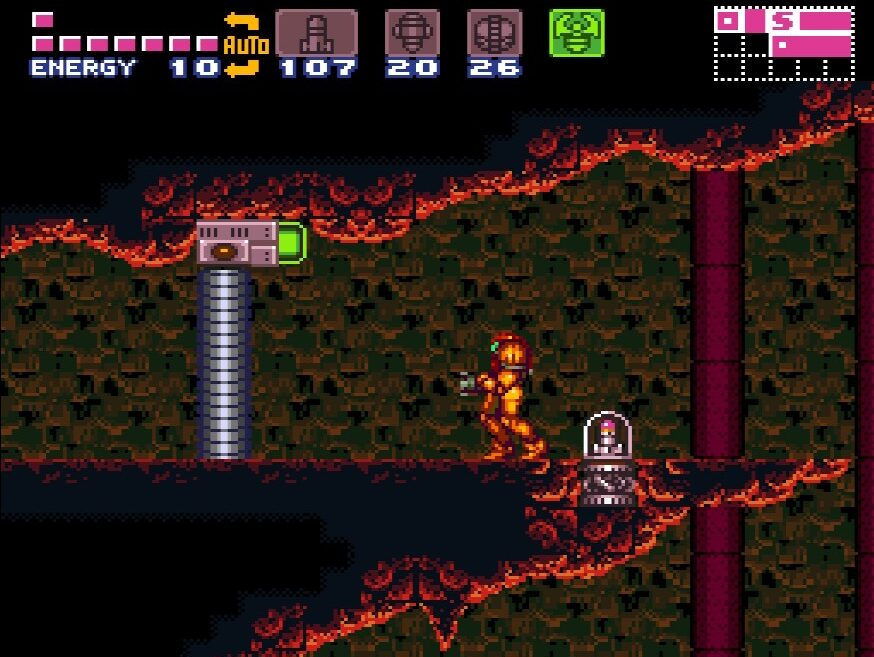
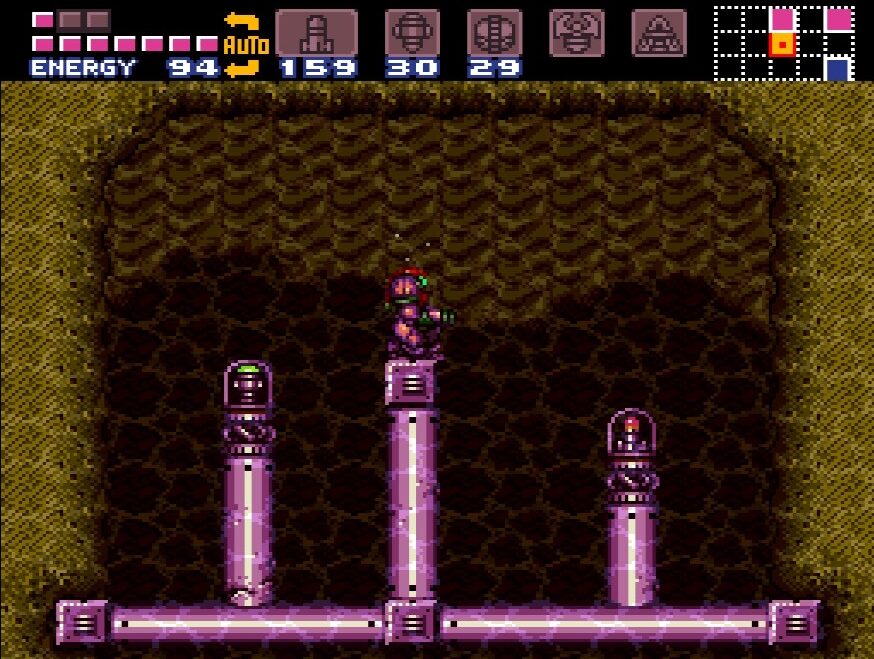
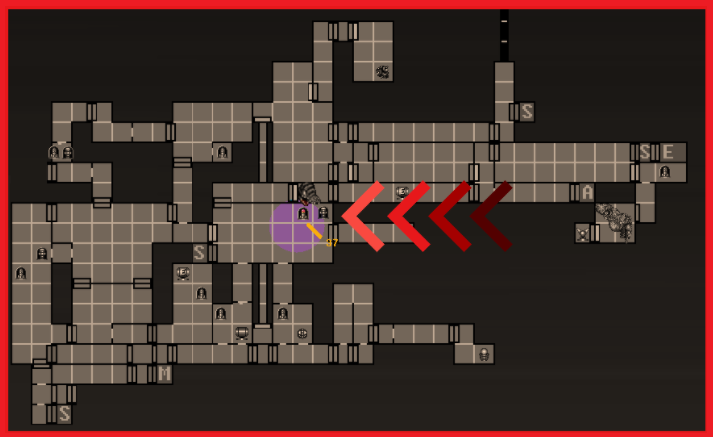
In Crateria, make your way out of the Torizo room and blast away the fireflies if you need health or ammo. Continue past that room and go up to the main hallway of Crateria, and then drop all the way down to the blue door on the ground, just like when we went to Brinstar. Follow the long shaft down until you get to the bottom. Blast open the door and head right.
There will be a Pirate as soon as you open the door, but a single shot will get rid of him. Now don’t move too far and make sure to stay in the first square of this room. Go into Morph Ball form and bomb the center of this platform and watch as the ground gives away, leading you to MISSILE EXPANSION #3!
Missile Expansion #4
Location: Crateria
Requirements: Bombs
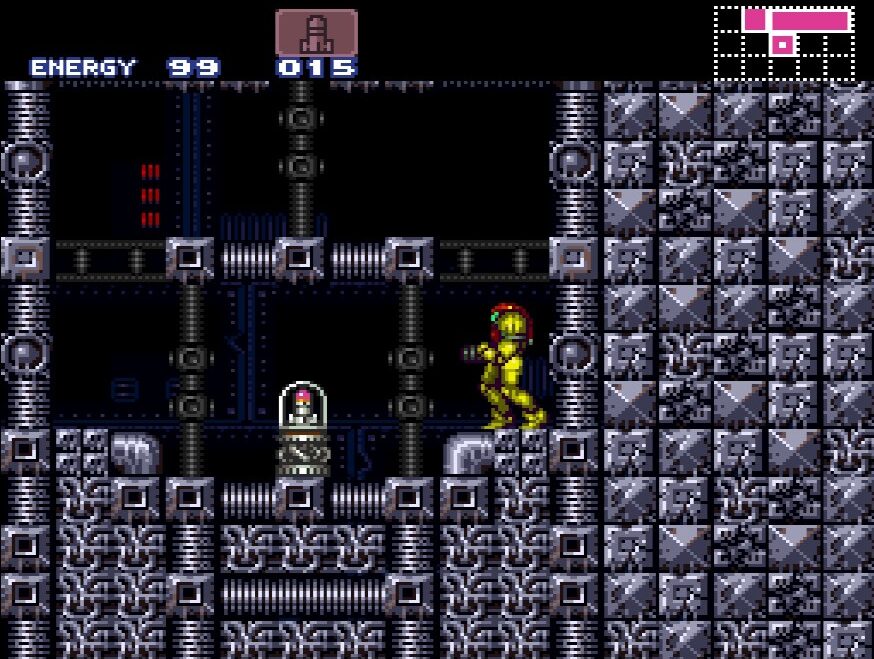
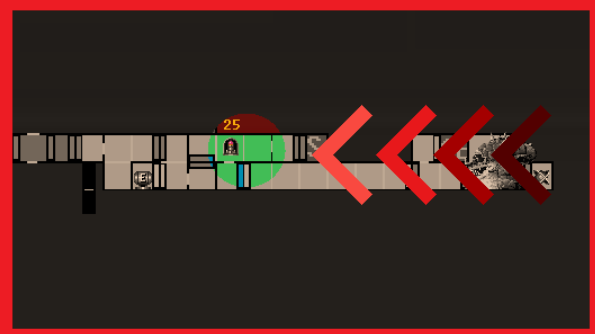
In Crateria, head to the two door intersection where the Map Station was. Instead of going right, this time we’ll take the left door. Shrink down and bomb the blocks in your way, keeping left until you get to a blue door. Open it up and collect MISSILE EXPANSION #4.

Missile Expansion #5
Location: Brinstar
Requirements: Missiles
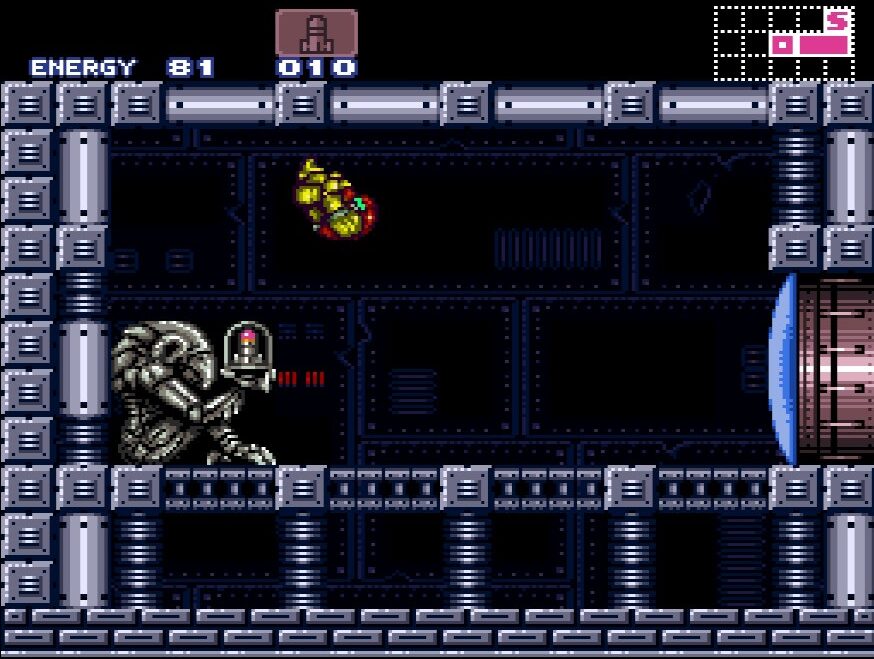
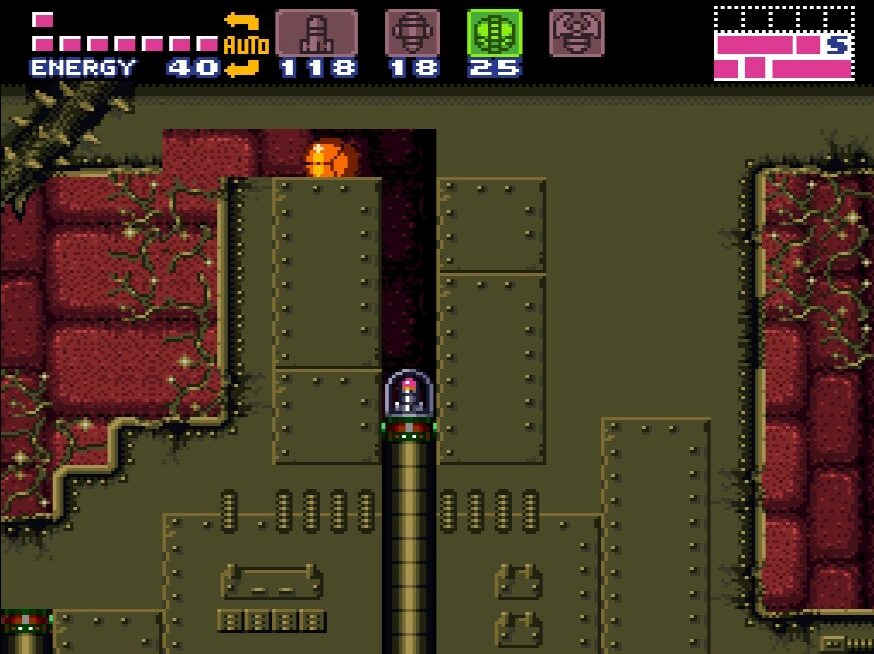
As soon as you step off the elevator to get into Brinstar from the left-most side of Crateria, there is a pink blast door. Open it and enter. Inside, there is a platform that will disintegrate as soon as you jump on it. Unfortunately, we’re not fast enough to yet make it to the other side of this room before the steel gates close, but fortunately, it will knock you down straight on top of MISSILE EXPANSION #5! Collect it, bomb the pillar to your left and exit into the main hallway again.

Missile Expansion #6
Location: Brinstar
Requirements: None (though Wall Jumping is required), OR Grapple Beam (makes it easier)
In the big pink room in Green Brinstar, head to what almost seems to be a mini pit within this room. You’ll see some blocks on the top that you can attach a grappling hook to, which the game wants you to come back to later to grab the Missile. However, with some careful jumping, we can claim it right now. Towards the bottom of the platform (not directly under it or the ground will give out and you’ll fall) perform a front forward jump so you’re spinning in the air. As soon as you hit the wall, perform a wall jump (see Samus’s Abilities for more info on how to do this) and as you’re jumping away, angle yourself so you’re still spinning towards the bigger block at the top of this platform. Perform a second wall jump off that block and land on top to claim MISSILE EXPANSION #6. If you’re having troubles with this, no sweat, come back later once you have the Grapple Beam and this will be a breeze.
Missile Expansion #7
Location: Brinstar
Requirements: None
Head to the pink room in Green Brinstar, eventually making your way to the bottom left corner of this room. Sitting right there in plain sight will be MISSILE EXPANSION #7! Kind of a relief to have this easy one since we had to jump around so much for the last one.
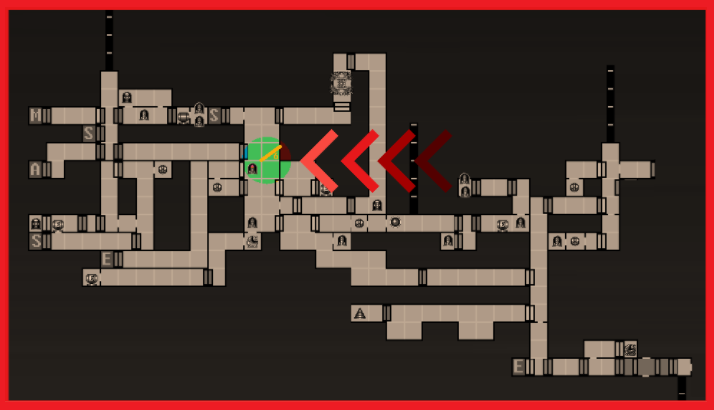
Missile Expansion #8
Location: Brinstar
Requirements: Super Missiles
From the pink room in Brinstar, head down towards the bottom right corner and proceed through the green door. You’ll now be in a room that’s taking downwards diagonally. Don’t let this fool you though! There’s a powerup here that’s easy to miss. There will be some more of those Super Mario pipes on the wall, but this time, they’re sideways and the creatures that are coming out of them are decidedly nastier. However, there’s one pipe at the very top corner in the middle of the room with nothing coming out. Wall jump up up it, shrink down to your Morph Ball, and roll towards your right to claim MISSILE EXPANSION #8.
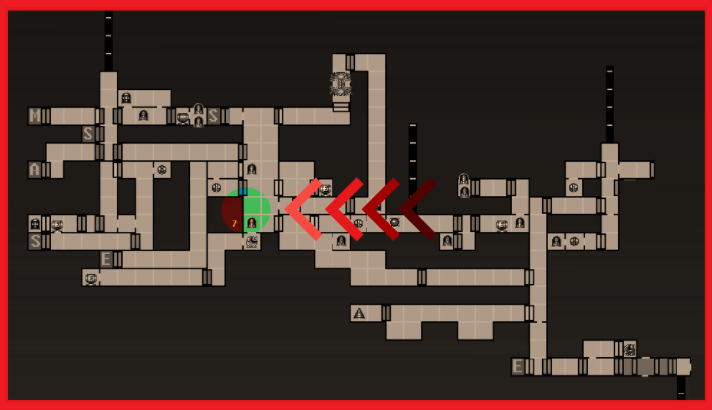
Missile Expansion #9
Location: Norfair
Requirements: Missiles, Hi Jump Boots
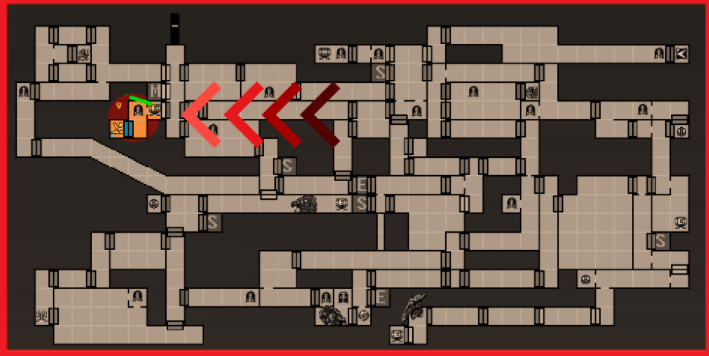
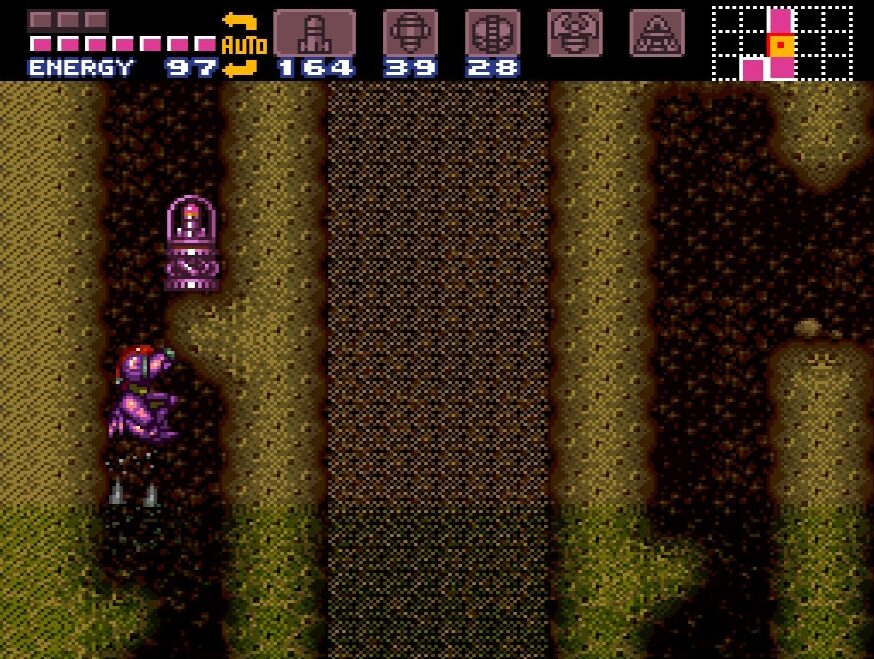
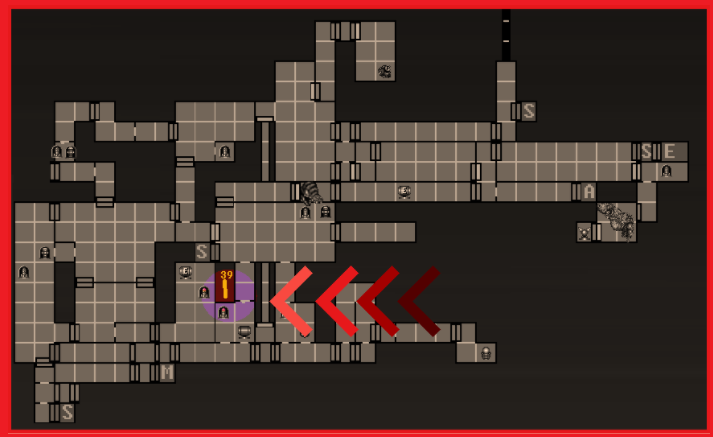
From the elevator in Norfair, head straight down and ignore every door that you see. The only room we can really do anything in right now is behind the pink blast doors at the bottom left corner of this shaft. Let some Missiles fly and enter.
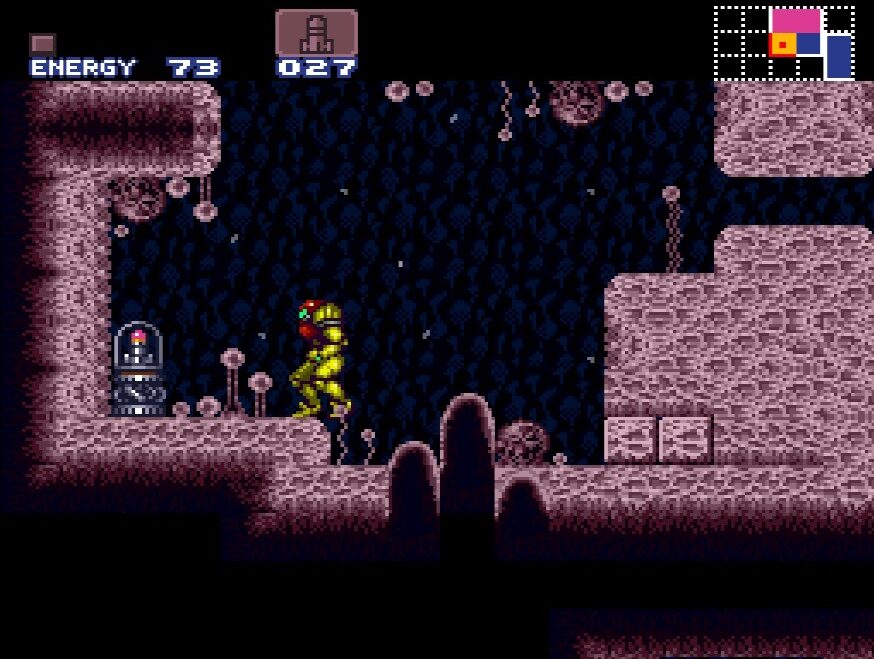
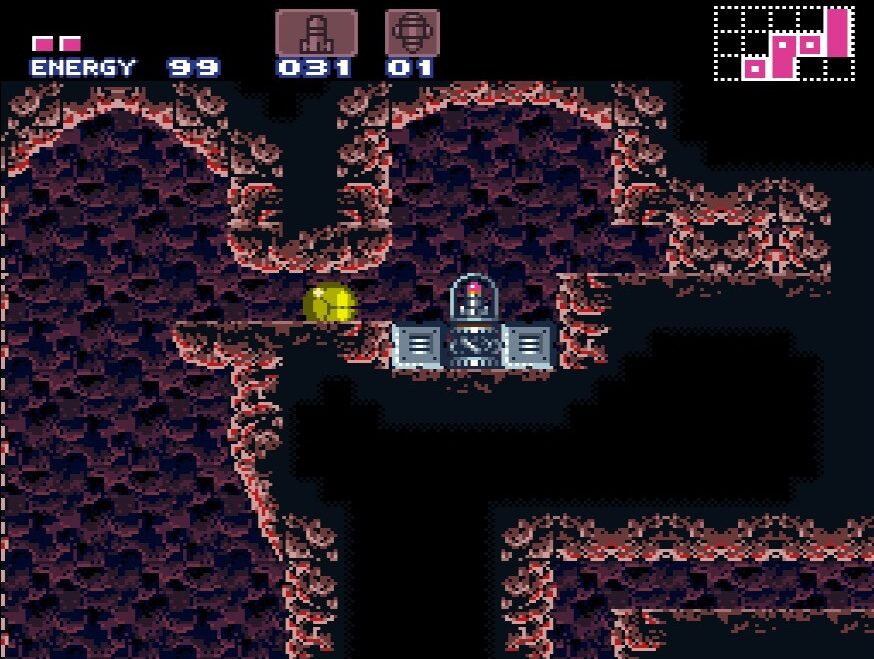
Immediately as you walk in, you’ll be able to grab ENERGY TANK #2. We’re not done yet though! You can see in the bottom left, there’s a small passage for us to fit through. Drop down and then roll left. Drop down the narrow tunnel and you’ll come out to a blue door. Master it open and walk through. Inside, there’s a Chozo Statue. Shoot the top part of the barrier in your way and jump over it to snag yourself the HIGH JUMP BOOTS. Jump up to the top of this room and nab MISSILE EXPANSION #9.
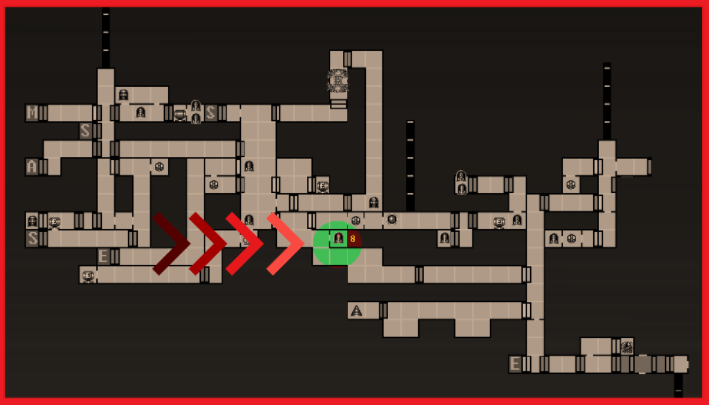
Missile Expansion #10
Location: Norfair
Requirements: Varia Suit
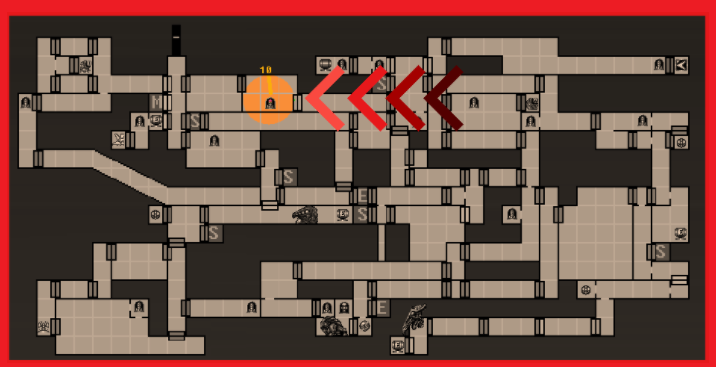
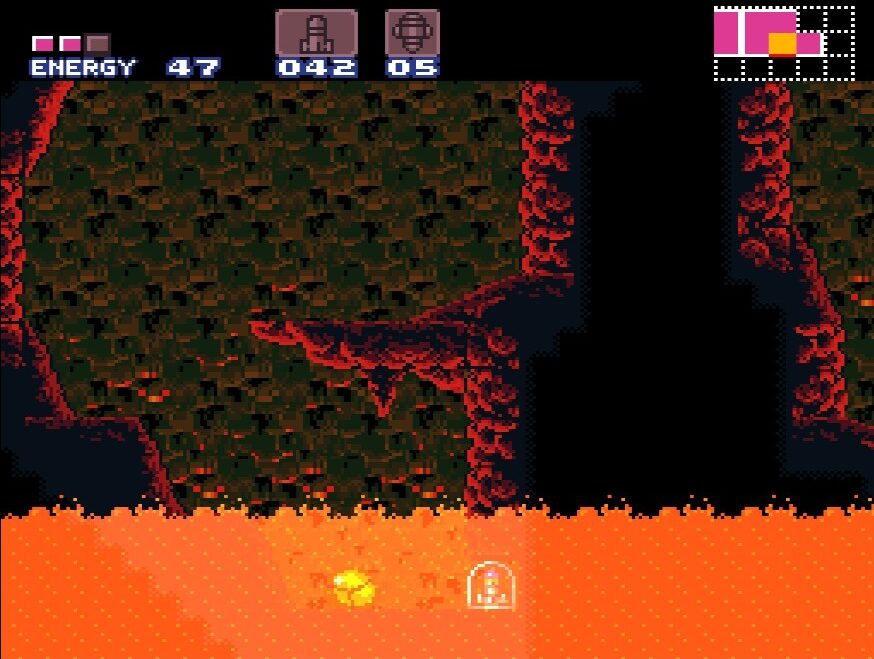
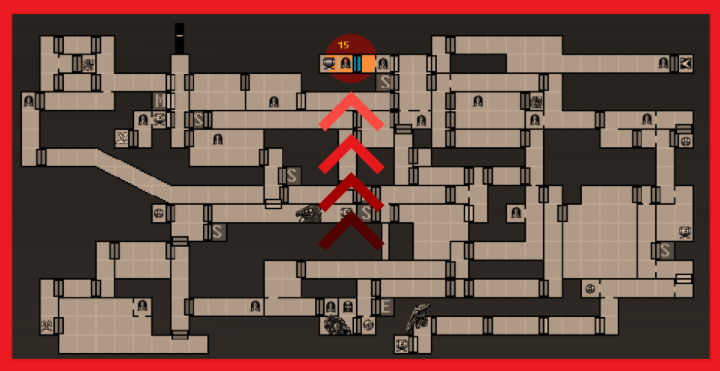
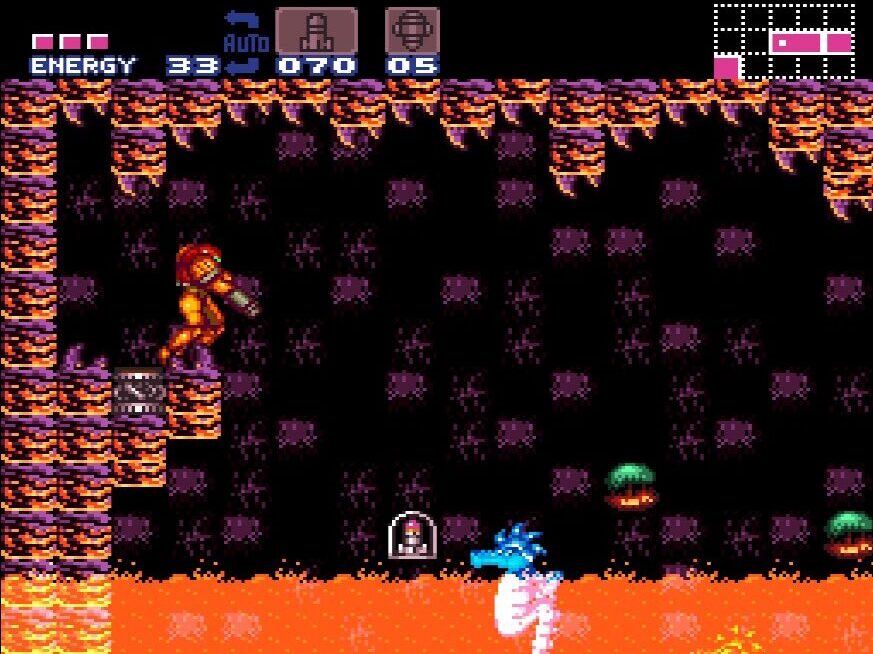
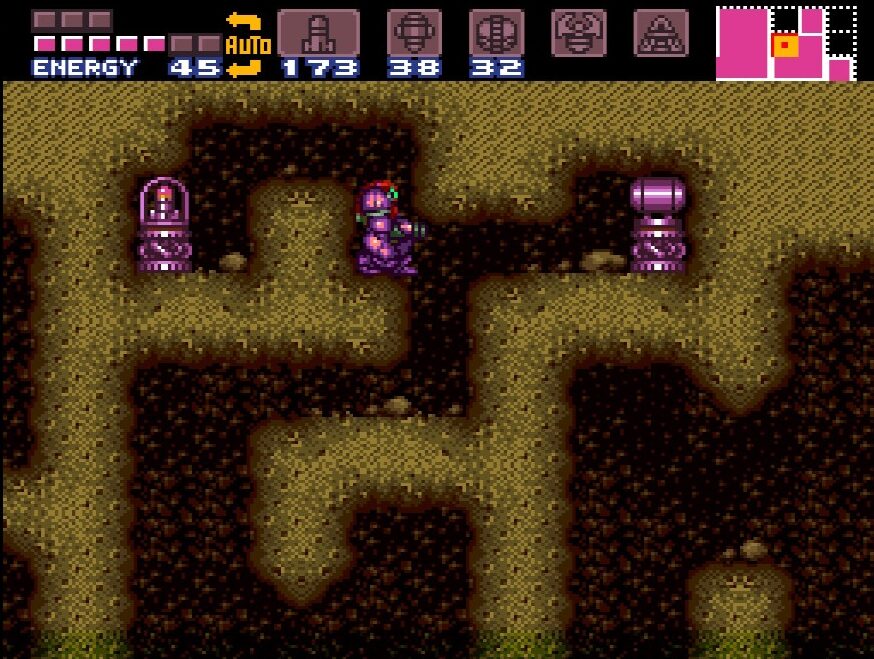
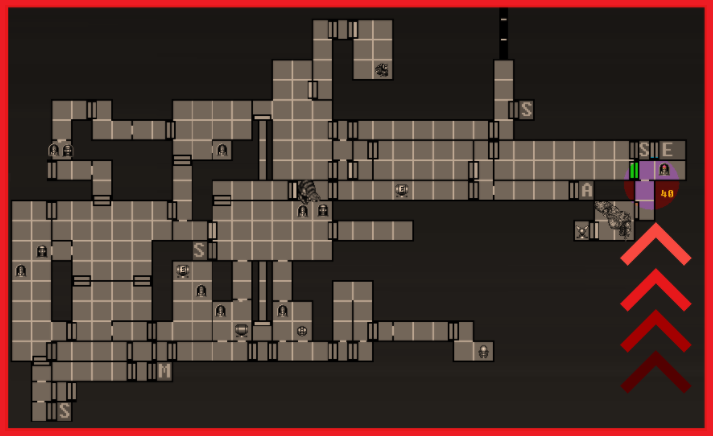
Once you’ve entered Norfair, go through the first blue blast door on your right. This room has a couple enemies and some platforms for you to scale, so deal with them and continue to the second room. This room is another large, cavernous room, but filled with boiling hot lava. Needless to say, try your best not to fall in. Progress through until you’re about halfway through this room, and then drop downwards to the lowest platform that’s right above the lava. Remember when I said don’t fall into the lava? Weeeell… turns out there’s something we want there. If you’re running low on health, skip past this, but if you’re feeling feisty and want some extra Missiles, then shoot the bottom left side of the wall to reveal MISSILE EXPANSION #10. Quickly roll over and grab it, ideally before the wall respawns, and then get the heck out of that lava ASAP!
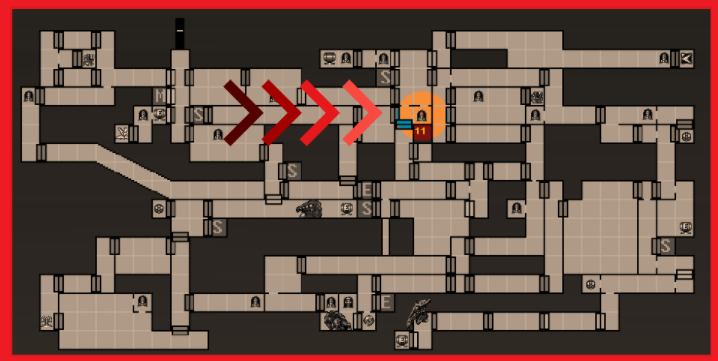
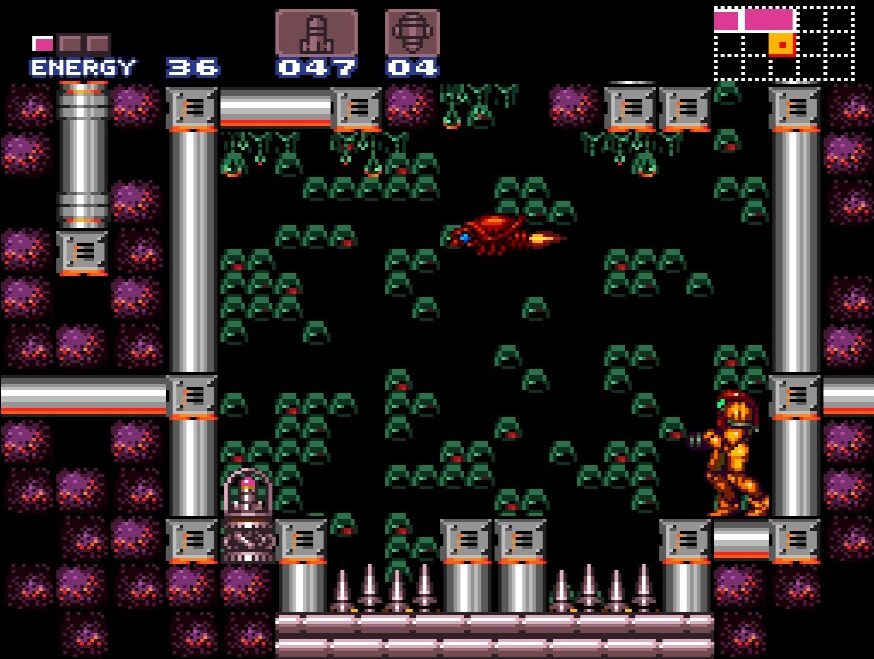
Missile Expansion #11
Location: Norfair
Requirements: Varia Suit, Bombs
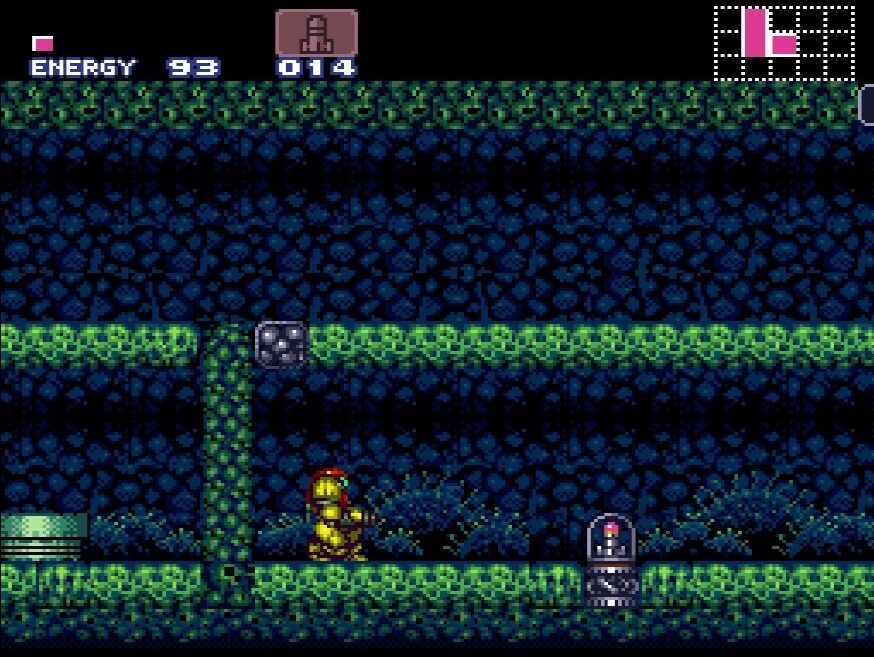
In the green Bubble room in Norfair, head over to the far lower right part of the room. The ground is false, so drop down, lay some bombs, drop down some more, avoid hitting the Ripper, jump across the spikes and pickup MISSILE EXPANSION #11.
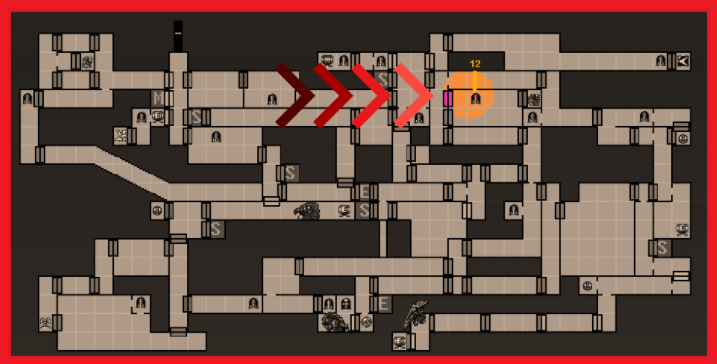
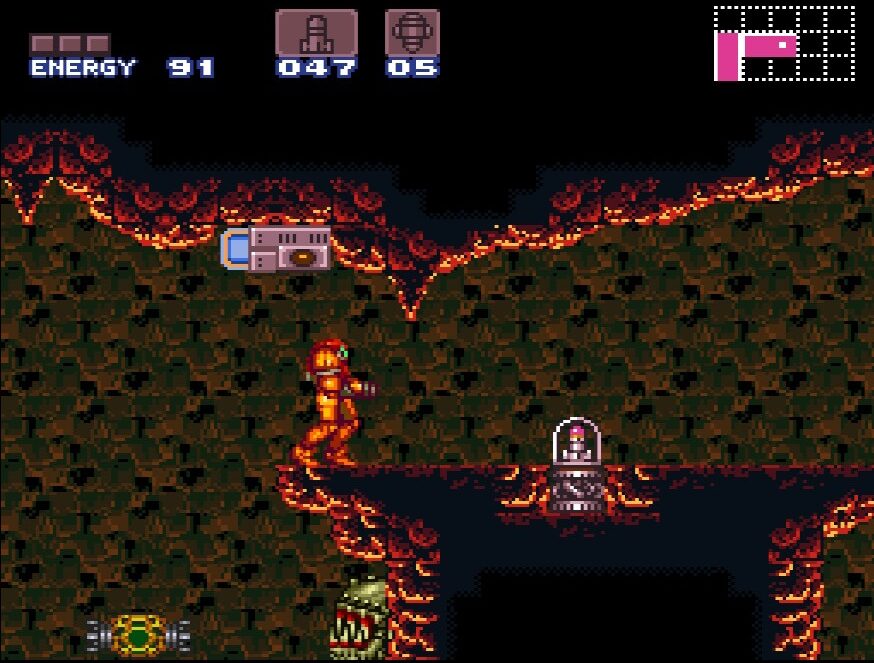
Missile Expansion #12
Location: Norfair
Requirements: Varia Suit, Missiles
There are four floating platforms that will move up and down when you jump on them. Carefully jump, being sure to avoid the Xenomorphs blue fire (these guys are everywhere, yeesh) and make your way across. If you fall, no big deal; you’ll just exit from that first blue blast door we walked past. If you make it across and shoot the gate open, then you’ll claim MISSILE EXPANSION #12.
Missile Expansion #13
Location: Norfair
Requirements: None
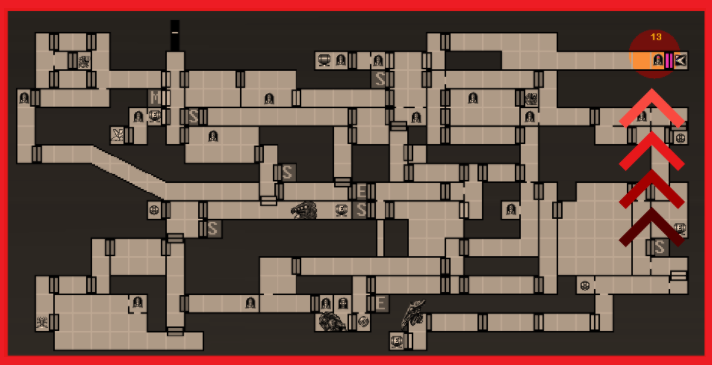
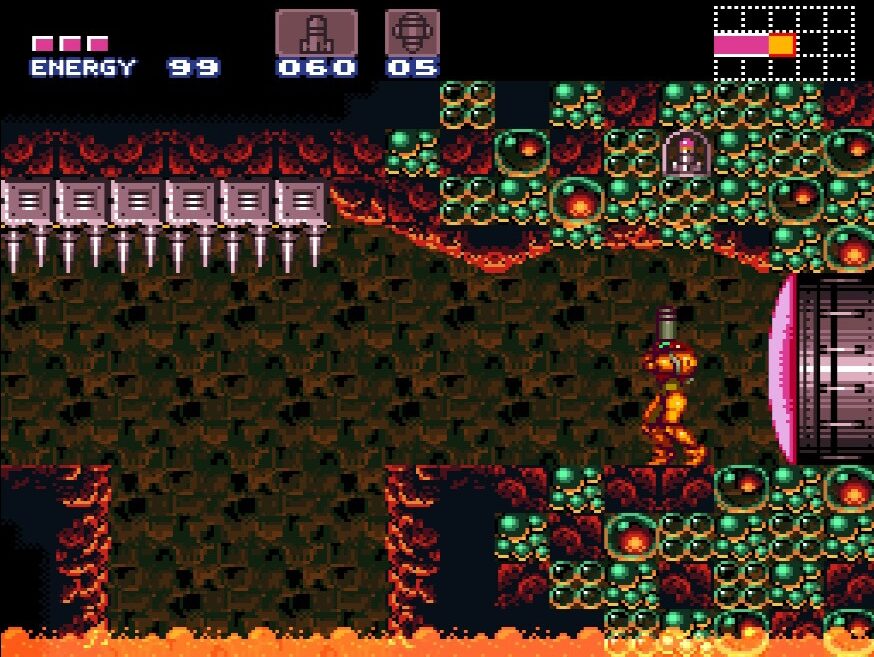
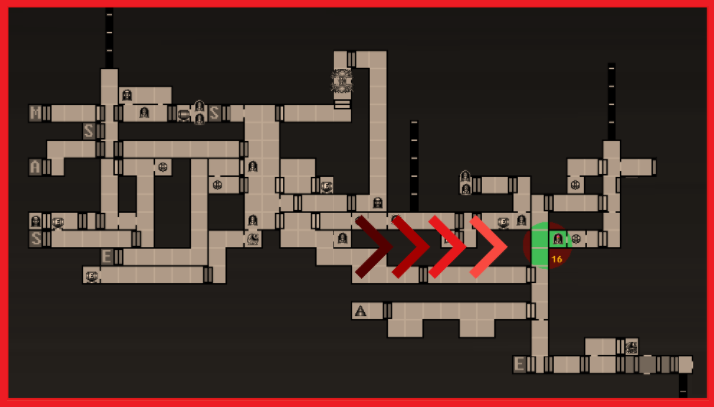
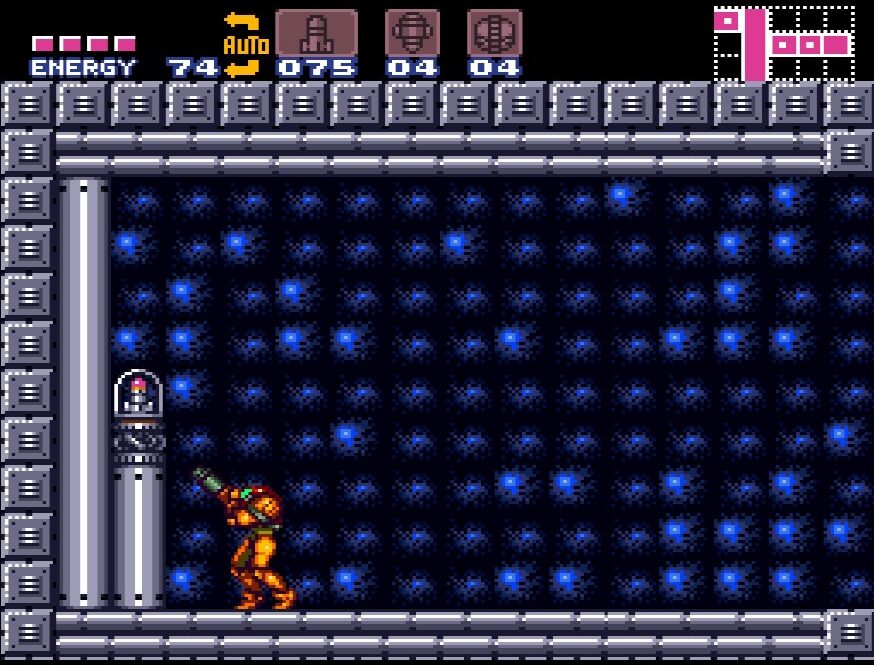
In the big long room before the Speed Booster, run to the very end. Before you open the pink door at the end of this long hall though, STOP just right before the door. Start shooting the ceiling, and one of the bubbles will burst, revealing MISSILE EXPANSION #13! Jump up and snag it!
Missile Expansion #14
Location: Norfair
Requirements: Ice Beam, Super Missile
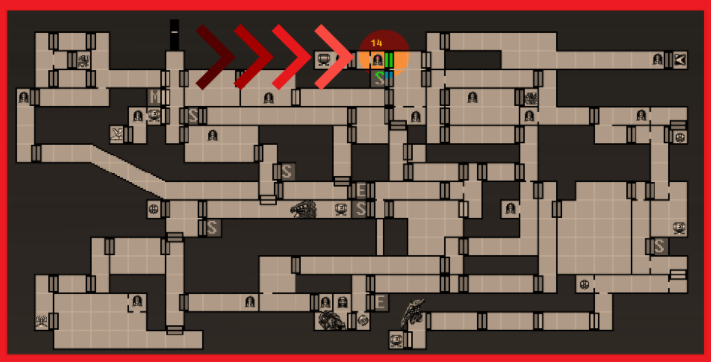
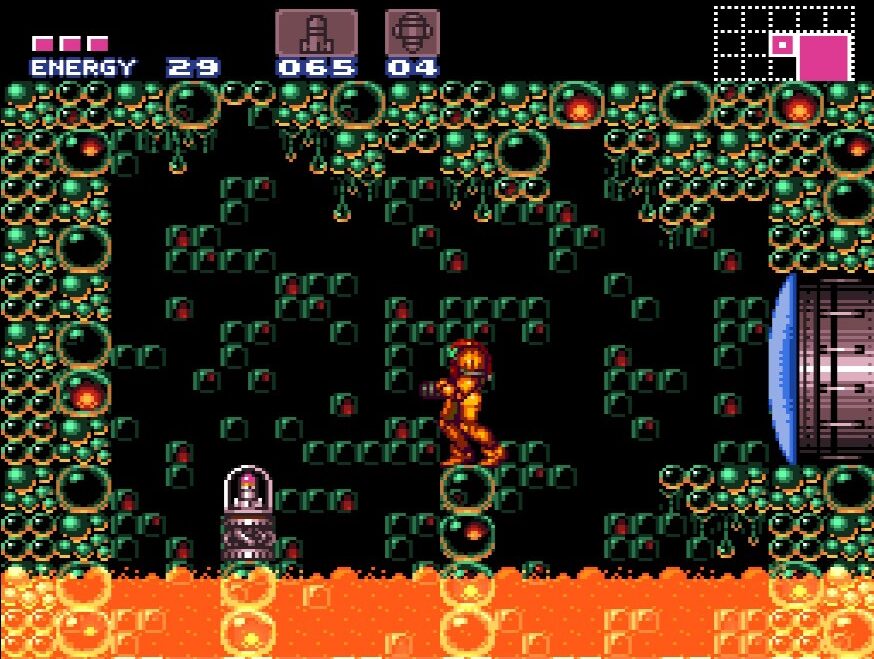
Make your way all the way back to the Bubble room. Go and stand on the platform beside the door leading to the Save Station room. This is gonna be tricky, but the powerups will be worth it. If you jump up, you’ll see two enemies flying about. Wait until one is in a perfect position and shoot it once to freeze it. We want this thing to be low enough that we can jump on it. It might take a few tries, but once you’ve frozen this erratic flying enemy, jump on him and jump up to the top left corner. Use a Super Missile and open the green door. Quickly get rid of the enemy in this room and hop over to grab MISSILE EXPANSION #14.
Missile Expansion #15
Location: Norfair
Requirements: Ice Beam, Super Missile
In the same room you grabbed Missile Expansion #14 in, shoot the left hand side wall and you’ll see one of the bubbles burst. You’ll want to jump and turn into a ball while you’re either ascending or falling – basically, tap down as soon as you launch yourself in the right direction. This can be tricky, and if you miss, you’re going to fall in some lava, but after a few tries, you should be able to fit through the small hole in the wall. Once you’re in, roll to the other side and go through the door.
This next room has all sorts of things going on – very small rock platform for us to jump across, fireballs being shot, and Geemers moving at mach speed (seriously, this is the fastest I think they move in the whole game!). Make your way over to the far right, freeing enemies and using them as platforms if you need to. Surprise – the last small rock/platform can be shot to reveal MISSILE EXPANSION #15!
Missile Expansion #16
Location: Brinstar
Requirements: Power Bombs
In the room you grabbed POWER BOMB EXPANSION #1 in, immediately drop one of those power bombs, A) just so you can see how destructive and cool they are, and B) because the wall beside you is going to blow out, giving way to MISSILE EXPANSION #16 (Woooo!).
Missile Expansion #17
Location: Crateria
Requirements: Power Bombs, Gravity Suit (optional)
If you want to wait until later in the game when we acquire the Gravity Suit to get these next couple pickups, I don’t blame you, although I think the reward will be worth it!
What you want to do now is speed boost in the area your ship is in. Run from the right side to the left, and right before you get to your ship, jump and launch yourself diagonally in the air, straight towards the upper portion of the rocky wall.
You should land on a crevice about halfway up the wall. Either lay a power bomb or wall jump up to the flat part of the wall and bomb it as you fall (see the map for the exact location). You’ll see a section of wall be destroyed, allowing you to wall jump up and into this new pathway. Once you’re in, go through the door.
This room has a bunch of rock walls that need to be bombed to progress. Trouble is, there is rising and falling lava which burns a lot when it touches. Again – if you come back later with the Gravity Suit, you will be immune to the lava, but if you proceed now and take as little damage as you can, we’ll have some extra goodies for the upcoming areas. Drop power bombs to break the walls, don’t mess around with regular bombs, and cross to the left side as quickly and with taking as little damage as you can. Watch out for the enemies that grab you, and make sure you have at least one power bomb when you leave.
Head into the next room and grab ENERGY TANK #5, which will mercifully fill your health back up. Good thing too, because we’re now doing something even crazier!
Underneath the platform the energy tank was on is a bombable wall and slot for us to fit through in Morph Ball form. Bomb it, roll through, try not to take too too much lava damage, and roll over to the other side. Shoot the wall on the left and jump up.
This room functions the same as the last – there are rock walls blocking your path that we’ll want to take out with power bombs. In addition to the rising and falling lava, this room also gifts us spikes everywhere which hurt like hell if we bonk them, so proceed carefully but quickly all the way to the left. Lay one final power bomb at the end and go through the grate and through the blue door.
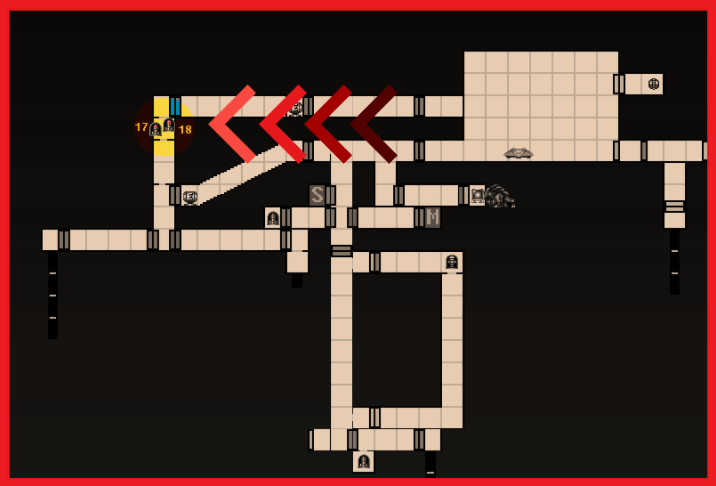
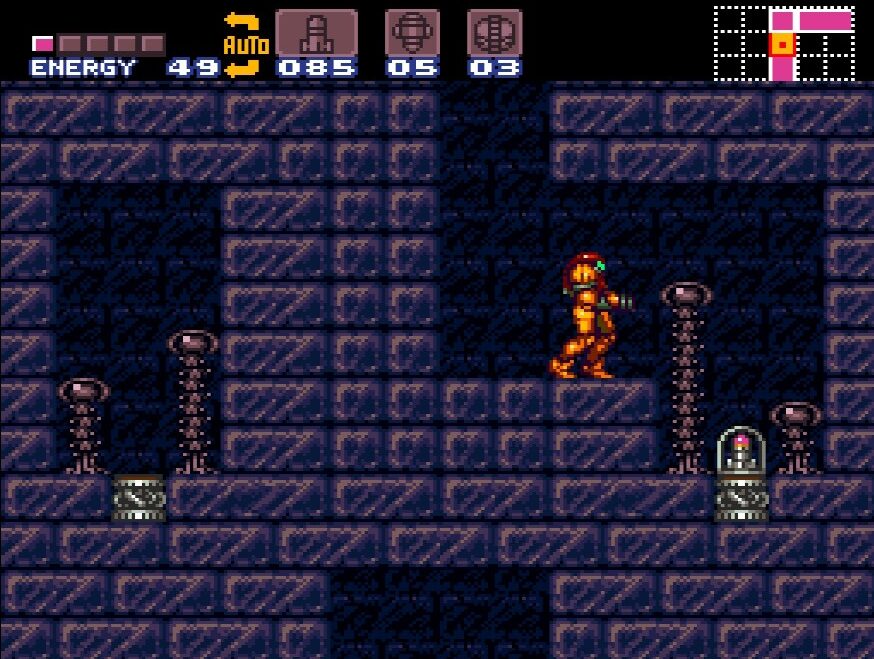
Here, you can drop down. Pick a side – either drop to the left or the right. Make sure you’re hugging whatever side you choose tightly, as you’ll soon see two Missile Expansions on either side. Shoot the walls when you start to drop close enough to one side and quickly get over to grab MISSILE EXPANSION #17. Drop down, lay a power bomb, and make your way back towards your ship to heal up and save.
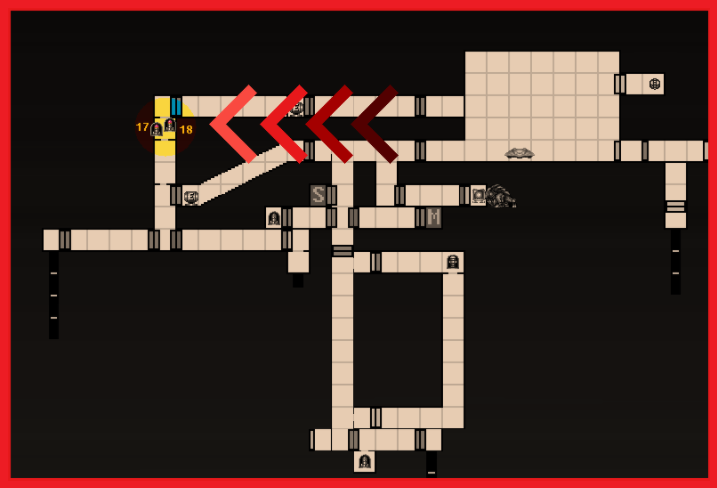
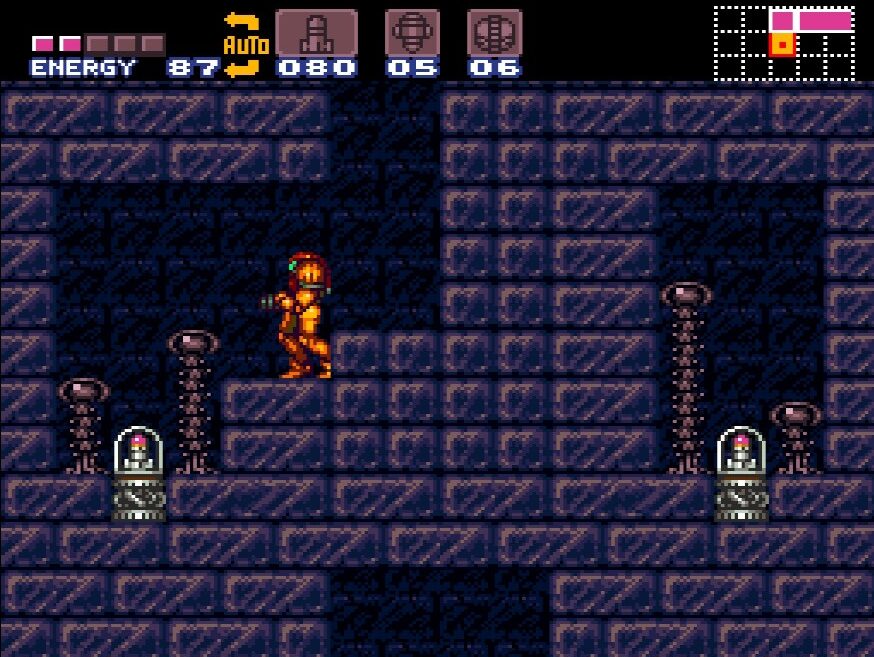
So… the bad news first? We’re going to have to do that while sequence again from start to finish, just falling down the opposite side of whichever side you decided to fall down. The good news is doing so gets you MISSILE EXPANSION #18.
Missile Expansion #18
Location: Crateria
Requirements: Power Bombs, Gravity Suit (optional)
Same exact strategy as Missile Expansion #17
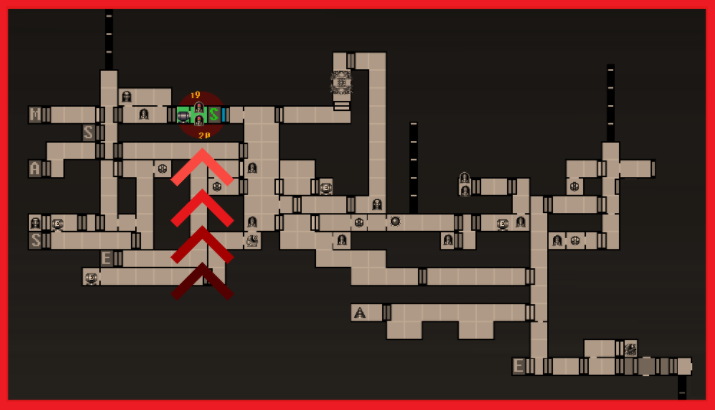
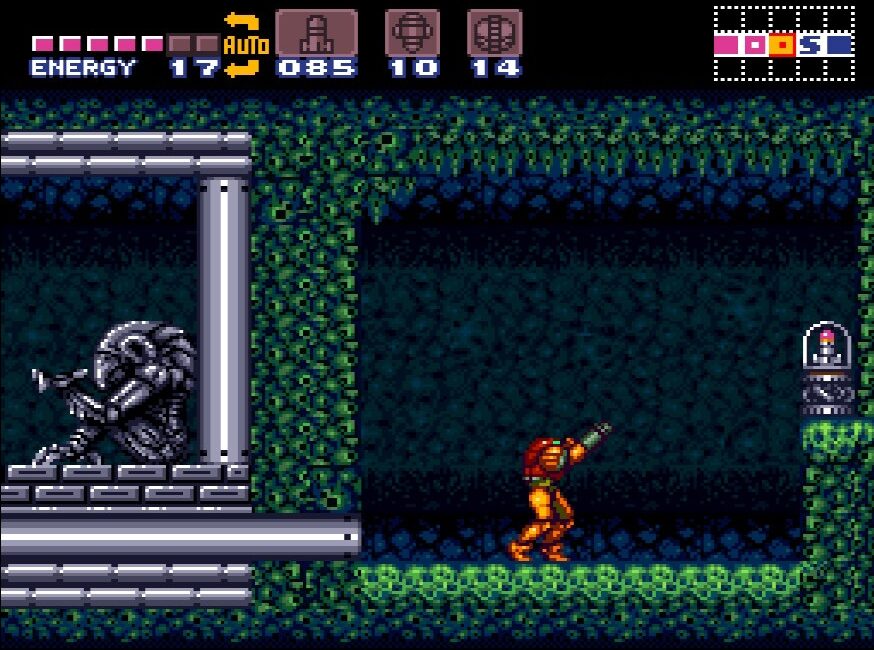
Missile Expansion #19
Location: Brinstar
Requirements: Speed Booster, Missiles
From the elevator room in Brinstar, head into the top right room where we grabbed Missile Expansion #5. Hop up on the platform and Speed Boost your way to the other end of the room, leaving those gates in your dust. Go through the pink blast doors and grab RESERVE TANK #2! But wait, there’s more! Simply roll under the Chozo Statue and enter a room behind it where you’ll see MISSILE EXPANSION #19. But wait – there’s more! Lay a power bomb and the wall will evaporate, revealing MISSILE EXPANSION #20!
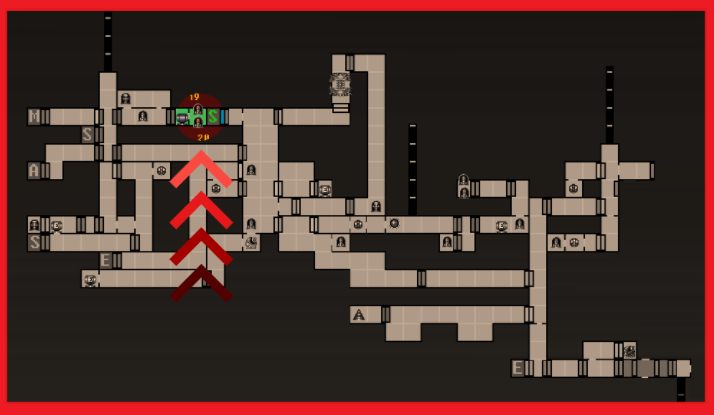
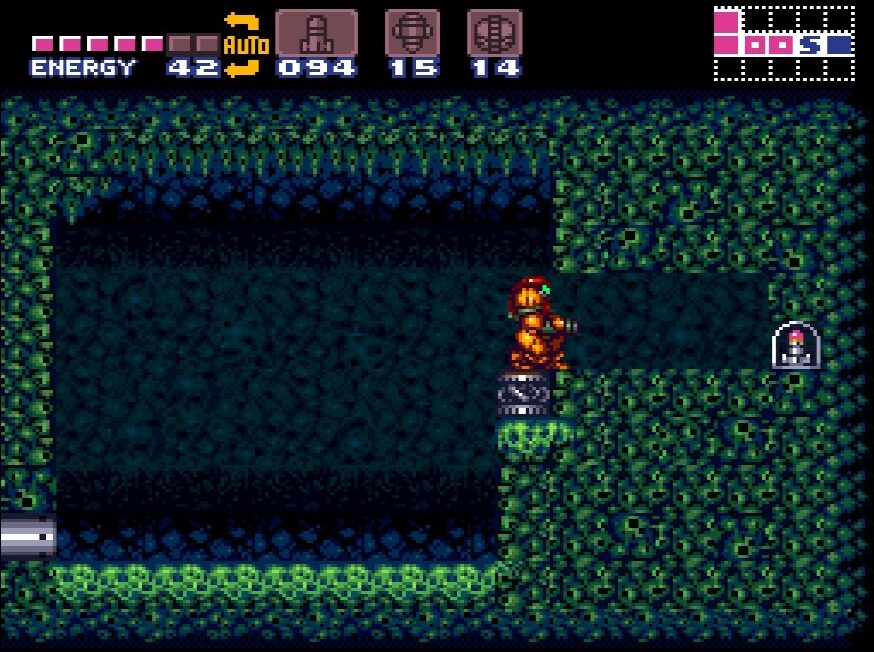
Missile Expansion #20
Location: Brinstar
Requirements: Speed Booster, Missiles
See Missile Expansion #19.
Missile Expansion #21
Location: Norfair
Requirements: Power Bombs, Space Jump (optional)
In Norfair, head to the top left room where we used our Speed Booster earlier to run past the grates and get the Ice Beam. This time, when we get to the end, lay a power bomb and drop down. Continue left a room until you arrive at a long shaft with red walls.
Don’t move when you get here! Stay still, because every tile and platform in here is collapsible. From the blast door, fire your beam straight ahead at the wall, and you’ll see a Missile hidden at the far left! Do your best to wall jump up to it before all the platforms completely disappear and grab MISSILE EXPANSION #21! If you’re having troubles with this, come back later once we acquire the Space Jump and grab it.
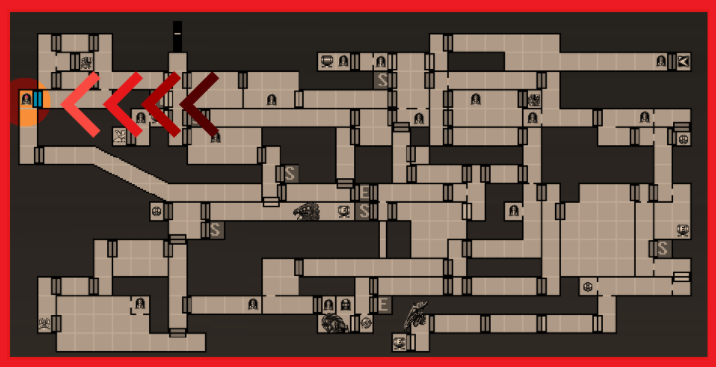
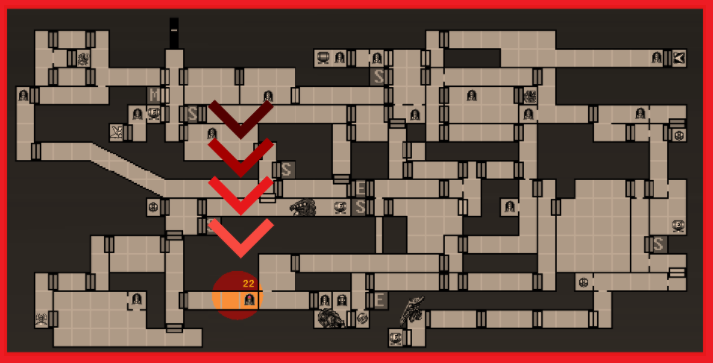
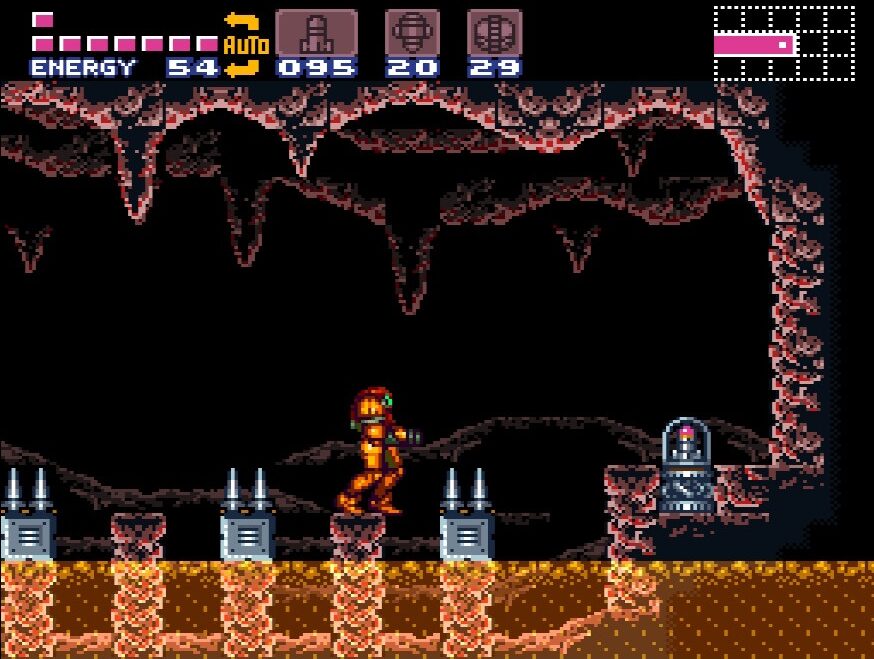
Missile Expansion #22
Location: Norfair
Requirements: Missiles
Enter room and head right, doing your best to avoid the lava. Jump over the spines and grab MISSILE EXPANSION #22.
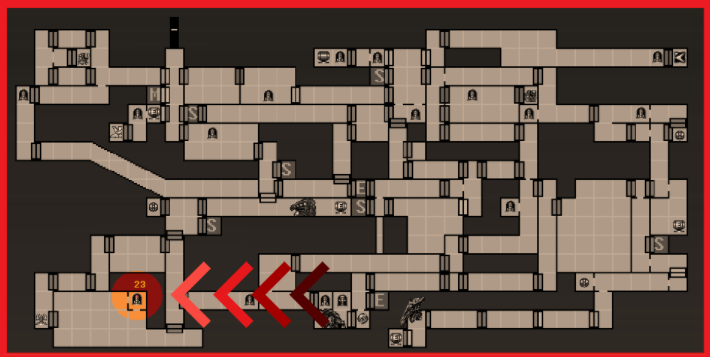
Missile Expansion #23
Location: Norfair
Requirements: Grapple Beam
From the room you got the Grapple Beam in, turn around and go through the door you entered from. This is one of the most annoying expansions in the entire game to get, but here we go. Jump up and grapple the flying Rippper’s at the top of this room. Swing and propel yourself forward and do your best to grapple the next Ripper over before you fall. You need to do this two more times after this to get all the way across. Unfortunately, there’s not really any advice I can give you, other than maybe try to make sure you launch yourself sideways instead of up. This is a pain, and you’ll probably fall multiple times (if you’re playing on the Nintendo Switch Online, there’s no shame in using the rewind feature!). Once you’ve finally, mercifully made it across however, go and pick up your hard earned MISSILE EXPANSION #23.
Missile Expansion #24
Location: Norfair
Requirements: Grapple Beam
From Crocomire’s hallway, head up. You’ll be back in the vertical room with the Save Station in the middle. Continue up to the top of this room and enter the door on your left. You’ll find yourself in another rather large room that actually connects to the main elevator shaft. Go to the top of this room and use your Grapple Beam to get yourself across. Pick up MISSILE EXPANSION #24 and open the green gate.

Missile Expansion #25
Location: Brinstar
Requirements: Power Bombs
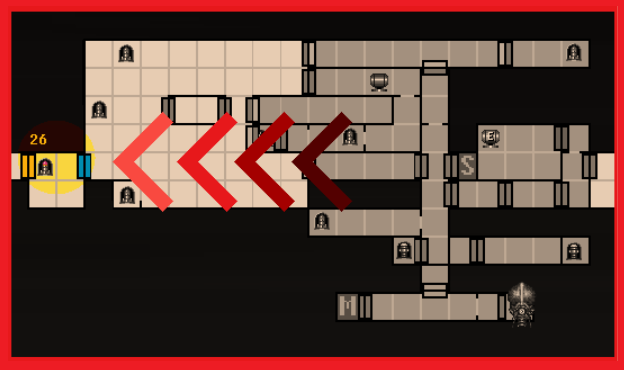
From the Norfair to Brinstar elevator room, make your way towards Kraid’s Lair. Work your way towards the Save Station, stopping when you get to the room with all the bugs two blocks before the Save room on the map.
Go over to the steps on the right hand side and lay a power bomb. You’ll see a Missile hiding in the wall, with a very narrow passageway to grab it. Either bomb jump up, or if you’re like me and suck at bomb jumping, jump up and immediately tap down to get into Morph Ball form, and slide over to the right to get MISSILE EXPANSION #25!
Missile Expansion #26
Location: Crateria
Requirements: Grapple Beam
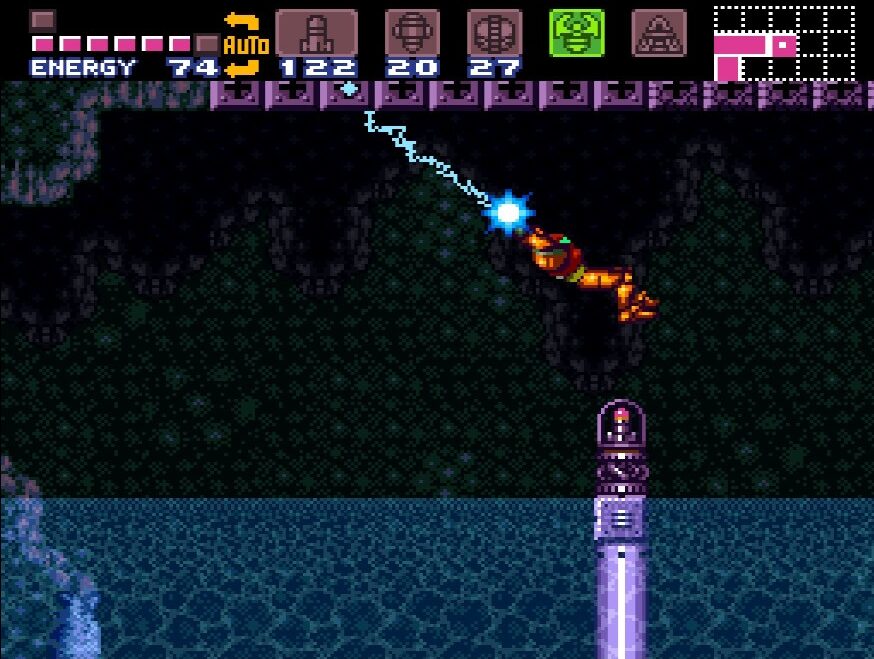
From Samus’s ship, continue right, pressing forward through the yellow blast door until you get to a room full of water with but a singular line sticking up at the center. Now that we have our Grapple Beam though, this is no match for us! Not only that, but you can swing by and snag MISSILE EXPANSION #26, which might be the easiest pickup in the game yet!
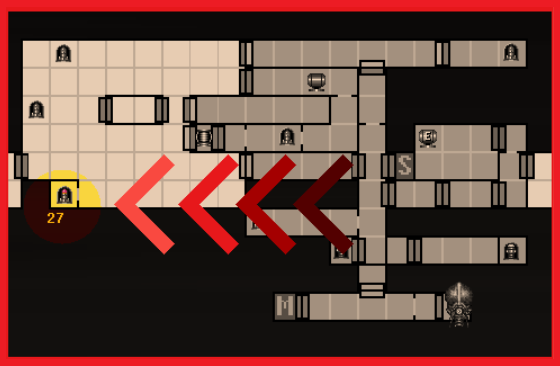
Missile Expansion #27
Location: Crateria
Requirements: Bombs
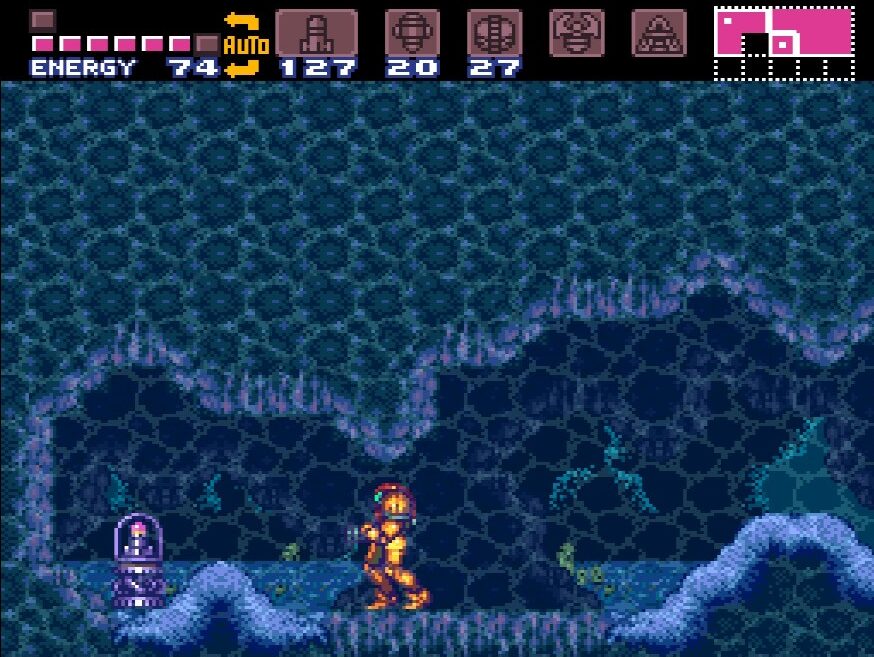
In the Crash Site immediately before entering the Wrecked Ship, roll down into the water and head to the left most wall underwater. Give it a shot and you’ll see a small passageway. Jump up and roll through to grab MISSILE EXPANSION #27.
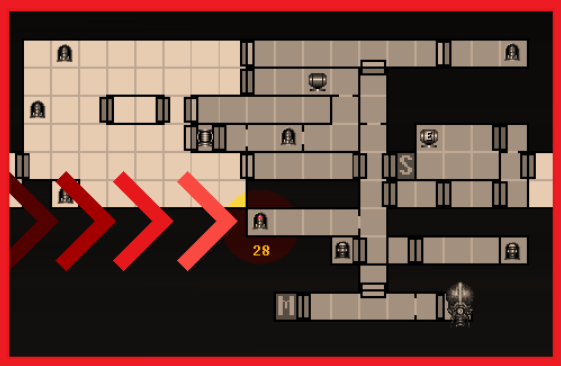
Missile Expansion #28
Location: Wrecked Ship
Requirements: Bombs
As soon as you enter the main shaft of the Wrecked Ship, drop down two map tiles and lay a bomb at the far lefthand side wall at the bottom, on the smaller platform with the sloped stairs. You’ll see a bunch of spikey looking platforms that normally would be moving up and down, trying to crush our bones, but are now nice and docile. Head over to the far lefthand side of this room and grab MISSILE EXPANSION #28.
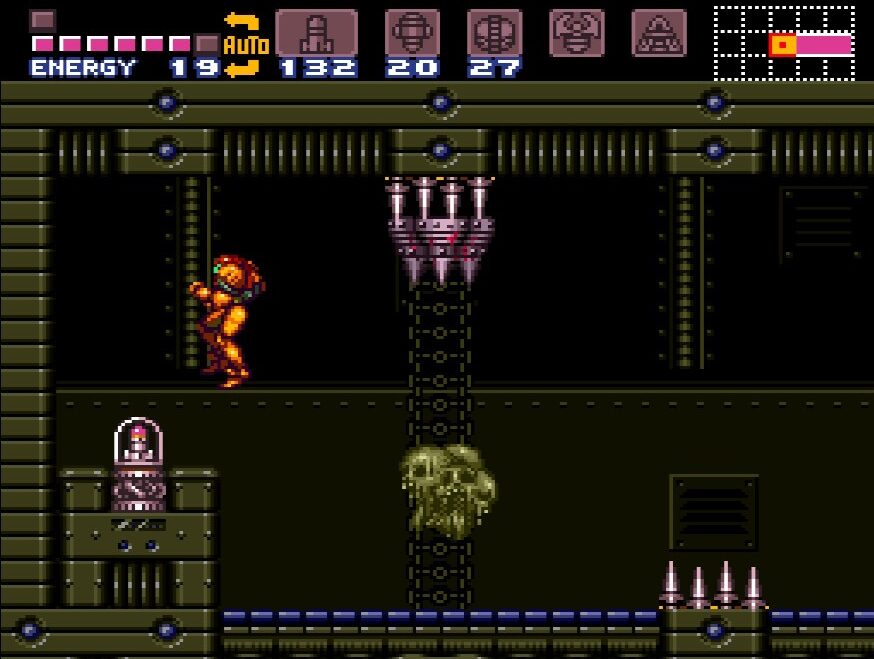
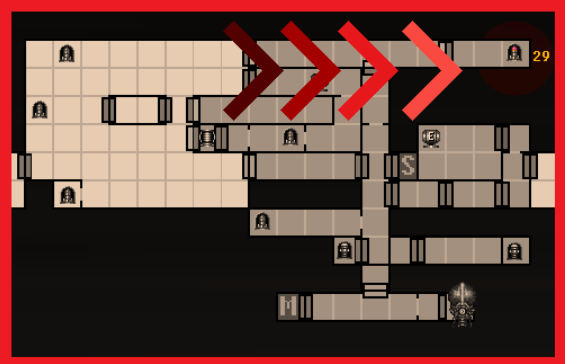
Missile Expansion #29
Location: Wrecked Ship
Requirements: None
Once all the enemies are defeated in the topmost hallway in the Wrecked Ship, enter the door on the far right of the room. There are some weird drone things that kind of look like a brown R2D2. Shoot them continually with your beams to push them backwards. Keep doing this until the bots fall into a pit of spikes. Keep doing this until you’ve made your way to the far right side of the room, at which point, you can grab MISSILE EXPANSION #29.
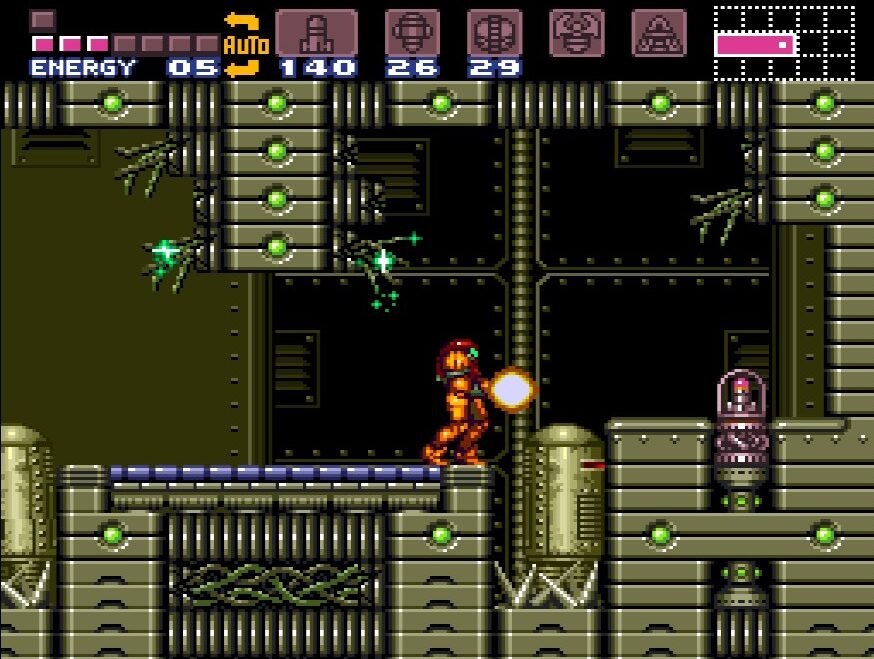
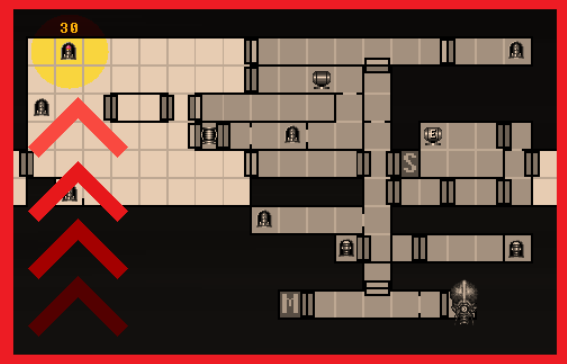
Missile Expansion #30
Location: Crateria
Requirements: None
Outside in the upper area of the Crash Site. If you look towards the sky, you’ll see some moving platform creatures zipping back and forth. Jump on the lowest one and keep jumping up onto a higher one until you’re basically at the top of the screen. Wait until the platform is heading west towards the left wall. When you see the wall start to approach, shoot it, and jump over to retrieve MISSILE EXPANSION #30.
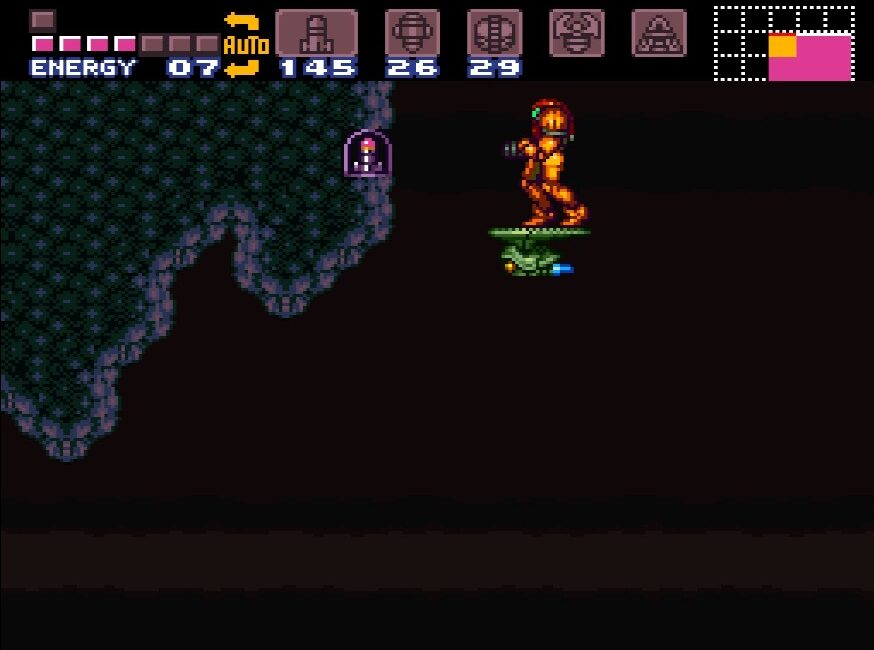
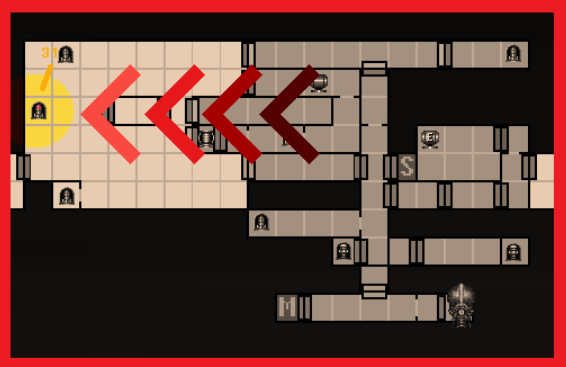
Missile Expansion #31
Location: Crateria
Requirements: Super Missile
Drop to the ground, and make your way to the left hand side of the upper section of the Crash Site. Either use your X-Ray Scope or drop some bombs to reveal a block for a Super Missile to destroy. Shoot it and drop down into the narrow passageway. Roll down and over to the left to grab MISSILE EXPANSION #31.
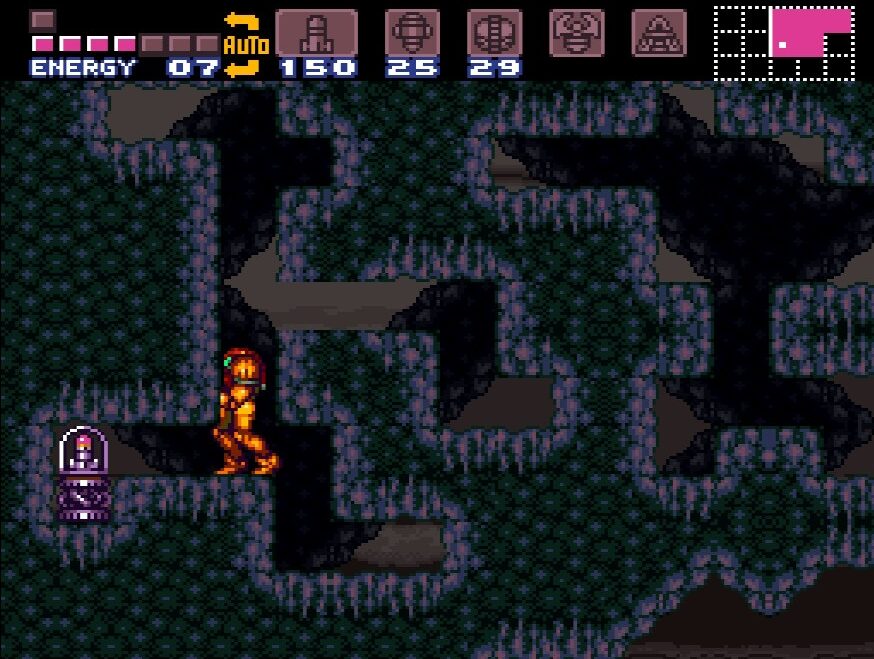
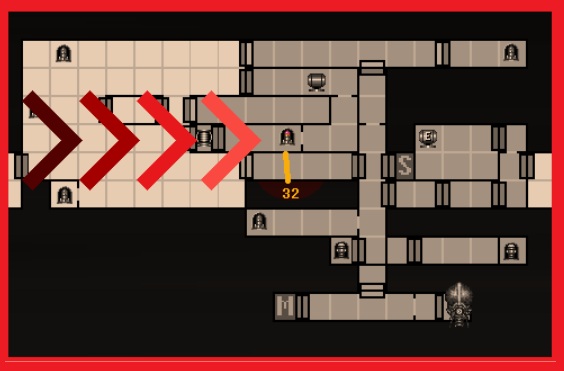
Missile Expansion #32
Location: Wrecked Ship
Requirements: Bombs
After the Chozo statue carries you and drops you in the Wrecked Ship, in the same spot where he dropped you, lay a bomb and roll over to the left. There are some more of those annoying R2D2 drones that you’ll need to shoot out of your way, but eventually they’ll fall into their spikey pits and you’ll be able to pass. You’ll see another Chozo Statue, and while this one doesn’t move, it does offer you MISSILE EXPANSION #32. Fair trade off.
Missile Expansion #33
Location: Maridia
Requirements: Speed Booster, Shinespark, Missiles
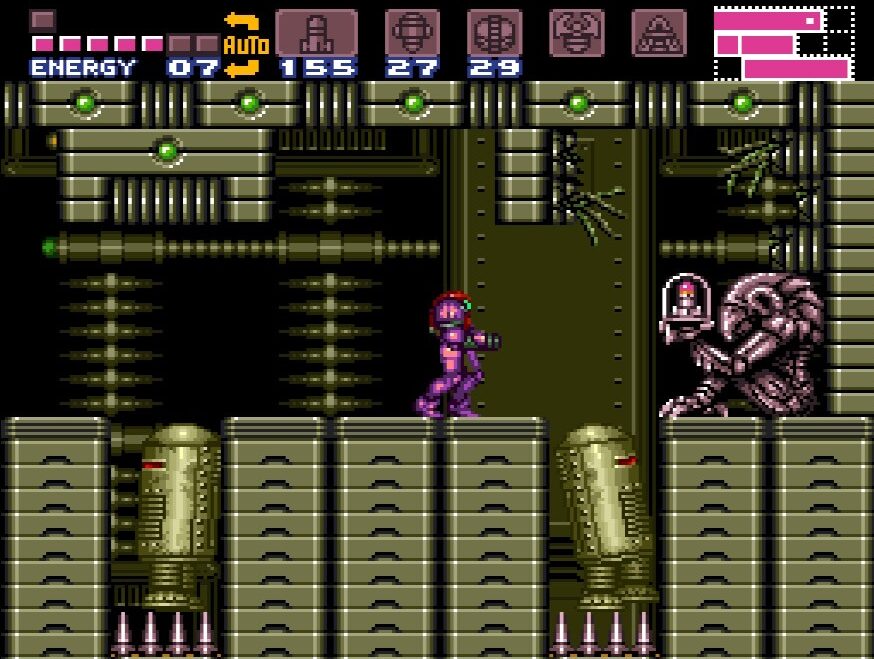
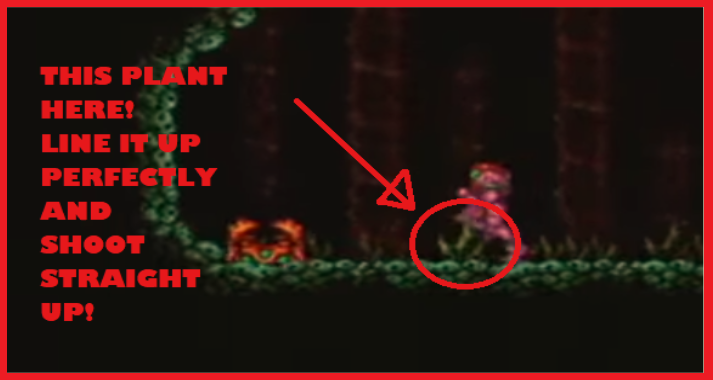
We may as well get one of the toughest Missile expansions out of the way right at the top here. First before you do anything, take a second to look at the ground right beside the door. Notice how there are two bright green plants on the floor? We’re going to use the second green plant as a marker, so remember that.
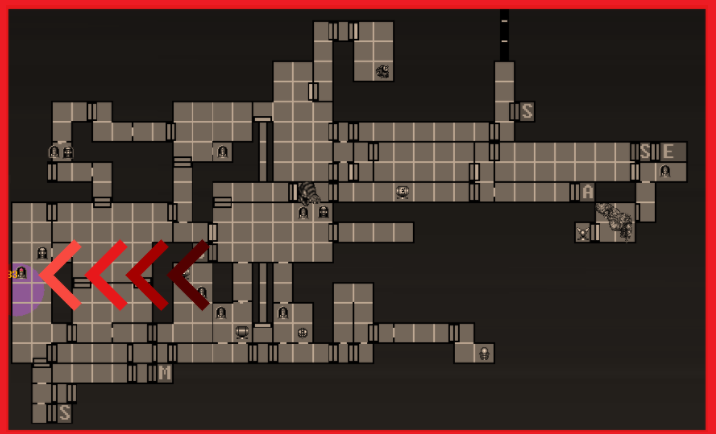
Head over to the pink blast door on the right and open it. Immediately turn around and open the blast door you just came through – don’t go through it, but just leave it open. Get rid of all the enemies in this room and open the gate with a Super Missile. Run towards the end of the room, and then start Speed Boosting towards the door you entered from on the left. Try and press down as you are going through the door! If you can’t, then try immediately after you exit the door into the main room. This can be tricky since the ledge is small though and you’re more likely to run off. You can likewise press down right before you cross the door and run through, but you’ll have to act really fast to make up for that.
In the main room, you should be blinking now, indicating that you can Shinespark. You have about 3 seconds to get into position until it goes away, so act fast! Quickly run over to where the SECOND green plant was and Shinespark upwards! If you’ve done this quickly enough and correctly, you should blast all the way up to MISSILE EXPANSION #33. This. Is. A. Pain! This will likely take you several tries, and even if you pull it off properly, there’s that stupid enemy slug that seems to always be in your way that can mess up the whole thing. It’s tough, but the satisfaction will be worth it, I promise!
Missile Expansion #34
Location: Maridia
Requirements: Missiles, Grapple Beam
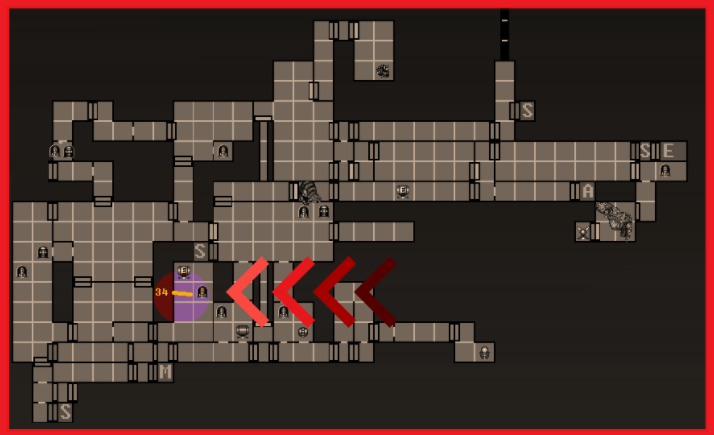
From the broken tube room, head on up into the main Maridia hall. Jump up a little bit, and head to the blue blast door on your right (above the pink one we were Speed Boosting out of earlier).
Head inside and we’ll be in another huge room with lots of cliffs and crevices in it. Wall jump up and over the first big hill in this room until you’re standing in the middle of the room. Drop straight down and fall into a pit with a nasty looking pink Space Pirate. These pink fellows are impervious to our current beams, so don’t even try to engage with them. Instead, run over to the righthand side wall, do a little hop and run right through it. This is the first of many invisible walls as I call them (that’s actually backwards – the walls are visible, but they shouldn’t be, but it’s the name I chose and I’m sticking to it!) in Maridia that we’ll need to go through. Keep running to the right and enter the pink blast door.
This room will have a bunch of baby turtle’s (cute!) and a big tough mama turtle who’s going to spin-attack us with her shell when we get close (not so cute). The mama turtle is actually going to be quite helpful to us however. If you jump on her back, she will propel you straight towards. Quickly jump onto the upper left ledge of the room and equip your Grapple Beam. In the top corner is a singular grapple block. Jump up, grapple it, swing around and land on ENERGY TANK #10. Fall down, and get back on the mama turtles back, but this time jump off on the upper right ledge of the room. Lay a power bomb and drop down. As you’re falling, you’ll see a Missile exposed. Stay snug to the wall as you’re falling and you’ll grab MISSILE EXPANSION #34. Thank the mama turtle and her babies and make your way out of this room.
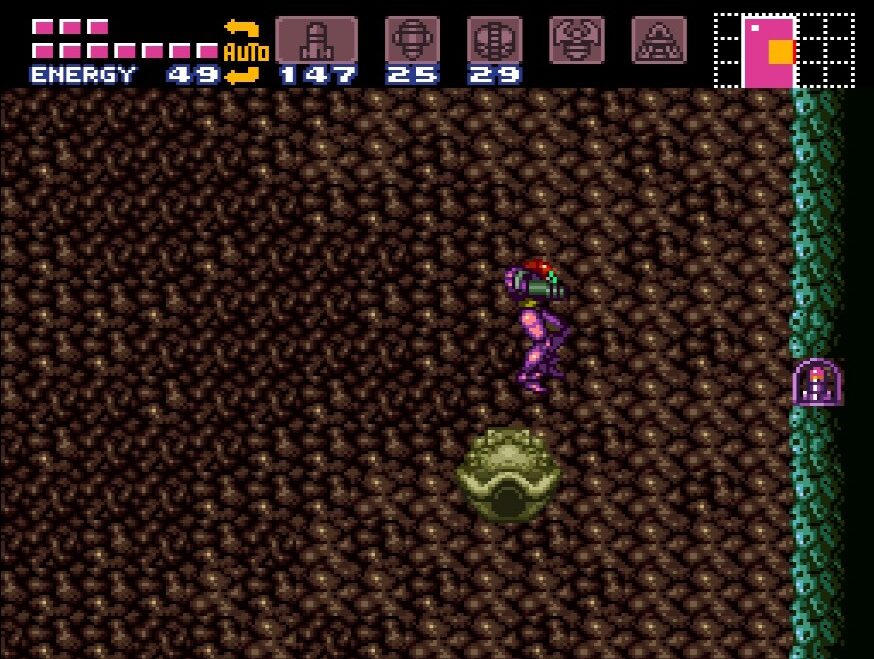
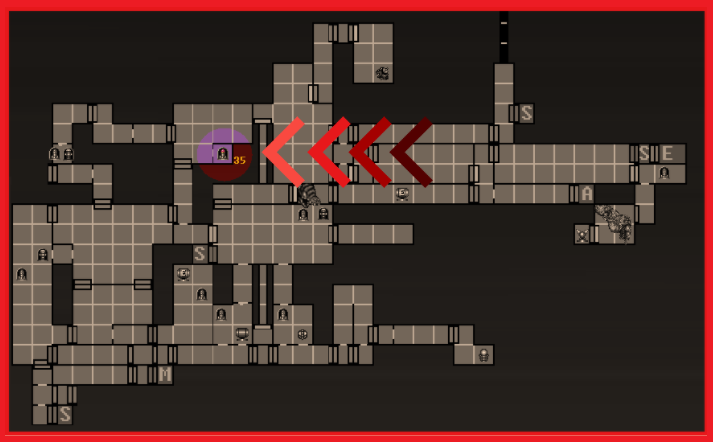
Missile Expansion #35
Location: Maridia
Requirements: None
From the blast door on the floor, run directly right. You’ll zoom right through an invisible wall and be rewarded with MISSILE EXPANSION #35.
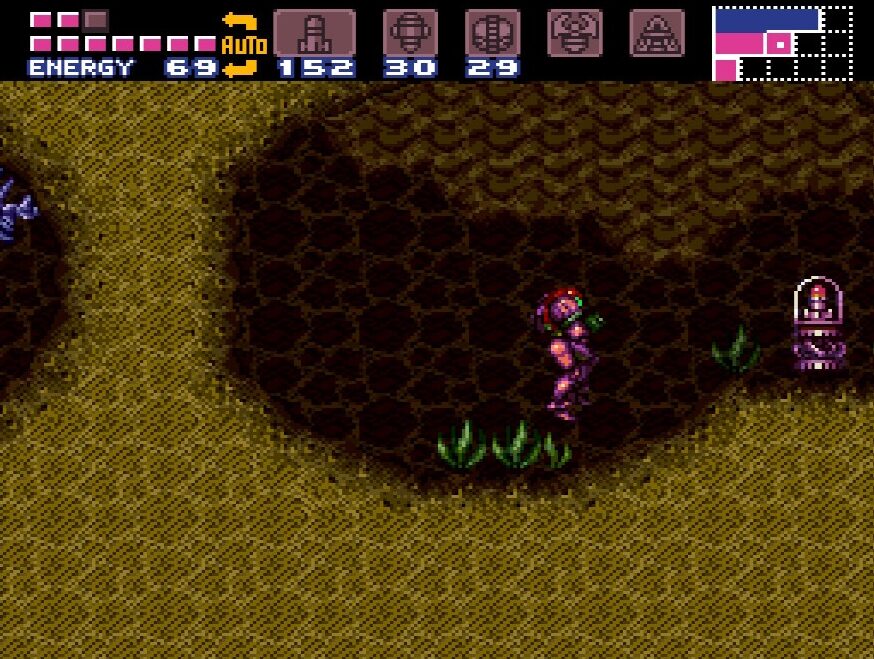
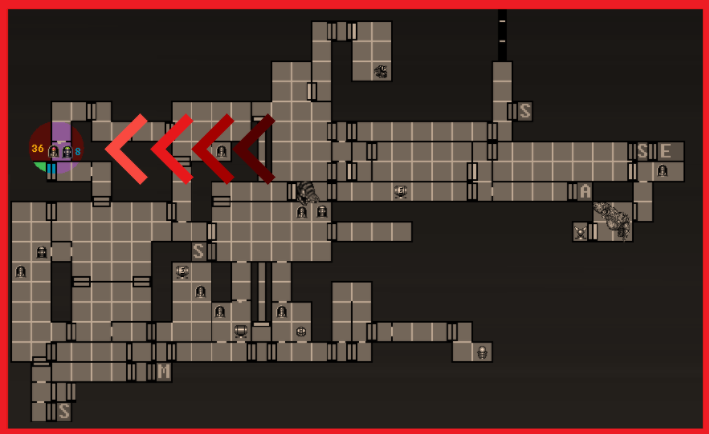
Missile Expansion #36
Location: Maridia
Requirements: None
In the same room as you acquired Missile Expansion #35 in, head up towards the top left corner of the room. Go through the door and you’ll be in a sandy hallway. Press left and you’ll eventually make your way through another invisible wall. When you’re at the other side, jump on up and through the blue blast door at the top.
Make your way over and you’ll see a large pit with seemingly nothing of value in it. Take out the flying monsters, drop down, and get into Morph Ball form. Directly in the middle is a (you guessed it!) invisible pathway that we can drop down into. Get up and pick up SUPER MISSILE EXPANSION #8 and MISSILE EXPANSION #36!
Missile Expansion #37
Location: Maridia
Requirements: Power Bombs, Speed Booster, Shinespark
We’re going to be calling this room the Freezer Room since it looks like, well, a big freezer. There’s a bunch of things to do in here and this is a room that we’re unfortunately going to have to come back to quite a bit. First things first, lay a power bomb and drop down to the ground. Start Speed Boosting to the other side of the room. Keep running and press down when you see a tiny space in the wall above you on the other inside for you to fit through. Shinespark straight up and grab MISSILE EXPANSION #37.
Missile Expansion #38
Location: Maridia
Requirements: None
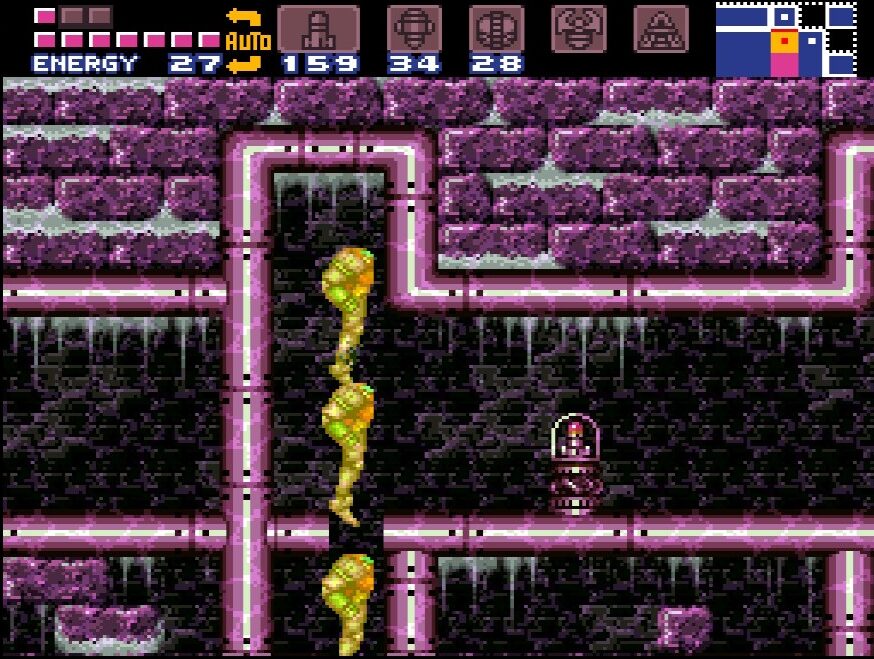
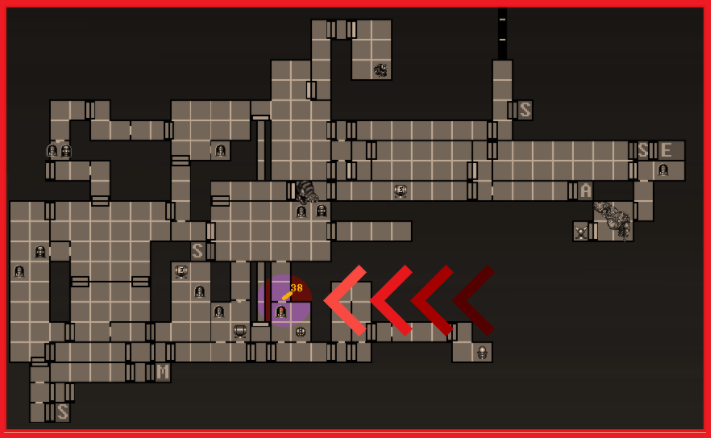
Head to the bottom right hand corner of the Freezer Room, just after where we Shinesparked up. If you shoot the ground, you can see a couple blocks can be destroyed. Drop down into this little alcove and head left. There will be two big pits of sand under here, and we want to drop down into both. It’s important to note that these are one way trips! Once you drop down, you need to take the loooong way back to the Freezer Room! Again – you can only go down, you cannot go up, so plan accordingly. Let’s start off by dropping down the first pit on the right side.
Let Samus fall in the quicksand and blast away any of the spores that try and cop a feel. You’ll eventually land in a sand pit. From the “sand waterfall” that you fell down, jump up to your left, go up and grab MISSILE EXPANSION #38.
Missile Expansion #39
Location: Maridia
Requirements: Spring Ball (optional but highly recommended)
Back in the Freezer Room, do exactly the same thing as if you did before (see Missile Expansion #38), except this time, head over to the second sand pit on your left. For the love of all things holy, do not fall down in the first sand pit, whatever you do!! Allow yourself to sink down, and you’ll find yourself in an almost identical sandy room as the last one.
This room will be a bit trickier. Jump up to your immediate left and get on the ledge. Shoot the block above you and creep over up and to your left. You’ll see two block squares now – one on the ground beside the platform you’re on, and one above you. Shoot the one above you and watch out – the one below you will dissolve almost as soon as you touch it. This is where the Spring Ball comes in really handy. Shrink down into a ball, and roll over, jumping up immediately. If you move fast enough, you’ll have enough time to get a jump off before the blocks dissolve. While jumping, press right and you should be able to fit into the pathway at the top. Here, you can claim RESERVE TANK #4 and MISSILE EXPANSION #39.
Missile Expansion #40
Location: Maridia
Requirements: None
In the room just before Draygon’s arena, make your way to far right, shoot the wall, and MISSILE EXPANSION #40 will be revealed.
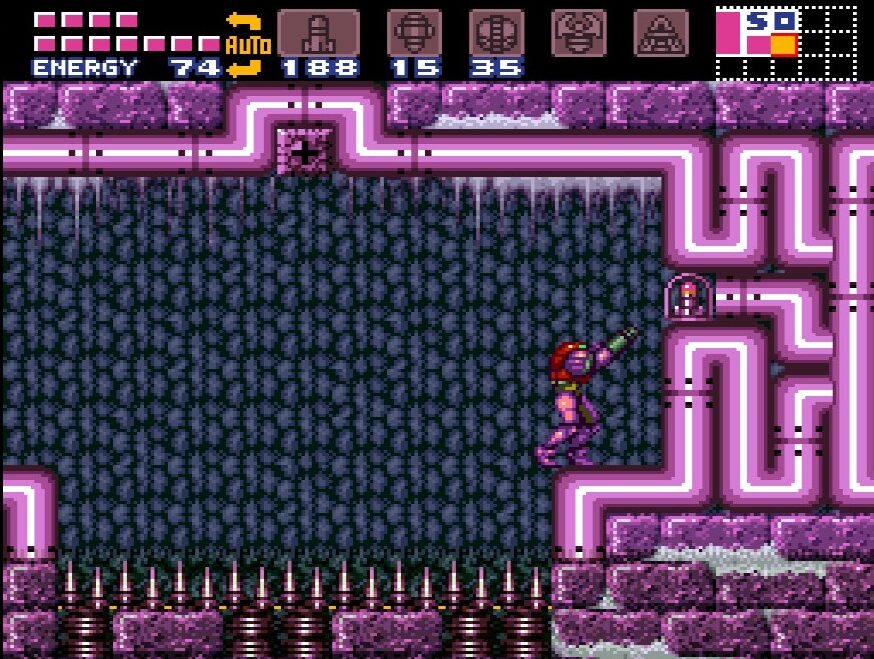
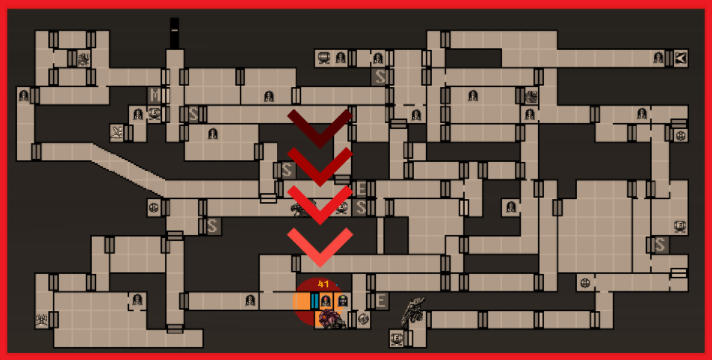
Missile Expansion #41
Location: Norfair
Requirements: Space Jump
In the room where you fight the Golden Torizo, upon first entering when you see the Missile tank, Space Jump over to get it! The floor will give out if you land on it. We’ll have to fall down in a second anyways, so it’s not a big deal if you accidentally touch it, but for now, you may as well jump over and grab MISSILE EXPANSION #41 before this next encounter.
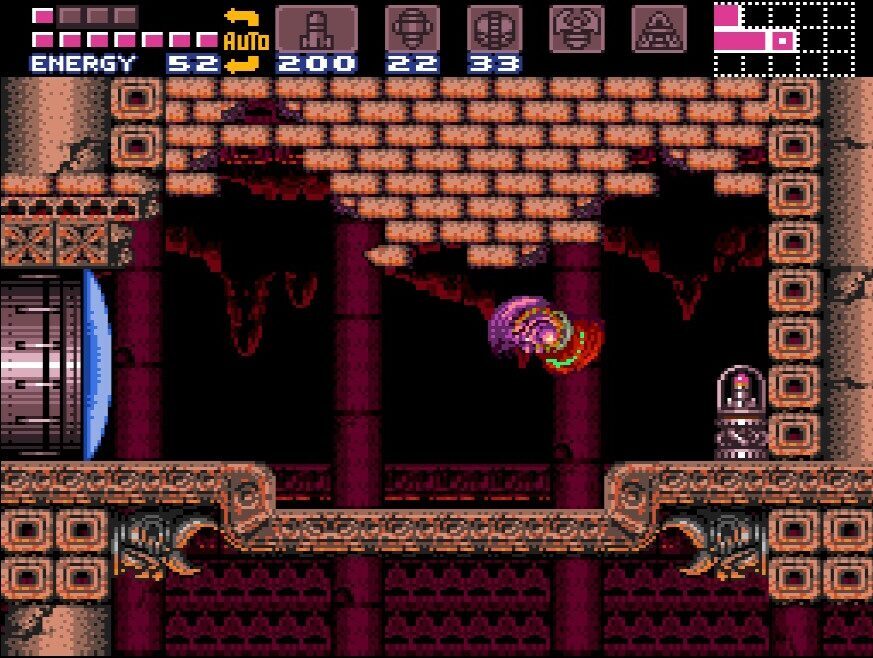
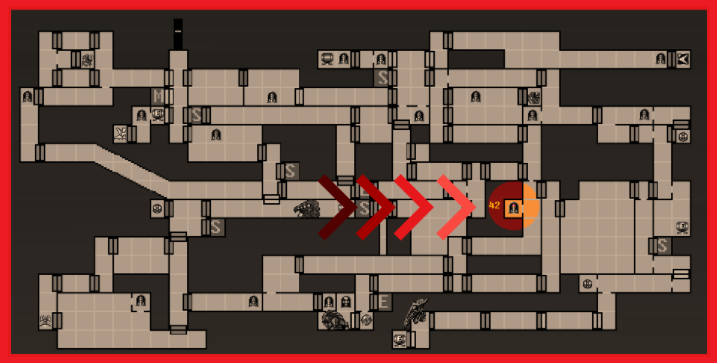
Missile Expansion #42
Location: Norfair
Requirements: Bombs
This room has a thin layer of flooring. Bomb the very center and drop down. Now, before you do anything else get over to the left most side of the room, hugging the wall. Drop a bomb there and don’t move! The rest of the blocks beside it are all collapsible and you’ll fall down if you try to roll over to your right. Instead, roll to your left, going through an invisible wall to grab MISSILE EXPANSION #42.

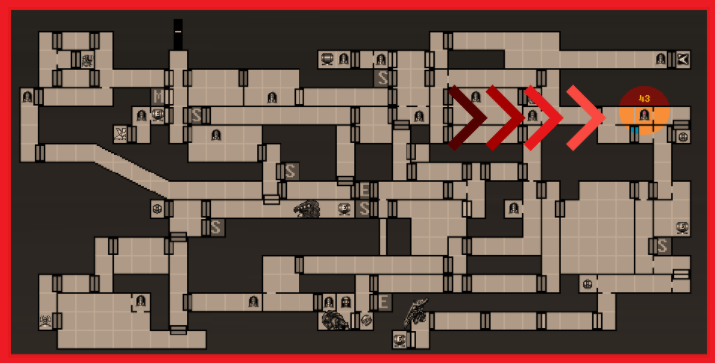
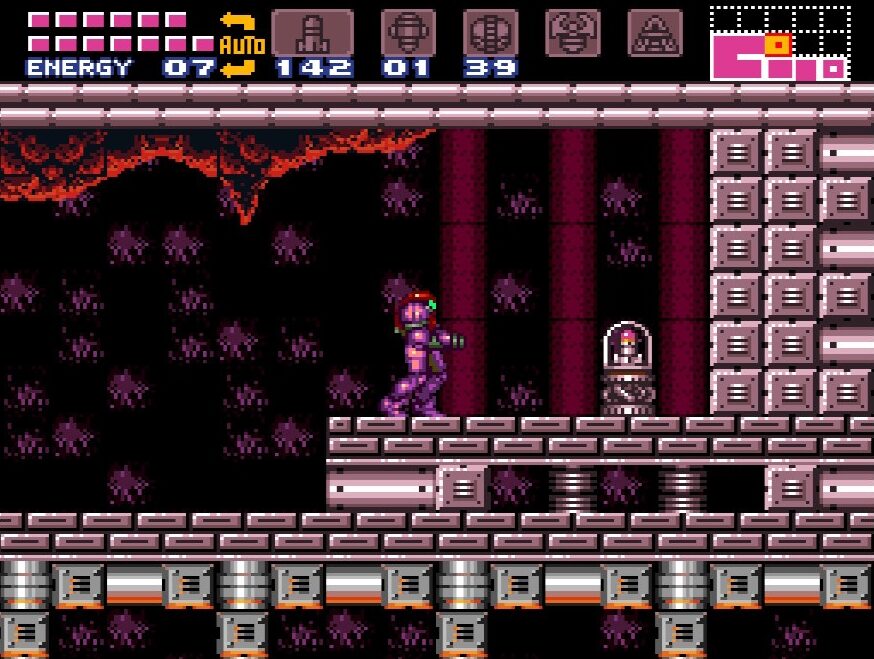
Missile Expansion #43
Location: Norfair
Requirements: None
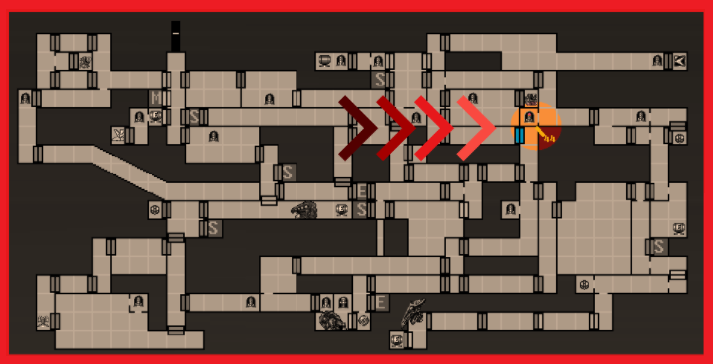
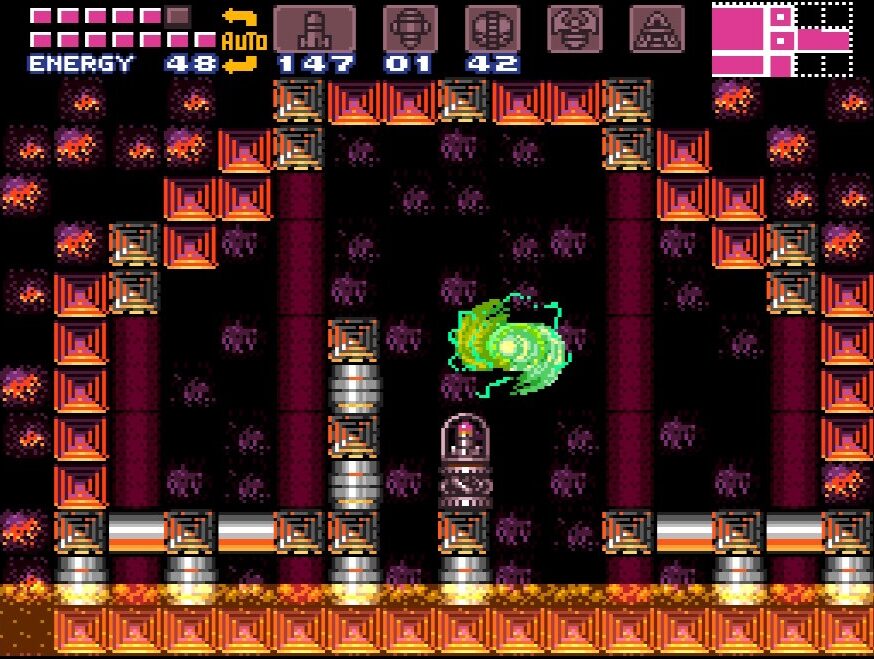
From the big Ridley/Kraid looking statue room, scale to the top, avoiding the Xenomorphs and the boulders falling down everywhere. When you get to the top, you’ll see a blue blast door on your right. Ignore it since it doesn’t lead us anywhere we need to go. Instead, head left and run through the invisible wall and out the door. Make your way up this room. Pretty quickly, you’ll see a blast door on your left. Hold off going through for now though and head right. You’ll see MISSILE EXPANSION #43 just sitting there for the taking.
Missile Expansion #44
Location: Norfair
Requirements: Bombs
In the next room, jump over all the rising lava until you hit a very inconveniently placed brick wall with but a single pathway for us to roll under. There’s no tricks or gimmicks here unfortunately, so you’re gonna have to wait until the lava is low and roll as fast as you can to the other side and jump up to the first available platform. Stop on this particular platform and lay a bomb right in the center. You’ll unearth a little tunnel that you can roll through. Creep over and grab MISSILE EXPANSION #44
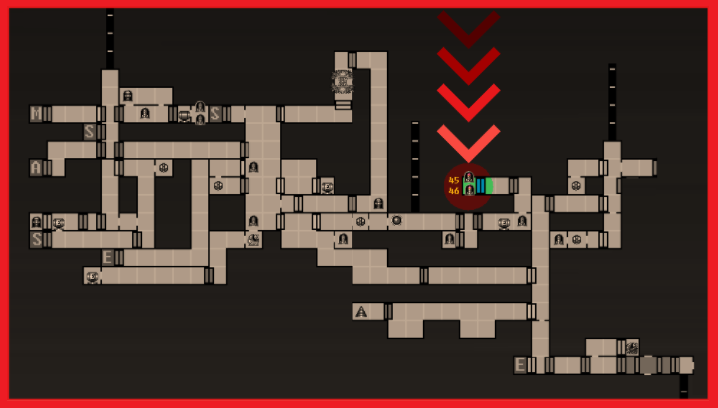
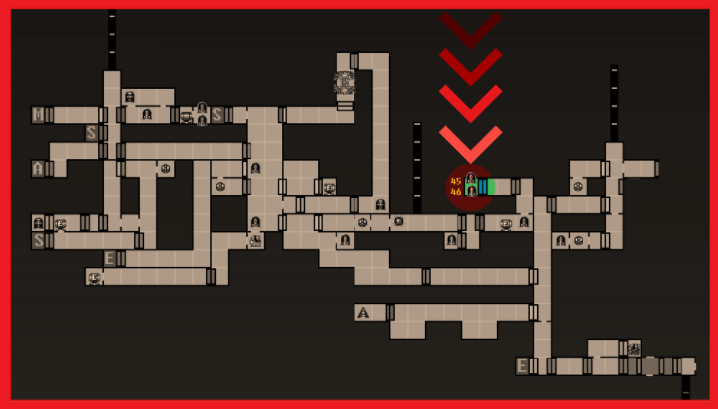
Missile Expansion #45
Location: Brinstar
Requirements: Power Bombs, Screw Attack, X-Ray Scope
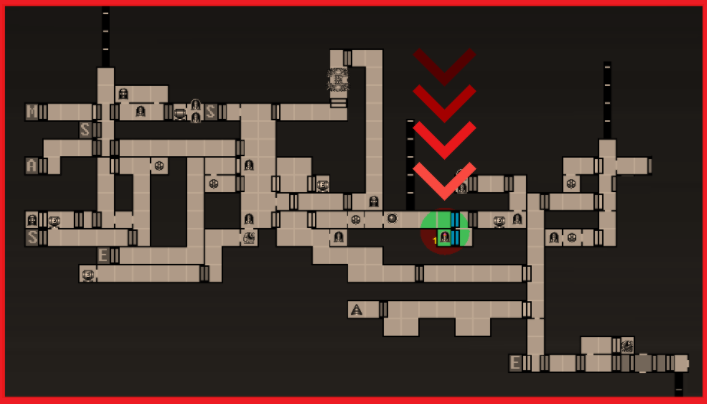
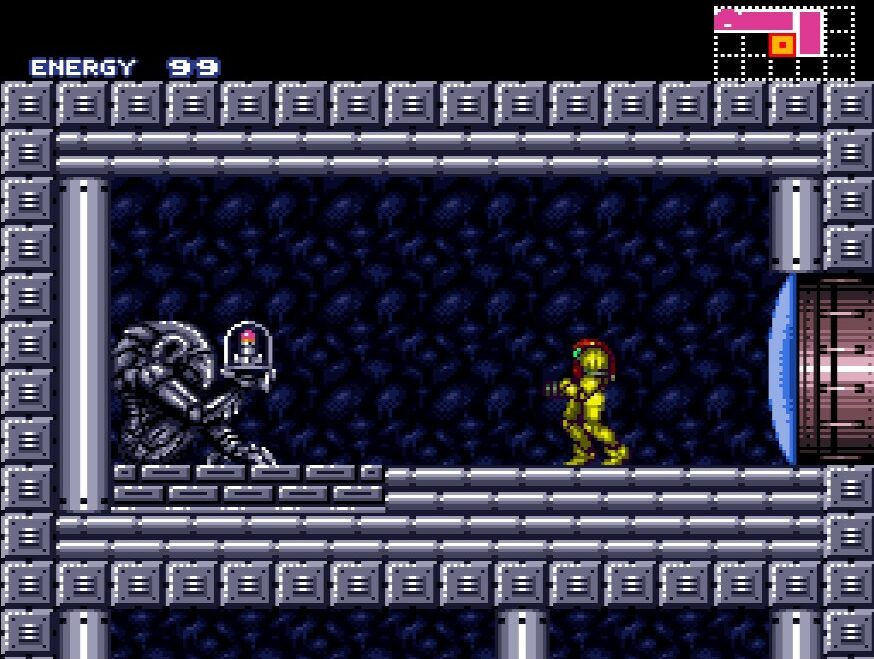
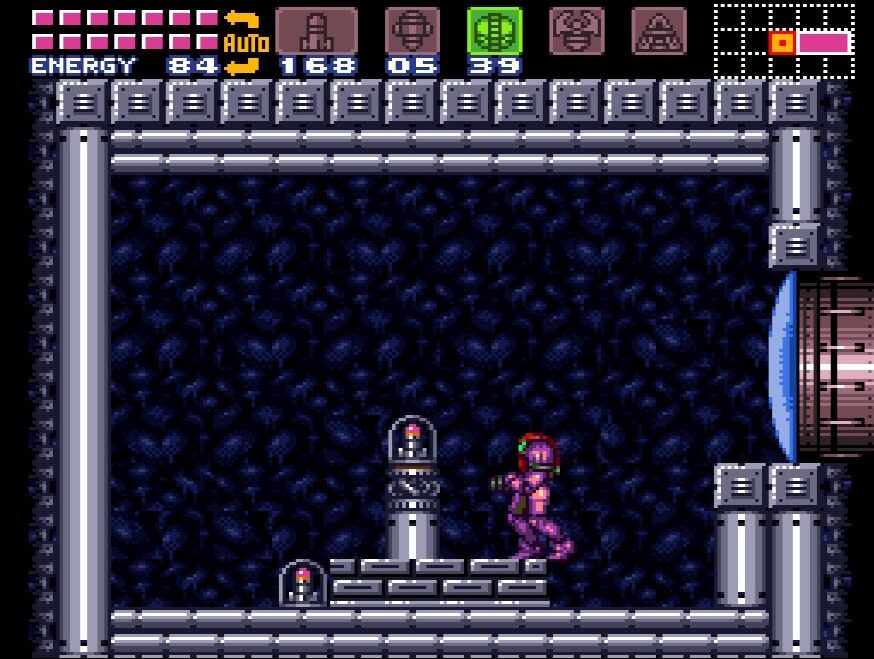
Making your way to the room where we first acquired the Morph Ball in. Keep pressing to the very right most room into you see the spot where once upon a time Missile Expansion #2 sat. Right before that, there is a brick wall that forces you to Morph Ball under it to get across. Lay a power bomb here, and a bit of this wall will give out, allowing you to stand up and jump straight up. Jump up, activating your Screw Attack, and keep climbing up. You should get to the top eventually, breaking through the brick that’s sealing the top. Enter the blue blast door at the top.
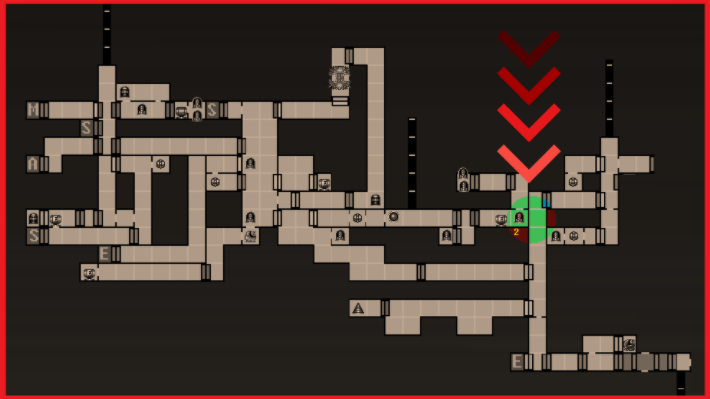
Use your X-Ray Scope in this room and you’ll see an invisible pathway towards the ceiling that you can run across. Beats swimming on the spikes I’d say. Jump up and cross the room. In the next room, you’ll see MISSILE EXPANSION #45! But wait, there’s more! Lay a power bomb, and MISSILE EXPANSION #46 will be revealed. Snag it to complete your Missile count.
Missile Expansion #46
Location: Brinstar
Requirements: Power Bombs, Screw Attack, X-Ray Scope
See Missile Expansion #45