Metroid Fusion Walkthrough – Energy Tanks
Here you’ll find the location for every Energy Tank in Metroid Fusion, as well as detailed explanations on how to get them and what powerups you’ll need. This list is ordered by way of progression; for a list of Missile Expansions by area, click here.
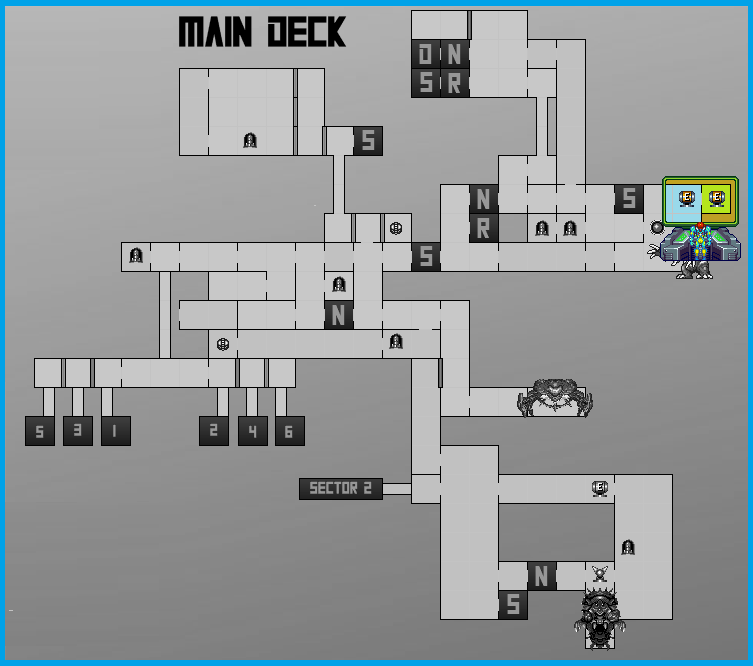
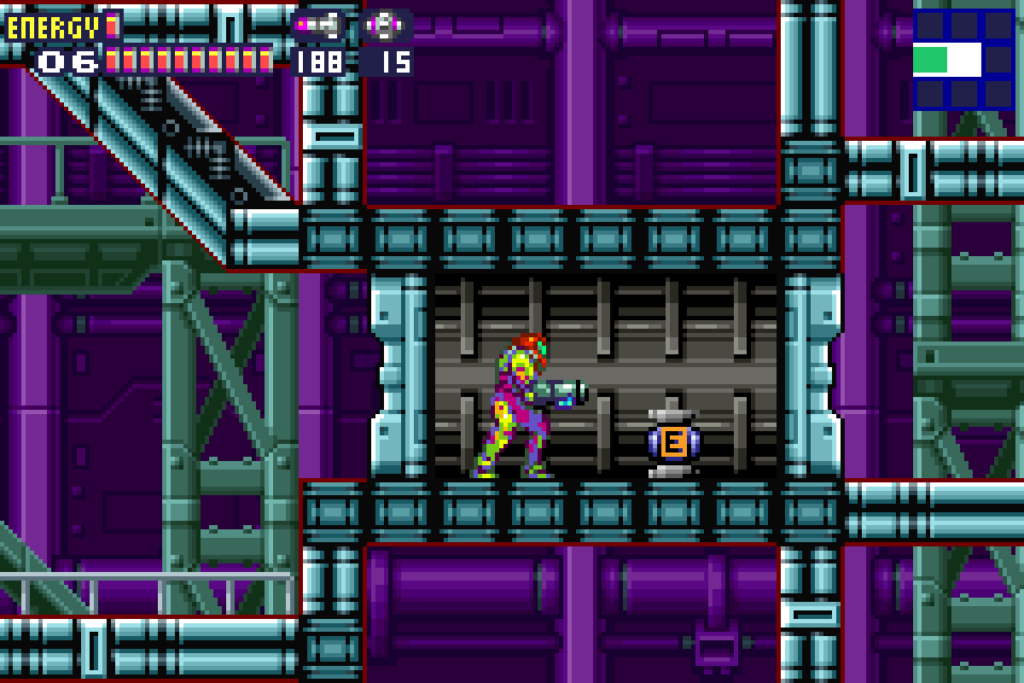
Energy Tank #1
Location: Main Deck
Requirements: Missiles
After destroying the first Gadora and entering the Aranchnus boss room but before fighting him, enter the room and use the ledges to propel yourself up. Keep heading left and you’ll run straight into ENERGY TANK #1. You’ll see a pit you can drop down, BUT WAIT!! At the very end of the ledge before you drop, stop and shoot a Missile at the ceiling. This will open up a passage in the ceiling that you can jump up to. Jump up and roll over to grab ENERGY TANK #2.
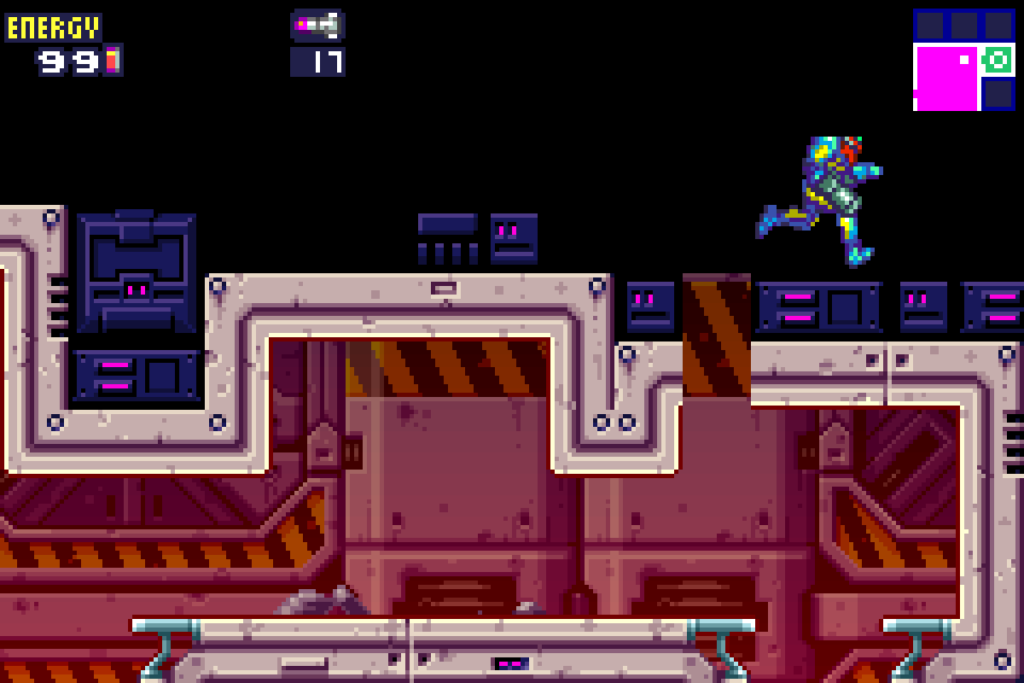
Energy Tank #2
Location: Main Deck
Requirements: Missiles
See Energy Tank #1.
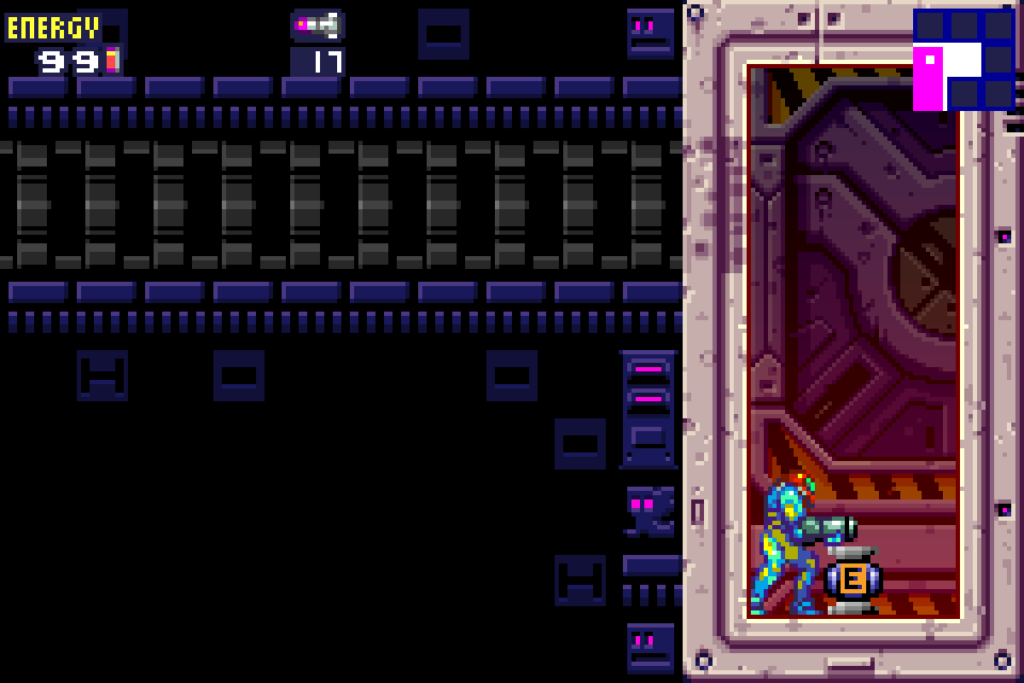
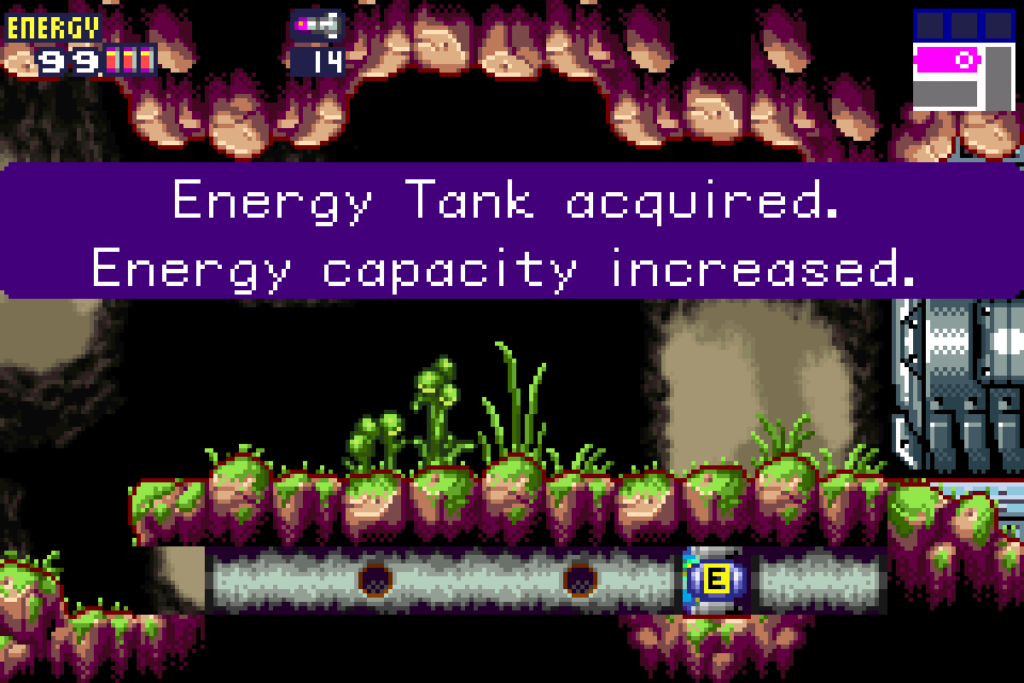
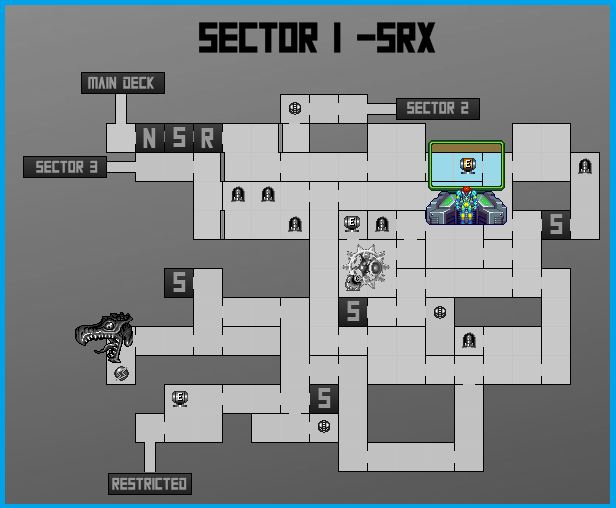
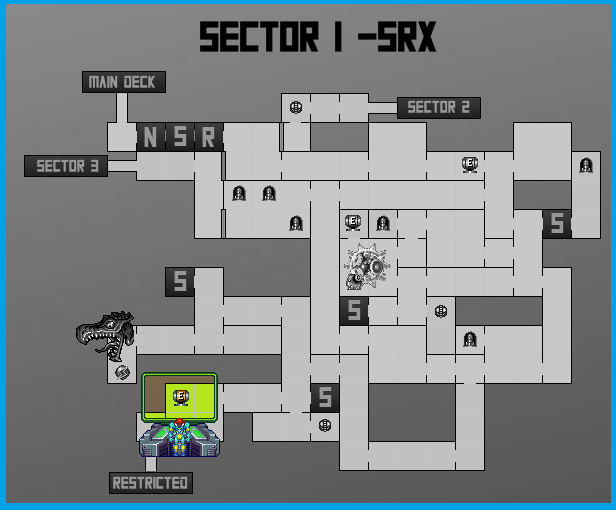
Energy Tank #3
Location: Sector 1 (SRX)
Requirements: Morph Ball
From the first atmospheric stabilizer room, press towards the right. When you get to the small ledge, stop and crouch. Shoot in front of you and you’ll see a Morph Ball tunnel. Roll through to grab ENERGY TANK #3.
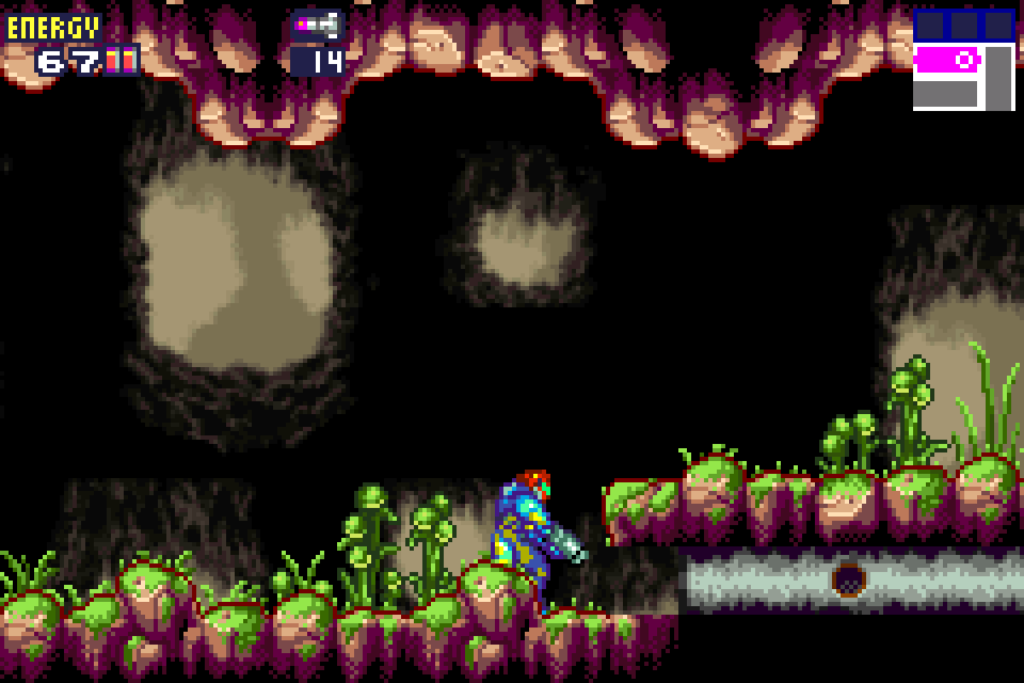
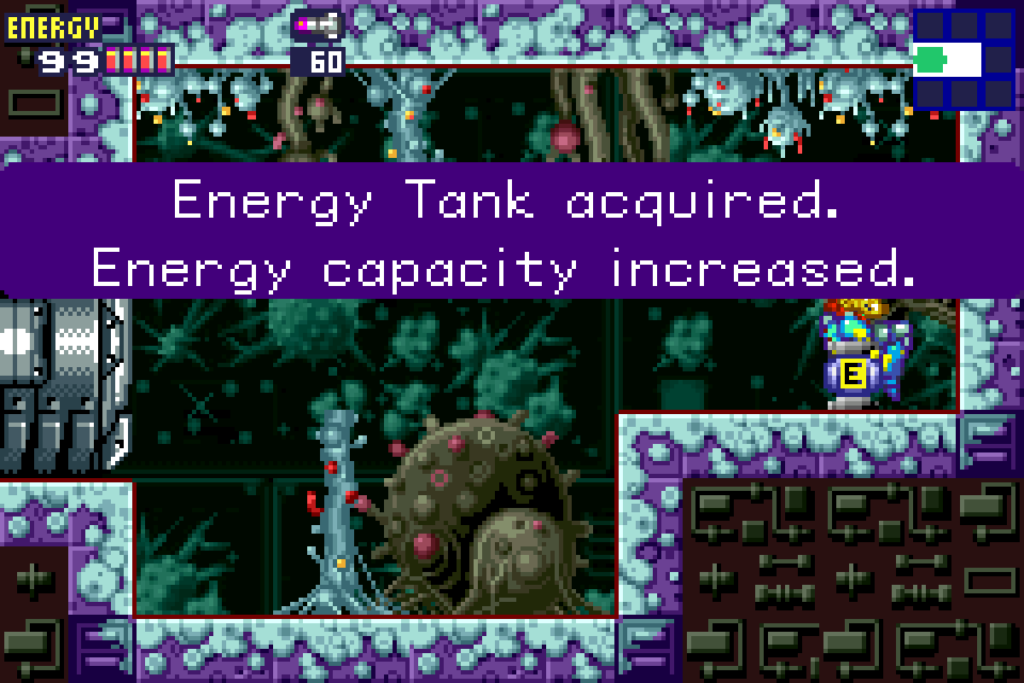
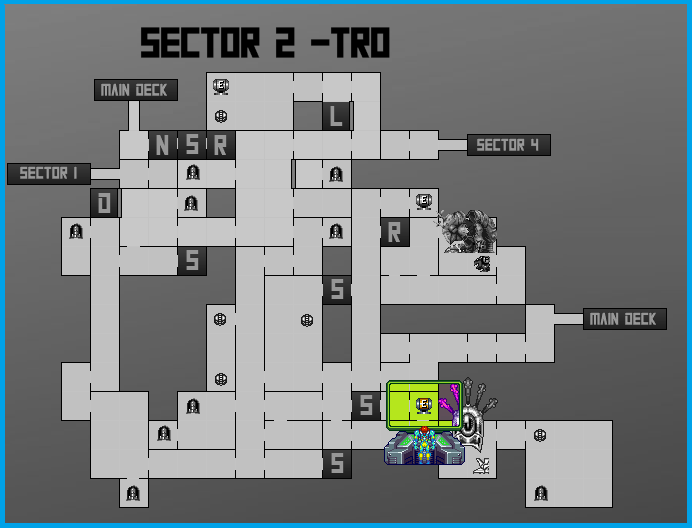
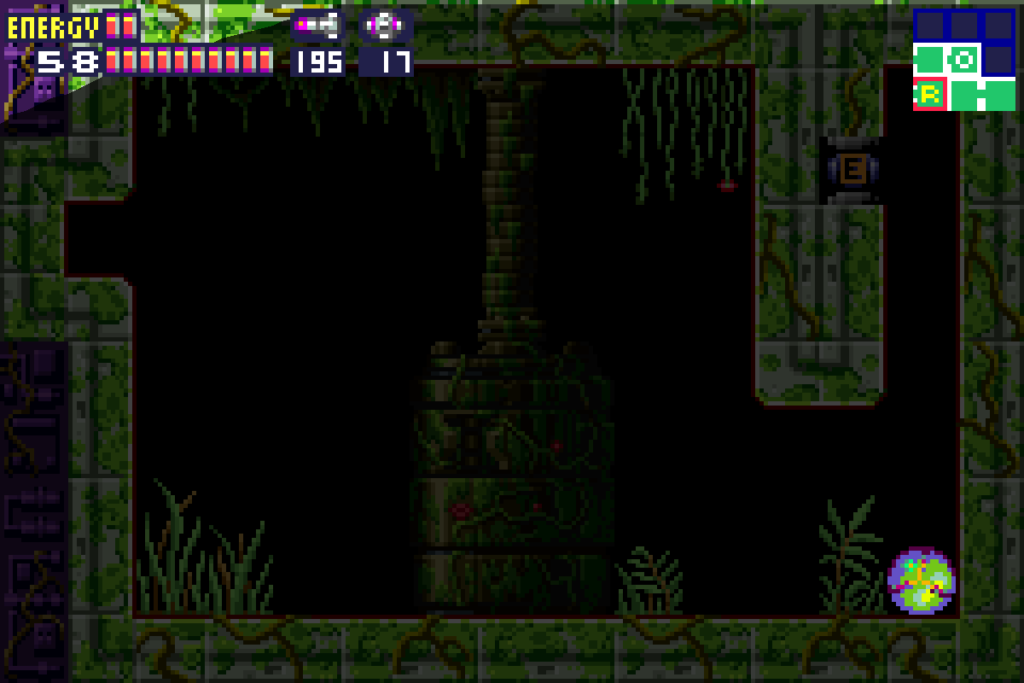
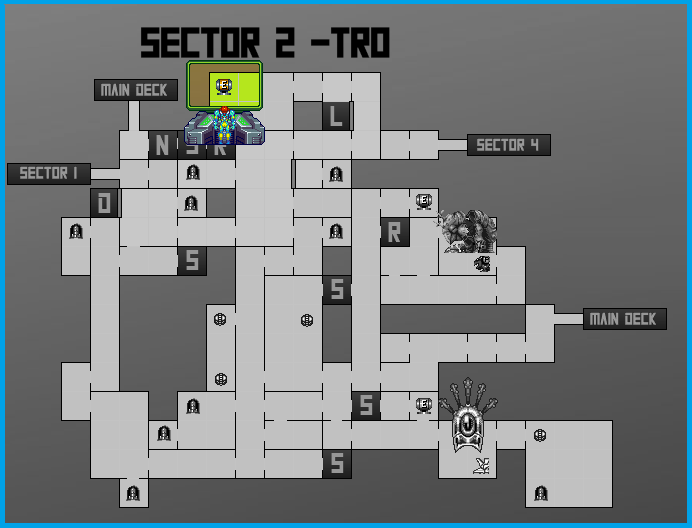
Energy Tank #4
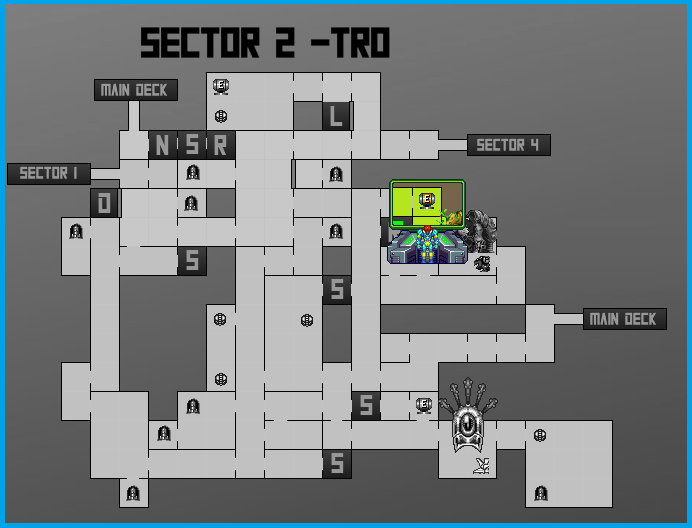
Location: Sector 2 (TRO)
Requirements: None
In the Plant Shaft room, go through the door third from the ground up on the right hand side (the one behind the pillar). Go through here, being careful of the Kihunters and slugs, and you’ll be in another long vertical hallway. Directly opposite you will be a Save Room; save your game, and then pass through the Save Room two rooms and grab ENERGY TANK #4.
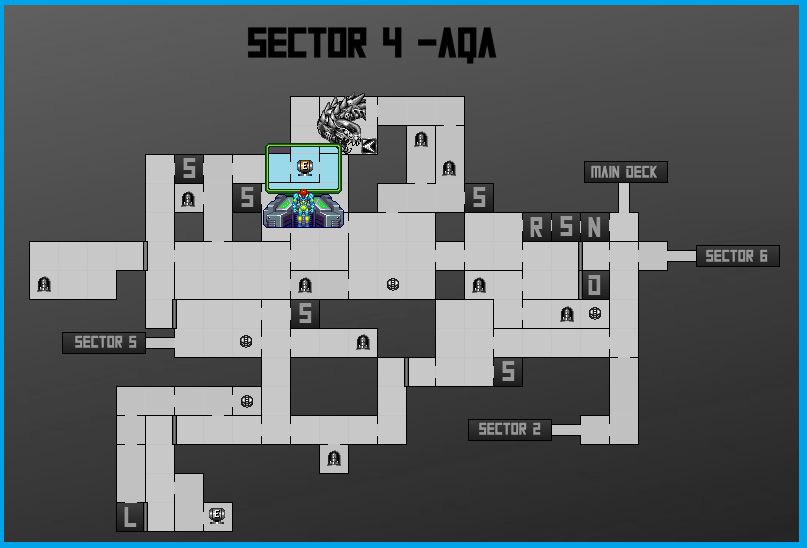
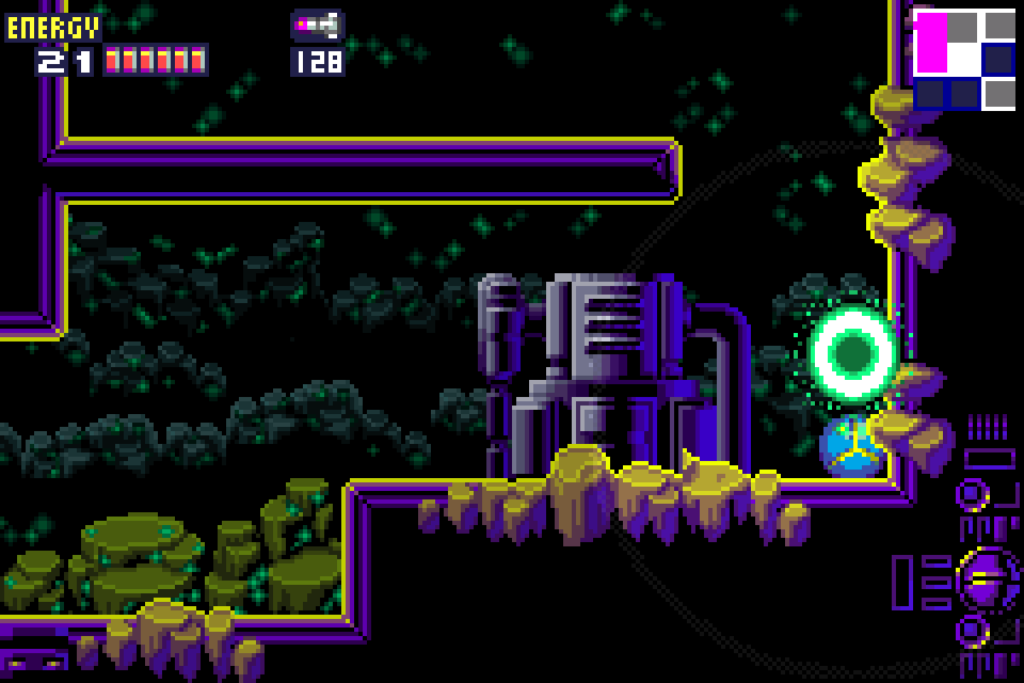
Energy Tank #5
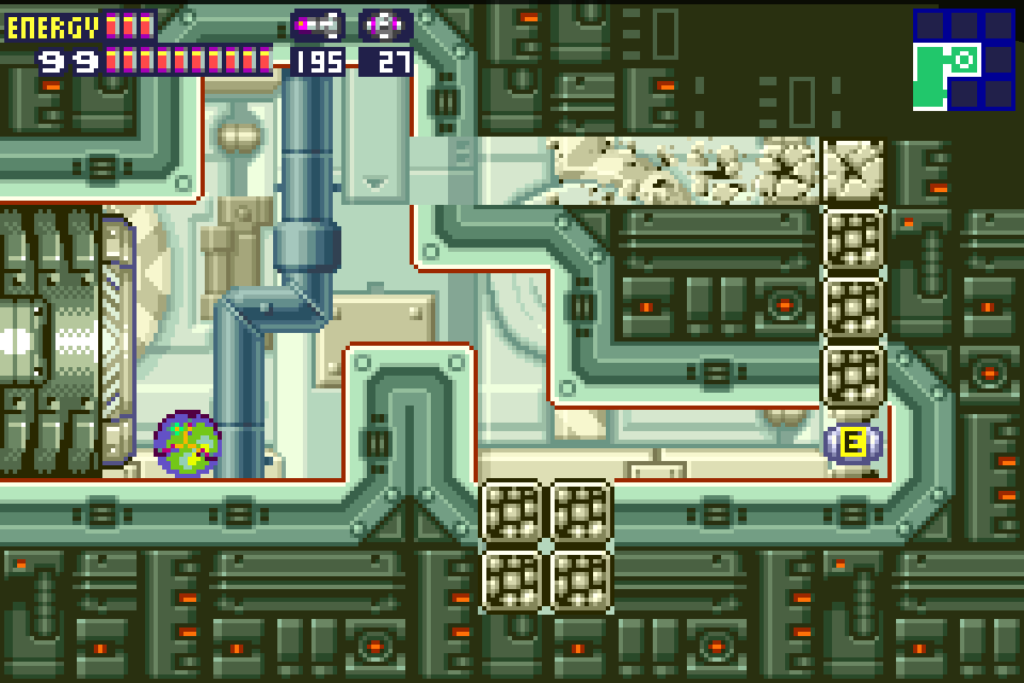
Location: Sector 4 (AQA)
Requirements: None
In the smaller of the square rooms (in the middle of the map), you’ll be in a smaller but similar looking room with a few pits full of NON-electrified water. This is good! Enter the water pit in the top left of the room and go through the door. Follow the path up and eventually you’ll come to a door that leads you right to ENERGY TANK #5!
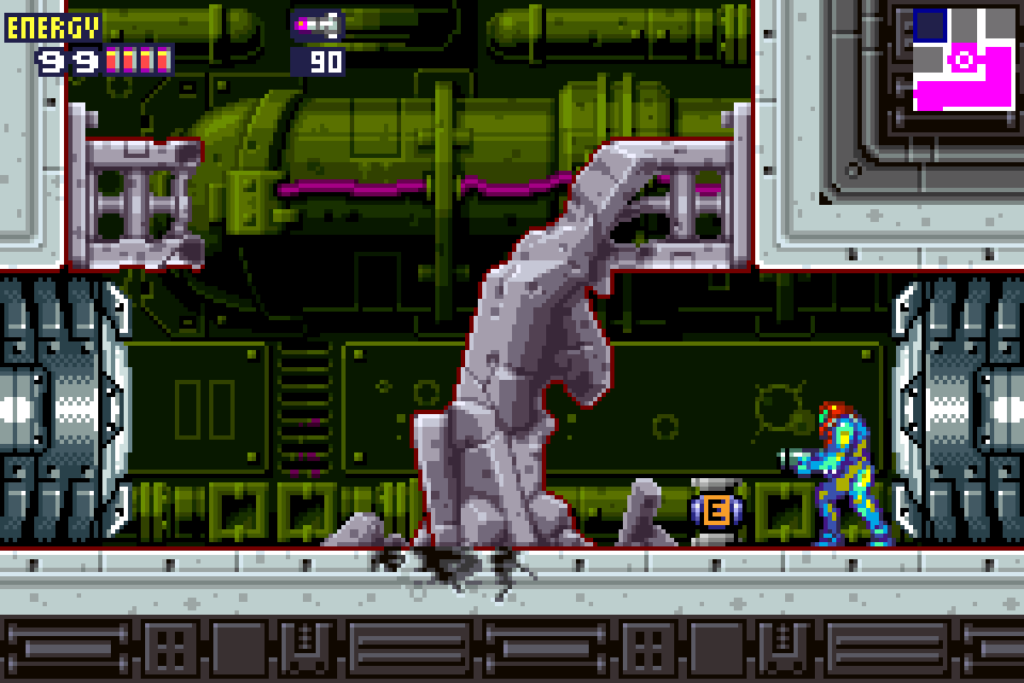
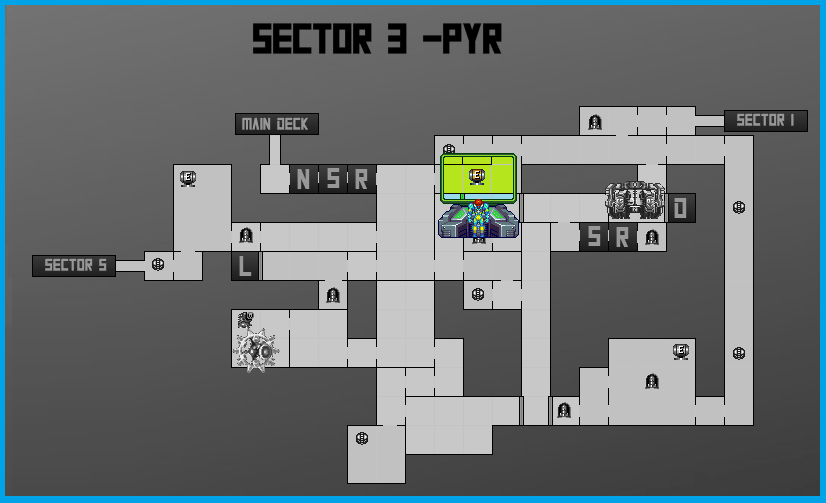
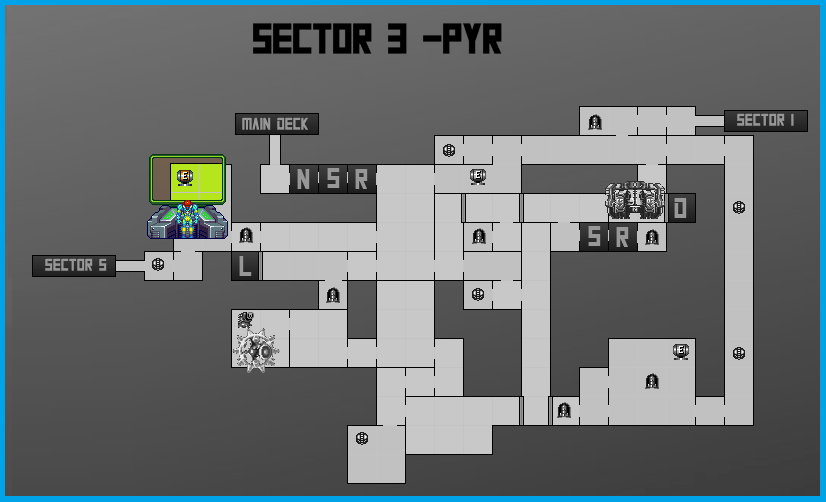
Energy Tank #6
Location: Sector 3 (PYR)
Requirements: Speed Booster, Bombs
After defeating B.O.X. for the first time, climb aboard the wreckage that B.O.X. was nice enough to leave behind and scale your way up to a hidden part of the map. You’ll see thin walls here just begging to be bombed, but unfortunately, none of our current loadout is able to break the walls here, so you basically want to just run straight towards the door on your left. Once you go through the door, crouch BEFORE you go off the ledge. You’ll be glowing and full of energy now. Shinespark directly in front of you into the wall on the left; you’ll crash into a hidden room. This room has a small alcove in the bottom corner that you can bomb. Do so and grab ENERGY TANK #6.
Energy Tank #7
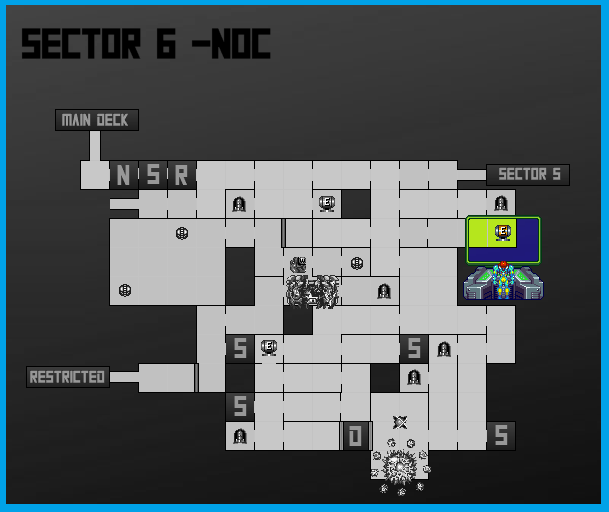
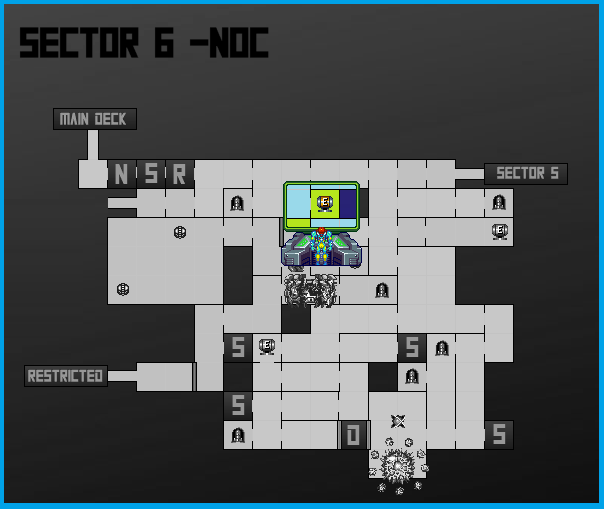
Location: Sector 6 (NOC)
Requirements: Bombs
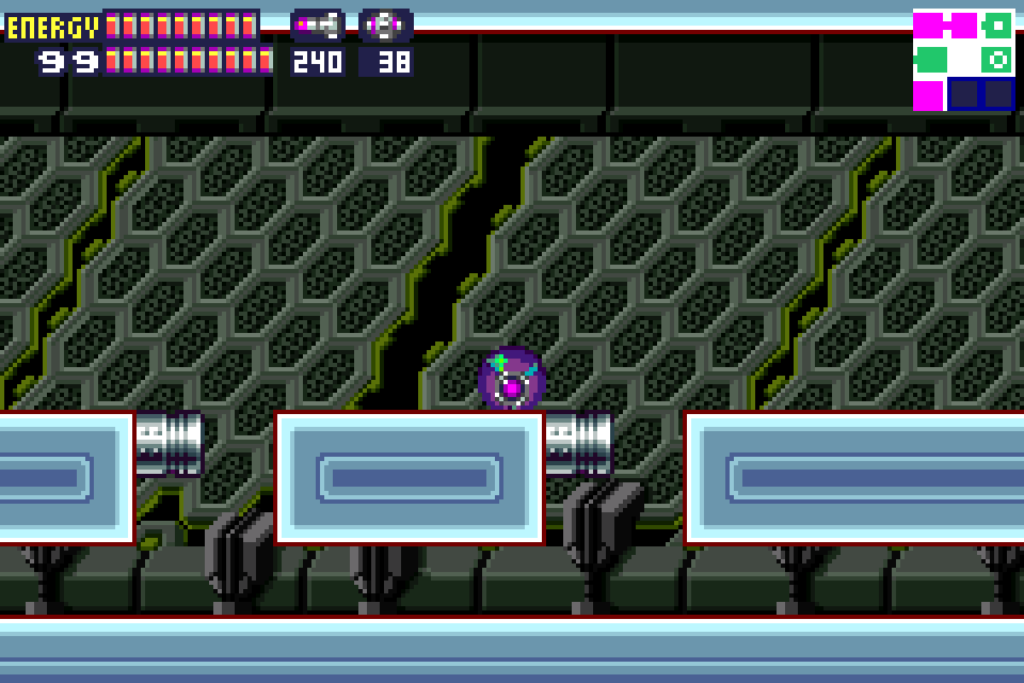
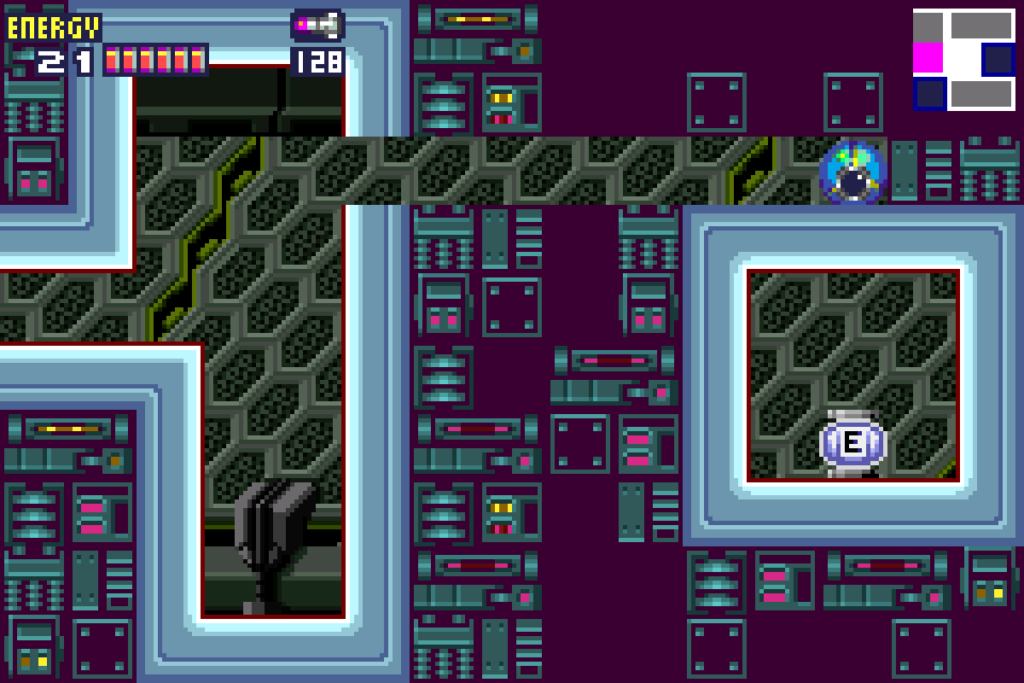
In the second room after the “main” room of Sector 6 (the one following the Save Station, Recharge Room, Navigation Room), you’ll see a little ledge to jump on. Use your springball and bomb the wall on the right side of this ledge and you’ll see a tunnel to a computer-y looking room. Use your springball again to bomb the wall at almost the very top; there are actually three hidden tunnels in this wall, but the bottom and middle paths are dead ends. Once you bomb the top, a small tunnel will open up and you’ll be able to grab ENERGY TANK #7.
Energy Tank #8
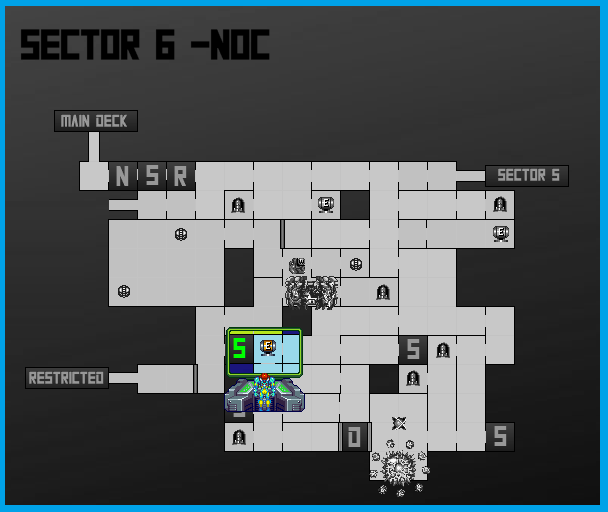
Location: Sector 6 (NOC)
Requirements: Speed Booster
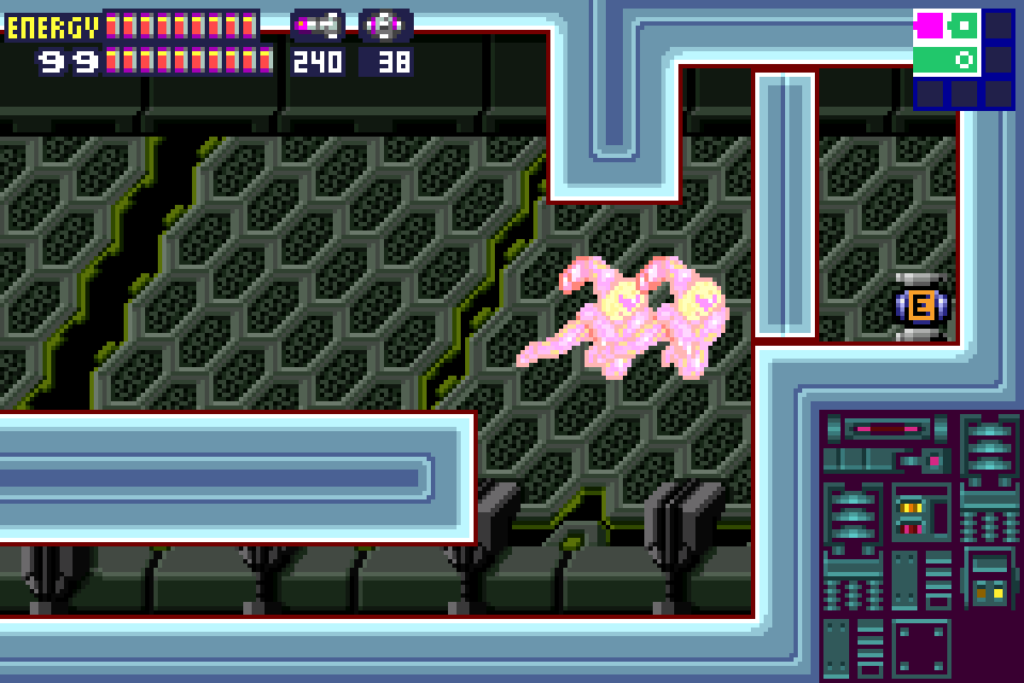
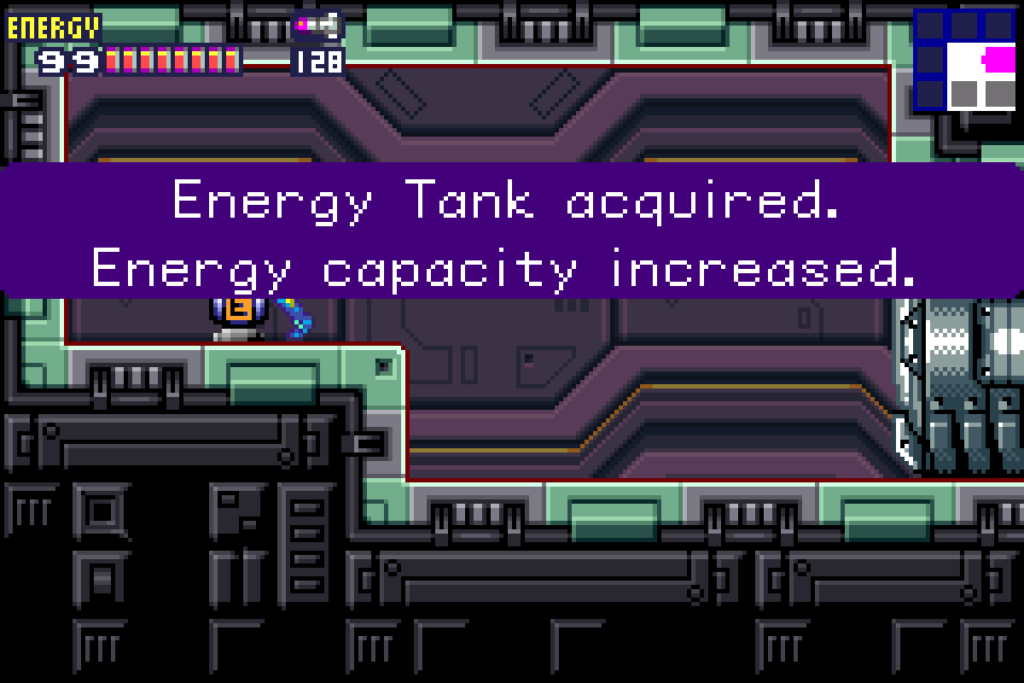
Starting from the giant rectangular room, proceed forward and you’ll see three big blocks blocking your way down; shoot the blocks on the top and middle, NOT the bottom one, which contains a frozen X. Grab onto the monkey bars on the wall and shoot out the thin wall opposite you. Stun the frozen X and quickly drop down and through the door. Aim upwards and shoot to stun all the frozen X and let your Speed Boost charge up to take down the wall at the far end and drop down. To your left, you’ll enter a room with ENERGY TANK #8 just sitting there for the taking! Nice!
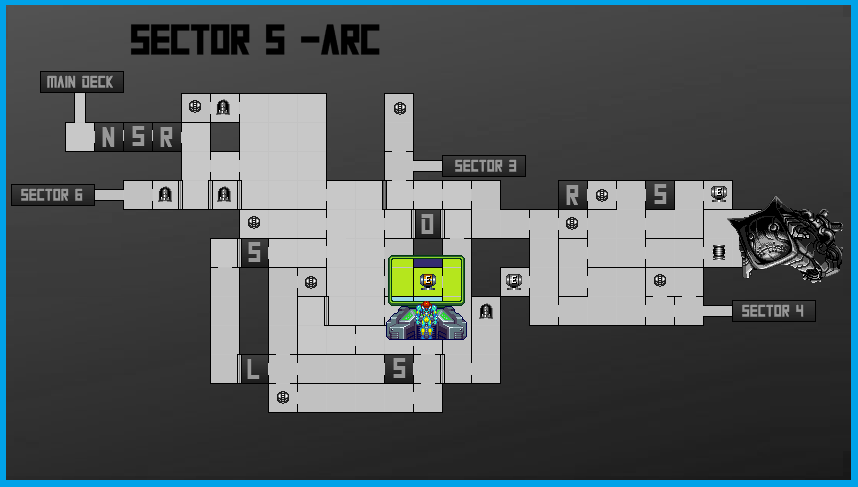
Energy Tank #9
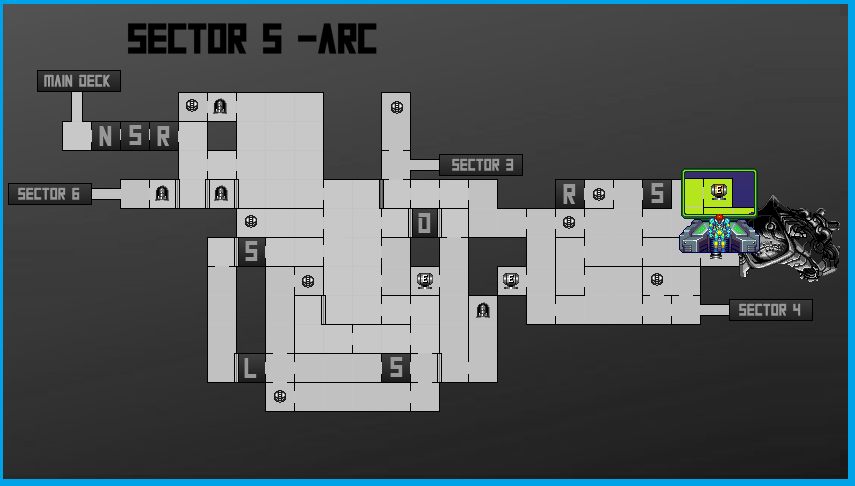
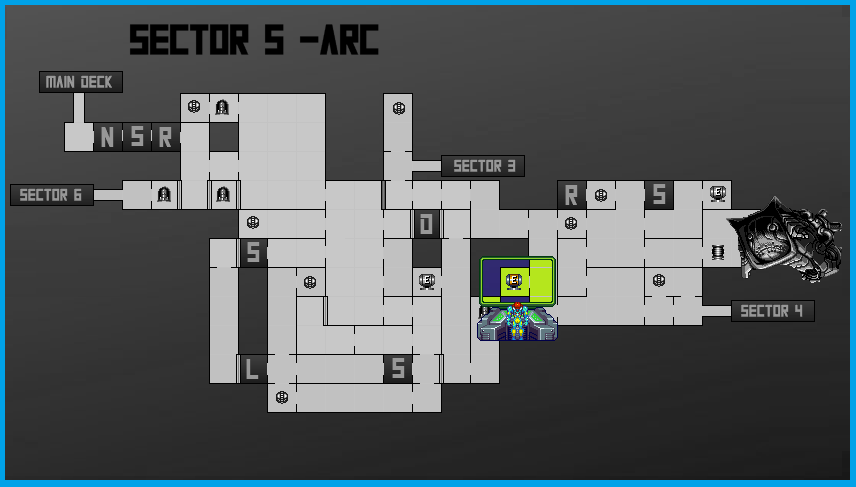
Location: Sector 5 (ARC)
Requirements: Speed Booster
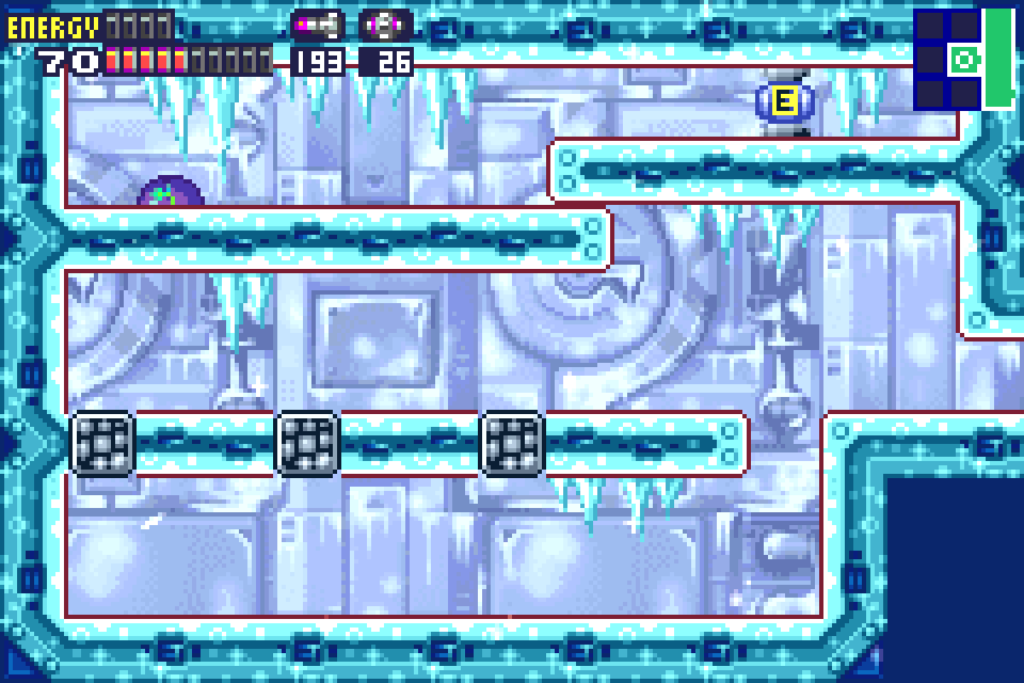
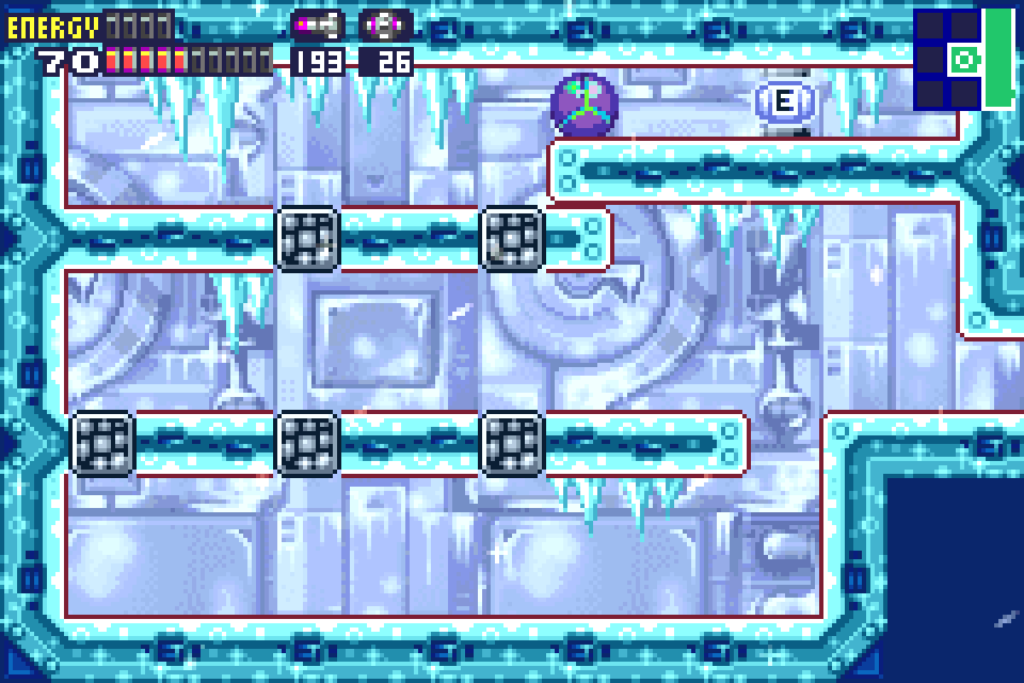
From the Data Room, press forward and go right. You’ll be in another chilly room; bomb the floors and you will start to fall. This is a huge vertical hallway, but don’t let yourself fall to the bottom quite yet. Rather, as you’re falling, hug the right hand side and grab the monkey bars. Climb to the top, and then lock on to the floating cockroach looking esq-Ripper. Shoot an Ice Missile and freeze it in place; this will give you a platform to stand on. Jump over and jump into the door to your left. In here, you’ll see another of those weird vampire-bat-X-posing-as-an-expansion type enemies, this time, posing as an energy tank. Shoot it, and then bomb the wall to reveal a pathway to ENERGY TANK #9.
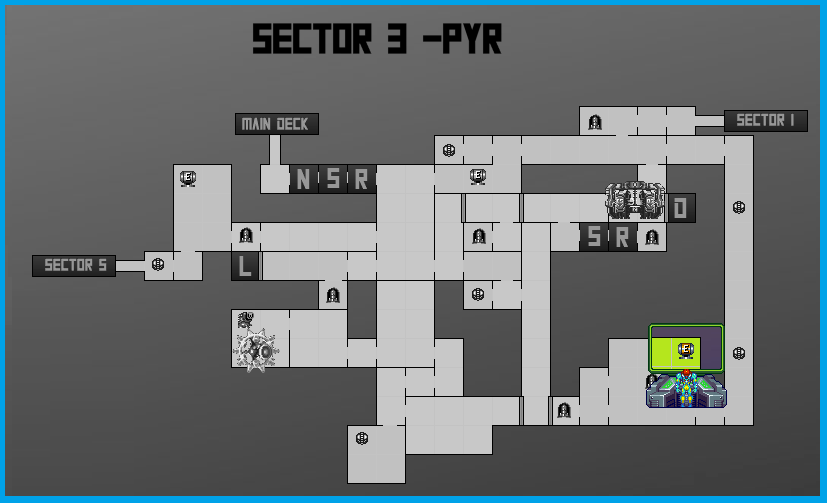
Energy Tank #10
Location: Sector 3 (PYR)
Requirements: Ice Missiles
From the Xeno Shaft, at the very bottom, take the door to your right. This will lead you to the room we grabbed a Missile Expansion in earlier. Bomb the right hand wall and roll through. You’ll see a door, but don’t bother going through it. Instead, jump up to the platform above you and wait for the fire bug to be somewhat in the middle. Freeze him with a Missile and jump on top of it. This frozen bug will give us the extra bit of height we need to grab the upper ledge and pull ourselves up. Go through the door.
You’ll be in a large room with a bunch of floating platforms. Unluckily for us, every one of these platforms EXCEPT for the first one will disintegrate as soon as we step foot on them. No problem though, because all these platforms have fire bugs on them that we are able to freeze and step on. Freeze them all and jump from bug to bug; eventually, you’ll get to the top and nab ENERGY TANK #10!
Energy Tank #11
Location: Sector 3 (PYR)
Requirements: Varia Suit, Speed Booster, Bombs
Work your way back to the first room in Sector 3, the one immediately after the Recharge Room. There is a door in the middle left wall that was too hot for us to enter earlier, but now is fair game. Enter and you’ll see lava on the floor and monkey bars on the ceiling. You know the drill; hop up and worm your way across, avoiding both the fire and the Sidehoppers. Eventually, you’ll get to the end and enter the next room where MISSILE EXPANSION #32 will be waiting for you.
But wait! We’re not done in this room yet! Bomb the walls on the left and roll over into a new room. Shoot out all the blocks on the ground until there is nothing but sweet, smooth ground for you to run on. Get to the right side of the room and start running left. Shinespark at the end of the room upwards, breaking the blocks covering the upper part of the room. Once you land, start firing at the wall in the middle of the platform. Eventually, you’ll get a path to the other side, although it looks like the upper part is again out of reach. Bomb the floor however and you’ll see a metallic rod shoot up from the ground. Hop on it and jump up to get ENERGY TANK #11.
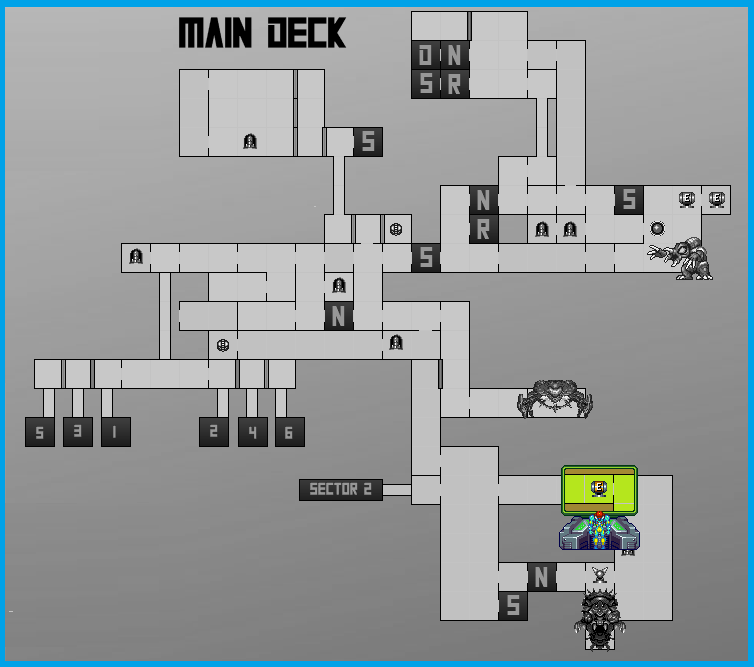
Energy Tank #12
Location: Main Deck
Requirements: None
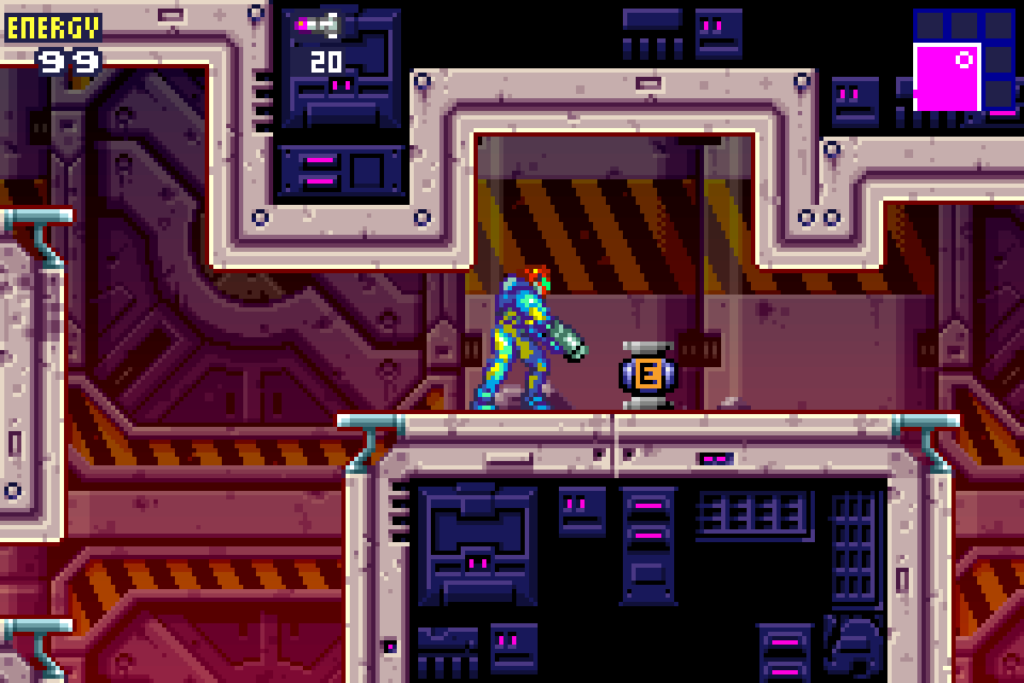
From the Central Reactor Core, head to the upper door on the right hand side. Climb up and you’ll enter a room with some more scaffolding. This room is absolutely riddled with X imitating Space Pirates, so tread carefully. Take out the first two Pirates as you move right, and you’ll run right into ENERGY TANK #12.
Energy Tank #13
Location: Sector 2 (TRO)
Requirements: Power Bombs
Continue on from Nettori’s room and drop down past all the Sidehoppers. Enter the now functional doorway (woo!) and continue left. Right before the Save Room, in the same hallway we passed earlier, make your way upwards. When you get to the top, you’ll see doors to your right and left. Take the door to your right first. Take out all the Menus and jump towards the far wall. As you’re falling, you should grab an invisible ledge halfway through. Roll over into the second hidden room and get over the right side. Lay a Power Bomb and you’ll see ENERGY TANK # 13 hidden in the pillar. Grab it and exit the room.
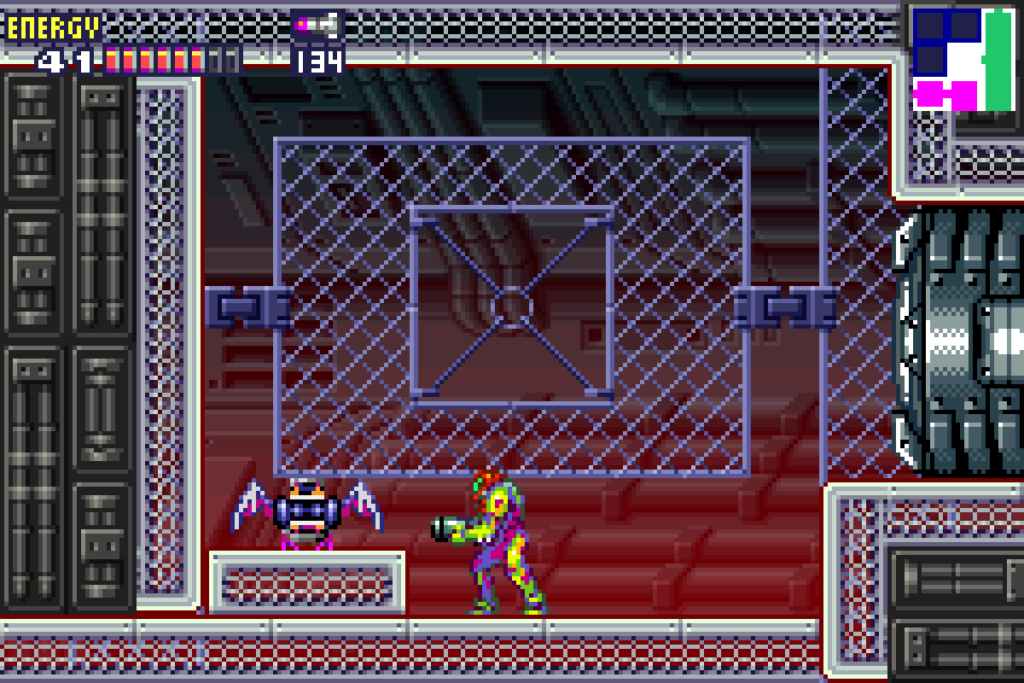
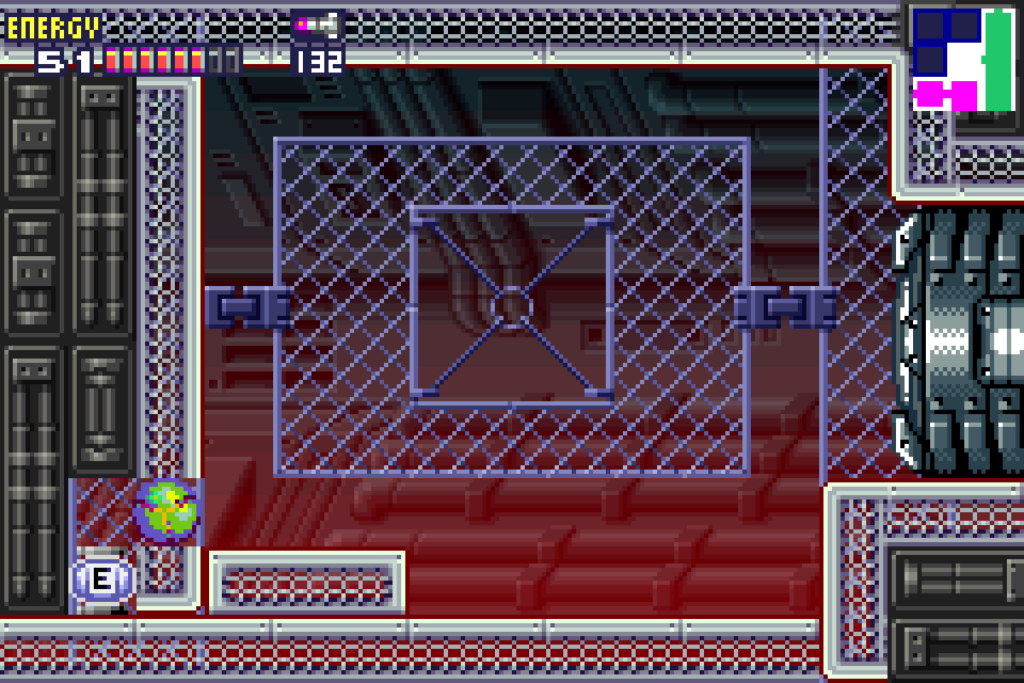
Energy Tank #14
Location: Sector 5 (ARC)
Requirements: Bombs
Blast away the Gadora guarding the Nightmare boss room and enter. You’ll see an Energy Tank, but don’t roll over to it or you’ll miss it! Instead, lay a Power Bomb and you’ll see a tunnel open up in the upper part of the wall. Jump up, roll over and grab the very well played ENERGY TANK #14.
Energy Tank #15
Location: Sector 5 (ARC)
Requirements: Gravity Suit, Missiles, Speed Booster
From the Nightmare room, go through the door and your Speed Boost will kick in, destroying the barrier that was previously blocking your entry. Follow the path back to the room that was submerged in water with the three Pirates in them. Head over and exit this room to the left, going back into the submerged vertical hallway that we first fell down. You’ll notice a ledge that you can jump up to and grab. Directly across from the ledge is a block that can be destroyed with a Missile. Shoot and roll into the newly exposed tunnel.
You’ll be in a small room with two platforms and an Energy Tank in the corner. There are multiple tiles of these platforms that will give away if you touch them, so just jump over them and continue. Even though it looks like there’s no access to the upper platform, simply jump when you get to the second-to-last tile on the left and you’ll pass right through the invisible wall and up. Jump over the drop points and roll over to grab ENERGY TANK #15!
Energy Tank #16
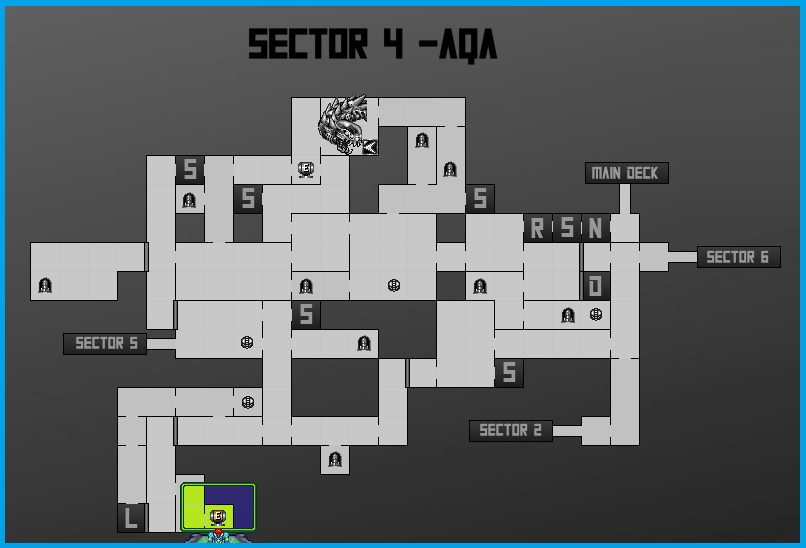
Location: Sector 4 (AQA)
Requirements: Power Bombs
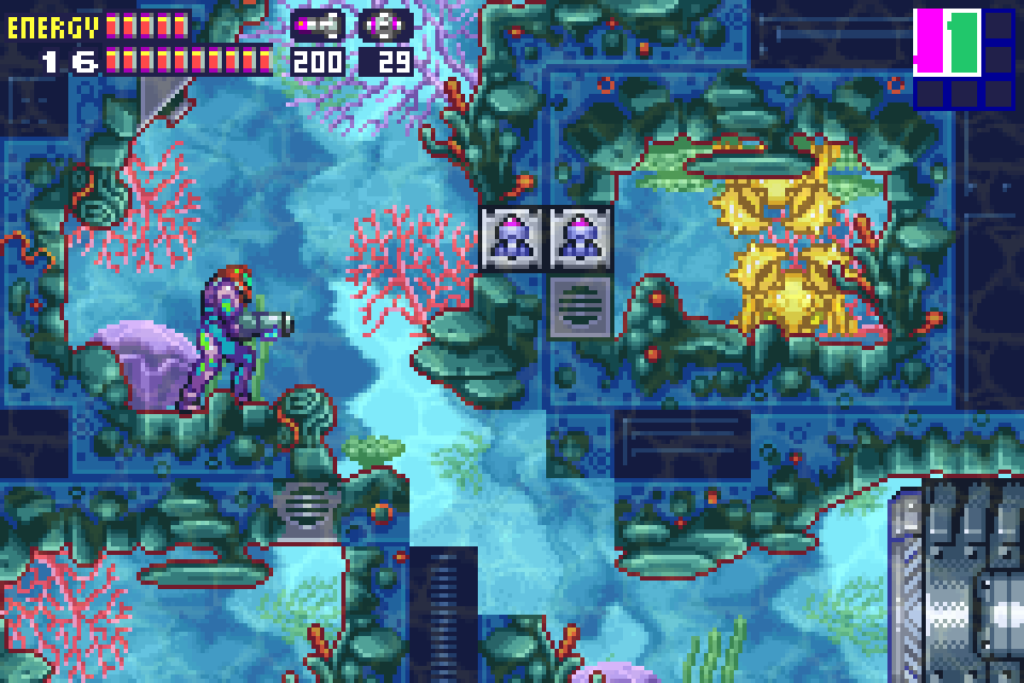
From the Lock Room, exit and Space Jump up. You’ll see a little ledge opposite a bunch of Scisers; get into Morph Ball form, jump and roll through the center of this alcove into a hidden room. You’ll find yourself in a room with a weird larva thing on the right side, a whole lot of Scisers on your left, and a locked door on the bottom. Get yourself in front of the door and lay a Power Bomb. Do not absorb any of the X that spawn from all the Scisers! Instead, let the X fly over to that larva thing and infect it. Two golden Scisers will spawn. Once you’ve destroyed both with Missiles, the door on the bottom will unlock. Go through, lay a Power Bomb, and follow the upper tunnel to get ENERGY TANK #16.

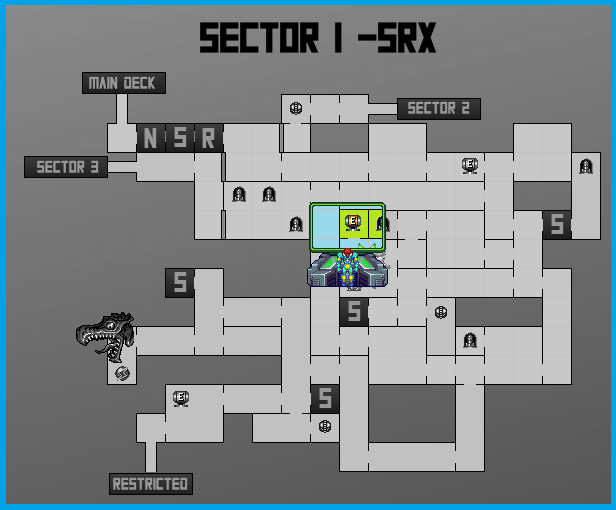
Energy Tank #17
Location: Sector 1 (SRX)
Requirements: Missiles
From the elevator leading from the Restricted Zone to Sector 1, exit the elevator room and you’ll find yourself in a room very reminiscent of Tourian. You’ll see large metallic rods and tons of Rippers floating around. When you get to the very top of the first rod, charge up a Diffusion Missile and fire it around where the Rippers are. You’ll see ENERGY TANK #17 sitting there for the taking.

Energy Tank #18
Location: Sector 1 (SRX)
Requirements: Speed Booster
Get yourself to the Save Room directly under where you fought the Elephant Bird earlier. In the next room over there are two Hornoads, and in the room next to that is a set of monkey bars that leads to the Elephant Bird room; Start running from the Save Room and get your Speed Boost going; crouch as soon as you get past the room with the two Hornoads. With your Shinespark charging, quickly jump up to the top left door (again, make sure you use directional jumps so as to not activate your Shinespark). Shoot the door open and Shinespark into it. You’ll only be flying for a quick second, and then you’ll be running up a hill in the room. Keep running and crouch right before the little dip in the floor on the far left side. With your Shinespark charged, jump into the little dip and Shinespark straight upwards. You’ll grab ENERGY TANK #18.
Energy Tank #19
Location: Sector 2 (TRO)
Requirements: Space Jump, Screw Attack,
Get yourself to the upper part of the Lock Room. Screw Attack the wall to your left and go through. This room is pretty fun. You’ll need to make a series of tough Space Jumps in here, as any time you touch the ground, it will give away. As you get closer to the expansions, you may have a quick half second of leeway to jump again if you hit the ground before you start sinking through. Keep your Space Jumps tight and good luck – there’s really not a whole lot of advice I can offer you! At the top of this room, in a tighter corner, you’ll find ENERGY TANK #19.
Energy Tank #20
Location: Sector 6 (NOC)
Requirements: Screw Attack, Speed Booster, Bombs
Head to the Frozen X room. In the middle will be a block that was preventing you from Speed Boosting before. Destroy it with your Screw Attack and head to the left. Speed Boost towards the right, crouch, shoot the door open, and Shinespark straight through the wall and into a hidden room.
This room will be tricky if you don’t know the sequence. There are four floating platforms and the goal is to bomb certain parts to activate connectors between them, allowing you to Speed Boost. Carefully lay bombs in the following spots:
- In the middle of platform #1
- In the middle of platform #2
- On the far left edge of platform #3
- On the far right edge of platform #3
- In the middle of platform #4
Doing so should activate all the connectors you need. Run over and charge up your Shinespark, go crashing through the far wall and get the last Energy Tank in the game, ENERGY TANK #20. Woo-hoo! Don’t forget – you need to Shinespark back towards the left through the wall you came in from!